
Level 73
HARDHow to solve Sand Loop level 73? Get instant solution for Sand Loop 73 with our step by step solution & video walkthrough. Sand Loop 73 tips and guide.
Play Sand Loop Now
Experience the puzzle challenge firsthand
Game Screenshots
Sand Loop Level Guides
Level 73 Overview: The Great Pyramids Challenge
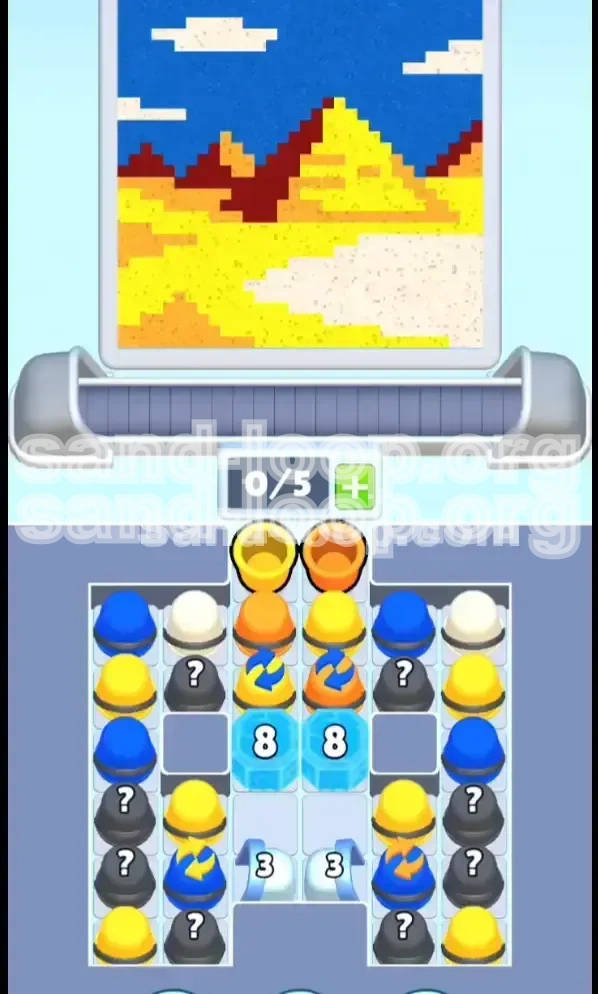
Welcome to Level 73 of Sand Loop, a stage that stands out as a premier test of logical sorting rather than reflex speed. Set against the backdrop of a pixel-art Egyptian landscape, this level divides the screen into two distinct zones: the foreground (sand and pyramids) and the background (sky and clouds). The challenge here lies in the tray layout, which is designed to punish premature color mixing. With a dense arrangement of cups, ice blockades, and mystery containers, players must exercise extreme patience. The stage requires a "bottom-up" construction approach; failing to respect the layer order will result in a clogged conveyor belt and an unfinished painting.
Stage Characteristics and Layout
The visual presentation is deceptively simple: a vast desert stretching toward towering pyramids under a blue sky. However, the game board is partitioned into a highly restricted tray format. Unlike open levels where you can pour freely, here you are constrained by specific columns that lock until certain conditions are met. The foreground occupies the lower 60% of the canvas, while the background takes the upper 40%. This ratio dictates your strategy; you cannot simply work left-to-right. You must prioritize the sand elements before the atmospheric elements, or the physics engine will blend the sky into the desert, ruining the contrast.
The Core Difficulty Spike
What makes Level 73 difficult is the "Ice Blockade" located in the dead center of the tray. Two massive Cyan blocks labeled "8" act as a dam, holding back the reserve colors needed to finish the level. While these blocks are count-based (requiring 8 adjacent clears), the real danger is the flood of new cups they release. If your conveyor belt is full when the final ice block shatters, the sudden influx of 4-5 new cups will cause an instant overflow. Managing this space is the primary logistical hurdle.
Visual Elements Analysis
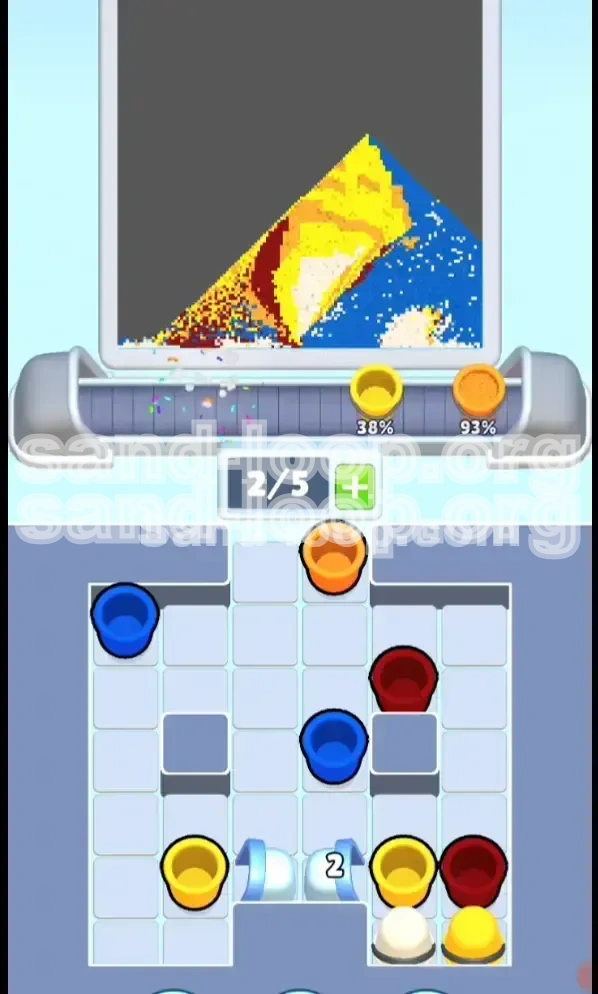
The art style requires precise color separation. The pyramids are not just one color; they require a specific interplay between bright Yellow (sun-drenched faces) and Deep Red (shadowed sides). The background is less complex but equally demanding, requiring a clean separation between Blue (sky) and White (clouds). The game's physics engine naturally settles heavier pixels first, meaning you must build the heavy sand base before attempting the lighter sky pixels, or the white clouds will sink into the sand and disappear.
Winning Condition Metrics
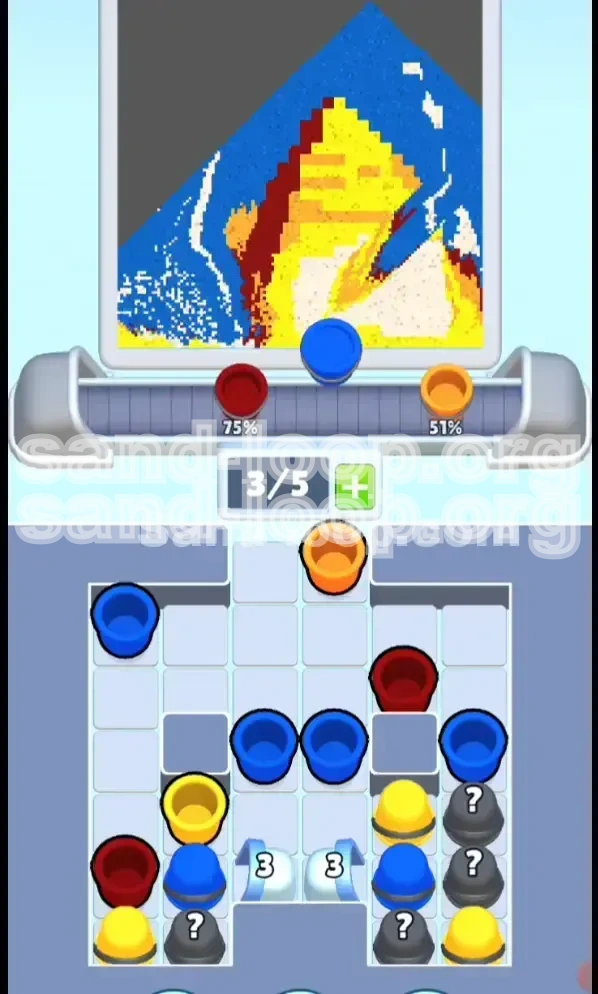
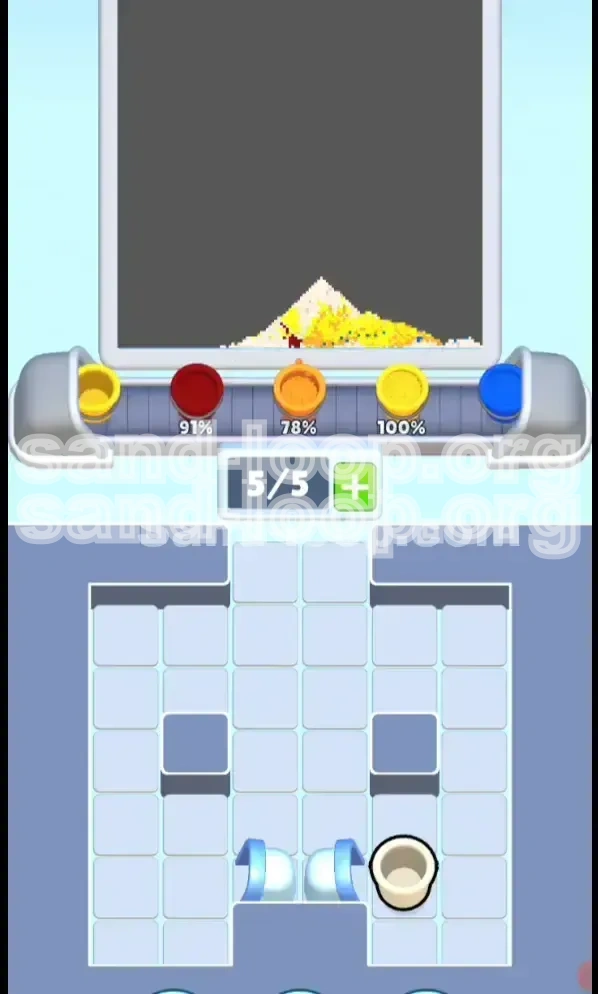
To secure a 3-star rating on this level, you need to complete the painting with less than 15% unused space and avoid "Jamming" your belt entirely. Efficiency is measured by how quickly you transition from the base layer to the sky layer. A perfect run clears the bottom reserves (Red and Yellow) before the Ice Blocks break, allowing for a seamless transition into the Blue/White phase without pausing to shuffle cups.
Why Speed Runs Fail Here
Speed running Level 73 is a trap. In previous levels, tapping rapidly to clear the queue worked. Here, tapping the Mystery Cups too fast releases Red sand before you have established a Yellow base, causing the Red pixels to sink to the very bottom of the canvas. This creates a visual error where the shadows are underneath the desert floor, making the pyramid geometry impossible to form correctly. Patience is the fastest route to victory here.
Clear Objectives: Your Mission Goals
Before you tap a single cup, understand the win conditions. Level 73 is a puzzle of resource management. Your primary goal is to construct the pyramids layer by layer, ensuring the shadows fall correctly against the bright faces. Only after the desert landscape is fully rendered should you turn your attention to the sky. Mismanaging the color queue will lead to a soft lock where you have the wrong colors for the remaining sections.
Primary Objective: The Desert Base
Your first major milestone is filling the bottom 40% of the canvas with Yellow sand. This serves as the foundation. Do not focus on the pyramid shapes yet; simply focus on volume. You need enough Yellow in the tray to create a floor. Until this floor is established, no other color matters. If you run out of Yellow cups early, you must use the "Loop" cups to regenerate more, or the level becomes mathematically impossible to finish.
Secondary Objective: Shadow Integration
Once the floor is set, the objective shifts to geometry. You must introduce the Deep Red/Brown sand to create the shaded sides of the pyramids. The challenge here is timing. If you pour Red too late, it sits on top of the Yellow peaks like a cap. If you pour it too early, it gets buried. The objective is to mix Red into the stream when the Yellow piles are roughly 50% formed, creating a diagonal transition effect essential for the pyramid look.
Tertiary Objective: The Sky and Atmosphere
This is the endgame. The Blue and White cups are your "Clean Up" crew. They are useless until the pyramids are done. Your goal is to clear the tray of ALL Yellow and Red cups before you start pouring Blue. If you pour Blue while Yellow is still active, you risk creating a muddy green tint in the transition zones. The sky must be pure blue and white to contrast the warm desert tones.
Unlocking the Reserves
A hidden objective is managing the Ice Blocks. You must clear the cups adjacent to the central Cyan blocks to reduce their counter from 8 to 0. Treat this as a side quest. Every time you clear a cup next to the ice, note the number dropping. Do not ignore this, as unlocking the center is the only way to access the massive reserve of Blue cups needed for the final stretch.
Maintaining Belt Hygiene
Throughout all these objectives, you must maintain at least one empty slot on your conveyor belt at all times. This is a critical non-negotiable objective. A full belt means you cannot react to new cups, and in a level with Mystery Gamble cups, a full belt is a death sentence. If you have 4/5 slots filled, stop tapping and wait for a pour to finish.
Step-by-Step Walkthrough: The Complete Strategy
This section provides the exact sequence of moves required to beat Level 73. Follow these phases in order. Do not rush ahead to the Sky phase until the Desert phase is solid. The guide is broken down into actionable steps you can execute immediately.
Phase 1: Establishing the Yellow Floor
The level begins with a mix of cups, but your eyes should only be looking for Yellow. The game spawns Yellow cups primarily in the center and right columns.
- Step 1: Ignore the Blue and White cups on the far left. Tap them only if you absolutely need to move the belt, but try to leave them untouched.
- Step 2: Locate the "Loop" arrows on the Orange/Yellow cups. Tap these first. They recycle color, keeping your Yellow supply healthy without consuming new slots immediately.
- Step 3: Fill your belt with 3 Yellow cups. Let them pour. As they pour, scan the incoming queue for more Yellow.
- Step 4: Do not touch the Grey "?" cups yet. Tapping them now spawns Red, which you aren't ready for.
Phase 2: The Mystery Cup Gamble
Once you have a visible layer of yellow sand covering the bottom 1/3 of the screen, it is time to gamble on the Mystery Cups.
- Step 1: Identify the Grey "?" cups in the left and right columns.
- Step 2: Tap ONE Grey cup. Watch the resulting sand color.
- Step 3: If it reveals Red, move it to the front of the pour queue immediately. If it reveals a color you don't need (like extra Blue), move it to a "hold" slot or pour it into a waste area if possible (though wasting is penalized, holding is better).
- Step 4: The goal is to establish a rhythm of Yellow - Red - Yellow. This sequence creates the shadow effect on the pyramid slopes.
Phase 3: Breaking the Ice Blockade
By following the previous steps, you will have cleared enough cups to lower the count on the central Ice Blocks.
- Step 1: Look at the number on the Cyan blocks. It should be dropping from 8 down to 4 or lower.
- Step 2: Before you break the final block, ensure you have only 2 cups on your belt. The break will add 2 new cups to your queue.
- Step 3: Clear the remaining cups adjacent to the ice. When the Ice shatters, it reveals a cache of Blue and White cups.
- Step 4: Do not panic if the tray looks messy. The shatter releases a lot of pieces, but now you have full access to the tray.
Phase 4: The Sky Transition
With the pyramids formed and the reserves unlocked, you enter the cleanup phase.
- Step 1: Scan the belt for any remaining Yellow or Red. Pour these immediately. Do not start Blue until the desert colors are gone.
- Step 2: Once the belt is clear, tap the Blue cups rapidly. The sky fills quickly.
- Step 3: Intersperse White cups (Clouds) randomly. The physics engine handles the clouds well; they don't need precision, just volume.
- Step 4: If you run out of Blue but have White left, pour the White. It acts as a buffer while waiting for the last Blue cups to cycle in from the queue.
Color Order and Palette Logic
Understanding the logic behind the color palette is the key to mastering this level without frustration. The palette is not random; it mimics the layering of real-world objects.
The Hierarchy of Colors
Think of the colors in terms of weight and timing.
- Tier 1: Yellow (The Foundation) - Heaviest visual weight. Must cover the bottom first. Without this, nothing else sticks.
- Tier 2: Deep Red (The Structure) - Medium weight. Needs to sit on top of Yellow but below the sky.
- Tier 3: Blue (The Background) - Light weight. Fills the negative space. If poured too early, it creates a muddy mix with the Yellow.
- Tier 4: White (The Detail) - Filler. Used last to add texture to the sky.
Processing the Yellow Stream
Yellow is your most valuable resource. You will consume approximately 50% of your total moves on Yellow cups alone. A common mistake is treating Yellow like a normal color. In Level 73, Yellow is the "currency" you spend to unlock the rest of the board. Every Yellow cup you pour clears space on the tray, bringing you closer to the Ice Block break. Do not conserve Yellow; spend it aggressively to build the floor.
Strategic Use of Deep Red
Deep Red is the "rare drop" from the Mystery Cups. Because it comes from a random source, you cannot plan for it as easily as Yellow. However, you can mitigate the randomness. When you tap a Mystery Cup and get Red, immediately look for a "Loop" cup nearby. If you have a Red Loop, you can pour Red indefinitely for a few seconds. Use this to create a thick shadow layer before returning to the Yellow stream. This contrast is what makes the pyramids look 3D.
The Sky Filling Technique
Blue and White are processed differently than the ground colors. For the ground, you want order. For the sky, you want chaos. Alternate Blue and White rapidly: Blue - White - Blue - Blue - White. The irregularity of the clouds looks more natural. Do not pour all Blue then all White; you will end up with a distinct line separating the sky and clouds, which looks artificial and may not meet the puzzle's completion criteria for "natural" blending.
The "Muddy Middle" Problem
What happens if you process colors in the wrong order? You get the "Muddy Middle." This occurs when Blue (Sky) touches Yellow (Sand) before the Red (Shadow) is there to buffer them. The result is an ugly greenish-brown band in the middle of your painting. If you see this happening, stop pouring Blue immediately. Go back and find Red or Yellow cups to cover the mistake. The game is forgiving if you catch it early, but if the mud dries (sets), the level is failed.
Key Tips and Common Mistakes
Even with a strategy, small errors can snowball into a loss. These tips are derived from analyzing the most common failure points in Level 73.
Common Mistake: The Early Blue Flood
The most frequent reason for failing Level 73 is tapping Blue cups in the first 30 seconds. Players see a full belt and instinctively want to clear slots by pouring Blue. Do not do this. Pouring Blue early buries the sand pixels under liquid sky. The sand is heavier, so it eventually sinks, but the timing will be off, and your pyramids will look deformed. Keep the Blue cups on the belt as "filler" items if you must move them, but pour them into a corner if possible, or simply hold them until the end.
Pro Tip: The "Slot Reserve" Method
Always keep one slot empty on your 5-slot belt. This is your "emergency buffer." When you break the Ice Blocks, new cups spawn instantly. If you have 5/5 slots full, the game forces a random cup into the queue, often causing a Jam. By keeping 1 slot open (4/5 full), you control exactly when the new cups enter your play area. This single habit prevents 90% of unexpected Game Overs.
Common Mistake: Ignoring the Loop Arrows
The Loop arrows (often found on Orange or Yellow cups) are regeneration tools. Novice players ignore them to focus on "fresh" cups. However, in Level 73, the Loop cups are essential because the level is long on Yellow sand. If you run out of Yellow cups in the tray, you cannot finish the base. Using Loop cups keeps the Yellow flowing without depleting the visible resources. Always prioritize tapping a Loop cup over a standard cup if they are the same color.
Pro Tip: Managing the Mystery Cup Risk
The Mystery Cups (Grey "?") are a double-edged sword. They contain the vital Red sand, but they also have a chance to drop "Junk" colors or colors you aren't ready for. Tip: Only tap a Mystery Cup when you have 2 empty slots. This gives you room to receive the cup, inspect it, and move it if it's bad. If you tap a Mystery Cup with a full belt, you might be forced to pour a bad color immediately, ruining your pyramid build.
Common Mistake: Breaking Ice Too Early
You might be tempted to focus all your energy on the center column to break the Ice Blocks fast. This is a mistake. The Ice Blocks guard the Sky reserves. If you break them while you are still working on the Desert floor, your tray will be flooded with Blue cups while you still need Yellow. This clutters your vision and jams your belt with unusable colors. Break the Ice Blocks only as a natural consequence of clearing the lower rows; do not force it.
Stuck? What to Do
If you are stuck with no moves left and the painting isn't finished, check the bottom corners of the canvas. Often, the "mud" (mixed colors) settles in the corners, blocking new sand from settling properly. If you see a stagnant pool of mixed color, you need to pour a large amount of the correct base color (Yellow or Blue) over it to "dilute" the mistake and force the physics engine to reset the layering in that area.
Speed Run Tips and Shortcuts
Once you have beaten the level and want to optimize your time for a high score, these advanced techniques will help you shave seconds off your run.
The "Quick Tap" Trigger
Speed in Sand Loop isn't about tapping fast; it's about tapping *between* animations. The "Quick Tap" trigger involves tapping the next cup the millisecond the previous pour starts. The game has a brief input window where it registers the tap while the physics are still calculating the previous pour. Mastering this allows you to queue up 5 Yellow cups in the time it usually takes to pour 3, significantly speeding up the base layer construction.
Pre-Loading the Belt
Before you even start the level, look at the initial tray layout. If the level starts with a high density of Yellow in the center, plan your first 3 taps before the animation finishes. By pre-loading your mental queue, you avoid the hesitation that usually occurs after the first pour. This initial burst of speed sets the pace for the rest of the level.
Ignoring Perfection for Speed
For a 3-star clear, you need 95% accuracy. For a Speed Run, you only need about 80%. You can afford to be messy with the "Mud" in the middle layers. Don't waste time trying to make the Red/Yellow transition perfectly sharp. Pour the Red roughly where it needs to go and move on. The Sky layer (Blue) covers a multitude of sins in the middle ground, so focus your precision on the bottom (Yellow) and top (Blue) and sloppily rush the middle (Red).
The Ice Block Skip
Is there a way to skip the Ice Blocks? Not entirely, but you can minimize their impact. If you have a power-up or a specific "Bomb" cup (if your version includes them), save it for the moment the Ice Block count hits 1. Using a bomb to clear the area around the Ice Block instantly triggers the break without you having to manually clear 8 adjacent cups. This saves about 10-15 seconds of cup shuffling. If no power-ups are available, focus on the column adjacent to the ice with the highest cup density to chip away at the counter faster.
Batch Processing the Sky
The biggest time sink in Level 73 is the endgame Sky phase. To speed this up, do not alternate Blue and White one by one. Wait until you have 3 Blue cups and 2 White cups on the belt. Then, pour them in a batch: Blue-Blue-White-Blue-White. This "batching" technique reduces the number of times the physics engine has to switch contexts between heavy sand and light sky, rendering the final 20% of the painting much faster.