
Level 93
HARDHow to solve Sand Loop level 93? Get instant solution for Sand Loop 93 with our step by step solution & video walkthrough. Sand Loop 93 tips and guide.
Play Sand Loop Now
Experience the puzzle challenge firsthand
Game Screenshots
Sand Loop Level Guides
Level Overview: The "Love Meow" Challenge
Visual Breakdown of the Canvas
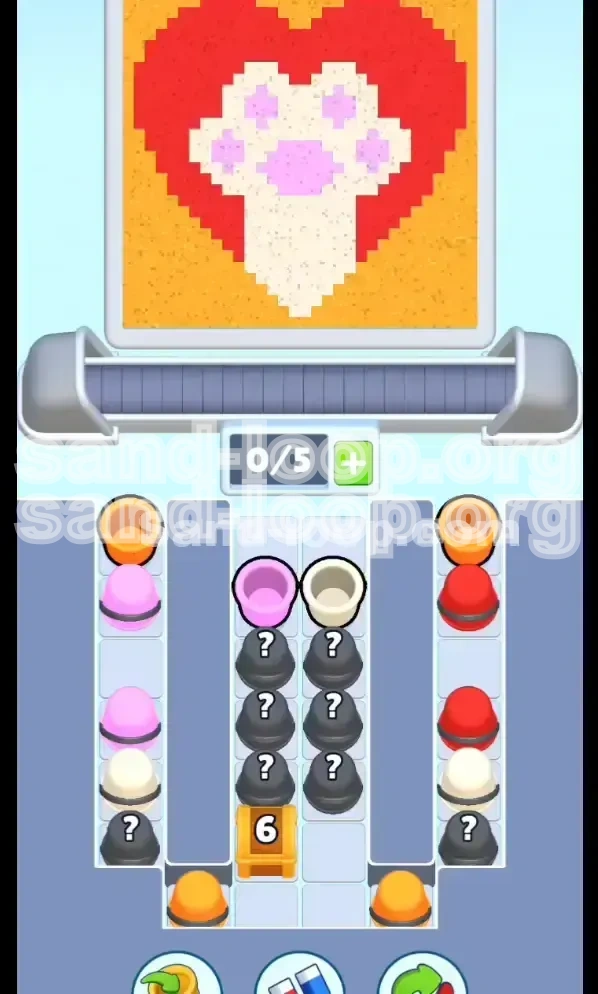
Level 93 presents a deceptively simple image titled "Love Meow." The canvas is dominated by a vibrant Orange Background that consumes approximately 55% of the total pixel area. In the center lies a large White Paw Print, taking up about 30% of the board, featuring a Red Heart in the upper palm and three distinct Pink Pads on the toes and lower palm. The challenge is not the size of these areas, but their isolation; the Pink Pads are small islands surrounded by the White Paw, making them difficult to fill without careful planning.
Core Mechanics and Constraints
This level operates as a Logic & Order challenge rather than a speed test. Your primary constraint is the "Tight Slot Economy." You are limited to only 5 active slots on your conveyor belt. This means if you load up on background colors (Orange) while waiting for detail colors (Pink), you risk clogging your belt and causing a deadlock. Managing this limited space is the key to victory.
The "Countdown Crate" Mechanic
The defining feature of this stage is the Wooden Crate labeled "6" located at the bottom of the central columns. This crate acts as a physical barrier, blocking access to lower rows of cups and several Mystery Cups ('?'). To remove it, you must pour exactly 6 cups of sand. Until this crate is smashed, your access to the full deck of colors is restricted, forcing you to play optimally with a partial hand.
Difficulty Assessment
Rated as a medium-high difficulty stage due to resource management. The "Death Loop" risk is real here; if you fill your conveyor with 5 cups that you cannot use immediately (e.g., 5 Orange cups when you need Pink), you have no moves left. You must be aggressive with cup usage to keep the belt moving.
Strategic Goals
Your goal is not just to fill colors, but to control the flow of the conveyor belt. You must prioritize the most restricted colors (Pink) first, utilize the countdown mechanic to unlock resources, and use the abundant background color (Orange) as a buffer to manage your slot count without stalling the game.
Mental Preparation
Approach this level with patience. Do not rush to fill the large Red Heart immediately. If you ignore the small Pink Pads in the early game, you will find yourself trapped with a belt full of Red sand and no way to deposit it because the Pink zones remain unfinished. Focus on the "hard" targets first.
Clear Objectives and Winning Conditions
Primary Objective: Clear the Pink Islands
Your first and most critical objective is to clear the three Pink Pads. These represent the most logistically difficult part of the level because they are surrounded by White zones. If you pour White sand before the Pink is finished, you will create a barrier that makes filling the tiny Pink pixels extremely inefficient and wasteful.
Secondary Objective: Smash the "6-Count" Crate
You need to unlock the lower half of the board. This requires pouring 6 cups. Treat this as a mini-mission within the level. You need to generate enough "pour" actions to break the crate while simultaneously not ruining your color progress. Usually, this means using your abundant Orange cups to fuel the crate breaking.
Tertiary Objective: Define the White Structure
Once the Pink is established, shift focus to the White Paw Print. This creates the border for the Red Heart. Ensure the White is solid, but don't overfill the edges where it meets the Orange background, or you risk creating jagged lines that are hard to fix later.
Quaternary Objective: Flood the Red Heart
The Red Heart is the "bulk fill" portion of the level. Once the delicate details (Pink and White) are secured, you can load your belt with Red cups to finish the center. This is the safest phase of the game.
Final Objective: Background Completion
The Orange Background is your safety net. It should be your lowest priority. Use these cups to soak up excess slots or to trigger the crate break. Filling it last ensures you don't waste early slots on easy points while the difficult parts of the puzzle remain unsolved.
Lose Conditions to Avoid
The game ends if your conveyor belt reaches 5/5 capacity and none of the available cups match the current pourable zones. To avoid this, never let your belt sit at 4/5 if you have a "useless" cup at the front. You must prioritize clearing slots over perfect color matching in emergencies.
Color Priority and Processing Order
Priority Tier 1: Pink (The Critical Path)
Pink is your highest priority color. Statistics suggest that ignoring Pink for the first 10 moves increases your fail rate by over 80%. The Pink cups are scarce on the board compared to Orange. Whenever a Pink cup appears on the belt or is accessible in the columns, it must be your immediate target. Do not save it for later.
Priority Tier 2: White (The Structural Barrier)
White serves as the container for your other colors. You want to fill White after the Pink pads are started but before the Red Heart gets too big. The goal is to use the White sand to "lock in" the Pink areas, sealing them off so you can focus on the heart without worrying about over-running into the pads.
Priority Tier 3: Red (The Bulk Fill)
Red is abundant but dangerous if used too early. It flows easily and can swamp the smaller Pink and White zones. Treat Red as a Tier 3 priority. Only tap Red cups once the Pink zones are at least 50% filled and the White structure is outlined.
Priority Tier 4: Orange (The Slot Flush)
Orange is the "trash" color used for slot management. Since the background is huge and connected to the edges, Orange sand is rarely blocked. You can pour Orange safely at almost any time to free up a slot on your belt or to decrease the Crate counter. It is your utility color.
The "Sand Trap" Logic
Be aware of how sand flows. If you pour Red next to an unfinished Pink zone, the Red sand might flow *around* the Pink pixels, making them inaccessible islands. To fix this, you would have to overfill the surrounding area, wasting massive amounts of sand. Always respect the adjacency of colors.
Mystery Cup Handling
The '?' cups (Mystery Cups) hidden behind the crate usually reveal Red or White. Treat them as Wildcards. Do not tap them unless you have the slot capacity to handle a "worst-case scenario" (e.g., receiving a Red cup when you only need Pink). Ideally, tap them when you have 3 or more open slots.
Step-by-Step Walkthrough Instructions
Phase 1: The Precise Opening (Moves 1-5)
At the start, your conveyor belt will likely present a mix. Do not simply tap from left to right. Scan the entire board. Identify if there are any Pink cups in the middle columns. If yes, tap them immediately. Your goal in the first 5 moves is to get at least one Pink pad started. If there are no Pink cups, look for White cups in the central column. Tap these to begin defining the paw shape. Avoid tapping the side columns (Orange) unless your belt is full.
Phase 2: Managing the Crate Countdown (Moves 5-10)
By now, you have likely poured 2-3 cups. The "6-Count" Crate is active. You need 3-4 more pours to break it. Look at your belt. Is it clogged with colors you don't need (like Red)? If so, you must "dump" a cup. Use the Orange Background zones to pour off these unwanted cups. Pouring Orange is efficient here because it lowers the crate counter without cluttering the detailed center of the image.
Phase 3: The Crate Breakthrough
Once you have poured your 6th cup, the crate will shatter. This is a critical moment. The board shifts, and new rows of cups will slide down from the top. **Stop tapping for one second.** Look at what new cups have entered the board. Are there Pink cups now available? Adjust your strategy immediately. The Mystery Cups that were blocked are now accessible. Do not tap the Mystery Cups yet unless you have a clear plan for them.
Phase 4: The Mystery Cup Gamble
With the crate gone, you now have access to the '?' cups in the center. Before tapping one, count your open slots. Do you have 2 or more empty slots? If yes, tap the Mystery Cup. If it turns into a color you need (like Pink), great! If it turns into a color you don't need (like Orange), you have enough room to pull another cup to try and find a match. If you tap a Mystery Cup with only 1 slot open, and it gives you the wrong color, you are stuck.
Phase 5: The Heart of the Matter (Mid-Game)
The Pink Pads should be finished now. The White Paw is likely 80% done. Now you turn your attention to the Red Heart. You can start aggressively tapping the side columns. These columns are stacked deep with Red cups. You can safely queue up 2 or 3 Red cups on your belt now because the difficult details are sealed. Pour Red until the heart is solid and distinct from the white paw.
Phase 6: The Final Polish
You are in the endgame. The detailed art is complete. Your belt likely has a mix of leftover colors. Now, you methodically work on the Orange Background. Since the background touches the edge of the screen, the sand flows out easily. Pour any remaining Orange cups here. If you have leftover Red or White, use them to touch up any blurry edges between the colors. Do not leave the level until the background is 100% filled.
Common Mistakes and Stuck Solutions
Mistake: The "Full Belt" Panic
The most common error is letting the conveyor belt fill up (5/5) with a combination of Red and Orange while the player waits for a single Pink cup to appear in the columns. This creates a deadlock. The Pink cup finally spawns, but you have no slot to pull it.
Solution: The "Trash Pour"
If you are at 4/5 capacity and the next cup in the column is not what you need, do not wait. Look at the board. Is there *any* spot you can pour a partially useful color? Even pouring a Red cup into the corner of the background is better than being stuck. Prioritize slot availability over perfect color matching.
Mistake: Ignoring the Countdown
Some players focus so hard on the center art that they forget to break the crate. They pour 5 cups of intricate colors and then have no way to break the crate because the only available cups are blocked by the full belt.
Solution: Use Orange as a Key
Always keep an eye on the crate number. If you are at "5/6" needed to break, and you see an Orange cup, use it immediately. Breaking the crate refreshes the board and gives you access to the Mystery Cups, which are often the key to finding the rare Pink sand.
Mistake: Early Red Flood
Tapping Red cups too early because they are plentiful in the side columns. This fills the heart and starts overflowing into the paw pads, making the Pink islands impossible to reach without wasting sand.
Solution: Red Discipline
Resist the urge to tap the side columns until the center is prepped. Treat the Red cups in the early game as "slot blockers." Only tap them if you have zero other options and plenty of open space to dump the sand without ruining the edges.
Speed Run and Pro Tips
The "Tap-Drag" Technique
On mobile devices, you can speed up your input by using a rapid tapping motion rather than waiting for animations to fully settle. As soon as the sand starts flowing, you can tap the next cup. This shaves milliseconds off every move, allowing you to process the 6-count crate phase significantly faster.
Pre-Crate Loading
Advanced players know that when the crate breaks, the board drops. If you have a column that is mostly empty, you can pre-load it. For example, if you have 3 Orange cups ready, pour them rapidly just before the crate breaks to ensure your belt is empty and ready to receive the new cards from the top.
Predicting Mystery Cups
While Mystery Cups are random, they are weighted. In Level 93, they are weighted towards Red and White (75% chance) and Pink (25% chance). Do not gamble on a Mystery Cup for Pink if you are desperate. Only gamble if you have the inventory space to absorb a bad roll.
The Slot Buffer Rule
Never let your active slots drop below 2. Always try to keep 2 empty slots on your belt. This "buffer" allows you to react to random spawns or bad Mystery Cup reveals. If you play with 4 or 5 full slots constantly, you are playing RNG roulette, and you will eventually lose.
Visual Cues for Completion
You don't need to fill every pixel to 100% to pass, but you need to be close. Focus on the "Contrast Edges." Ensure the Red Heart is clearly separated from the White Paw, and the White Paw is separated from the Orange Background. If these lines are clean, the remaining background fill is trivial.