
Level 95
HARDHow to solve Sand Loop level 95? Get instant solution for Sand Loop 95 with our step by step solution & video walkthrough. Sand Loop 95 tips and guide.
Play Sand Loop Now
Experience the puzzle challenge firsthand
Game Screenshots

Sand Loop Level Guides
Sand Loop Level 95: Complete "Sunset Seascape" Walkthrough
Welcome to the ultimate strategy guide for Sand Loop Level 95, infamously known as the "Sunset Seascape." This level represents a significant spike in difficulty within the Logic stage category. Unlike previous levels where you could rely on quick reflexes, Level 95 demands strict inventory management and spatial reasoning. The stage is designed to trick you into clogging your belt with the wrong colors while a wall of ice blocks your access to critical resources. Success here depends not on speed, but on the precise order of operations.
In this guide, we will break down every pixel of the target image, analyze the specific ice block formations, and provide a turn-by-turn strategy to secure a 3-star victory without burning through your boosters. Prepare to dive into a puzzle that tests your patience and your ability to predict the dispenser's next move.
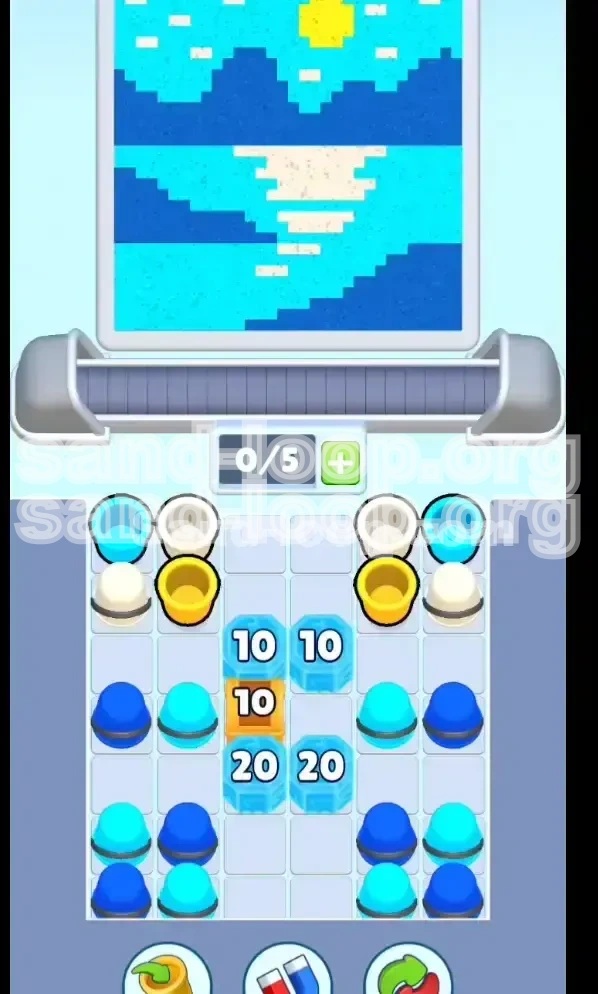
The "Sunset Seascape" Visual Breakdown
Before you tap a single cup, you must understand what you are trying to build. The target image is a serene landscape divided into four distinct color zones. Understanding these zones is crucial because the game algorithm prioritizes background fills over details.
- Zone 1: The Cyan Sky (Top 40%): This is the largest single color block. The dispenser will aggressively request Cyan cups early on to fill this background.
- Zone 2: The Yellow Sun (Top Center): A circular element requiring Yellow paint. This is usually the second major fill request after the sky begins.
- Zone 3: Royal Blue Mountains (Middle Horizon): A jagged line separating the sky from the water. This requires a darker blue pigment.
- Zone 4: The White/Cyan Reflection (Bottom 30%): This is the "Danger Zone." It is a chaotic mix of White, Cyan, and Royal Blue pixels. This area causes the most jams because the dispenser switches requests rapidly here.
Analyzing the Supply Tray Obstacles
Your supply tray is not just a source of cups; it is a maze. The most critical feature of Level 95 is the Central Ice Column. This column consists of four ice blocks (labeled 10, 10, 20, 20) encasing a central Wooden Crate (labeled 10).
- The Choke Point: These ice blocks sit directly in the middle of your board. They physically separate the top-left cups (Cyan/Yellow) from the bottom-right cups (Royal Blue/White). You cannot move cups freely until these are destroyed.
- The Slot Trap: You only have 5 available slots. If you fill your belt with Royal Blue cups from the bottom before clearing the top ice, you will have no room to maneuver the cups needed to break the ice itself.
- The Hidden Crate: The Wooden Crate inside the ice formation likely contains a score booster or a bucket of white paint, which is essential for the complex reflection phase later.
Level 95 Primary Objectives
To beat Level 95, you must adhere to a strict set of goals. Do not aim to "paint the picture" immediately; aim to "unlock the board" first.
- Clear the Ice Wall: Your first and most important objective is to shatter the four ice blocks guarding the center crate. This unifies your tray.
- Open the Wooden Crate: Once the ice is gone, you must break the wooden crate to access the rewards inside, likely necessary for the high-score threshold.
- Manage the Cyan Supply: You must prevent the Cyan sky phase from consuming all your cups, leaving you with nothing for the reflection phase.
- Survive the Reflection Switch: You must navigate the rapid color switching in the bottom 20% of the level without clogging your belt.
Why Speed Kills in This Level
This is a Logic stage, not a Speed stage. If you try to play Level 95 like a standard level, you will fail.
- The "Jam" Probability: If you send cups faster than the dispenser can paint the reflection details, the belt will back up. Since the reflection is a mix of 3 colors, a backup here is fatal.
- Resource Starvation: Clearing ice requires cups to be adjacent to the blocks. If you play too fast, you might send a cup away that was one hit away from breaking a block, wasting valuable moves.
Step-by-Step Walkthrough: Phase 1 (The Setup)
This phase covers the first 15% of the game. Your only focus here is breaking the top seal of the ice fortress. Ignore the dispenser's requests for background color if they threaten your ability to clear obstacles.
Step 1: Assess the Top-Left Layout
Start the level and pause immediately. Look at the top-left corner of your tray. You should see a cluster of Cyan (Light Blue) and Yellow cups. Directly below them, likely toward the center, are the first two "10" labeled Ice Blocks.
- Action: Identify the path these cups need to take to touch the ice.
- Note: Do not touch the Royal Blue cups at the bottom yet. They are trapped behind the ice and irrelevant right now.
Step 2: Surgical Ice Breaking (Top Blocks)
The dispenser will likely start asking for Cyan (Sky) or Yellow (Sun). This works in your favor.
- Strategy: When the dispenser asks for Cyan or Yellow, tap the cups that are physically touching the top two Ice Blocks.
- Mechanic: Every time a cup leaves a slot adjacent to an ice block, it deals damage. You don't need a special "hammer" power-up; you just need to cycle the correct color cups next to the ice.
- Priority: Focus 100% of your Cyan/Yellow inputs on the top-left ice blocks until they shatter. Do not worry about "filling" the picture yet.
Step 3: Managing Slot Capacity
As you clear the top ice, you will generate new cups from the tray. Be very careful not to let your 5 slots fill up with useless colors.
- The Risk: If the dispenser asks for Royal Blue (which you can't reach yet), do not pull a random cup just to keep the belt moving. Let the dispenser wait.
- The Fix: Only send cups that are adjacent to the ice blocks. If you have to send a cup that isn't touching the ice, make sure it's a color you have a massive surplus of, like Cyan.
Step 4: Destroying the Central Crate
Once the top ice is gone, the Wooden Crate (10) is exposed. This is your new target.
- Why: Breaking this crate usually drops a Score Multiplier or clears a massive chunk of space. It also fully connects the left and right sides of your tray.
- Execution: The dispenser will likely switch between Yellow and Cyan. Keep sending these. Use the movement of cups to "rub" against the crate. If the dispenser requests a color you don't have near the crate, look for a swap opportunity to move a valid cup into position.
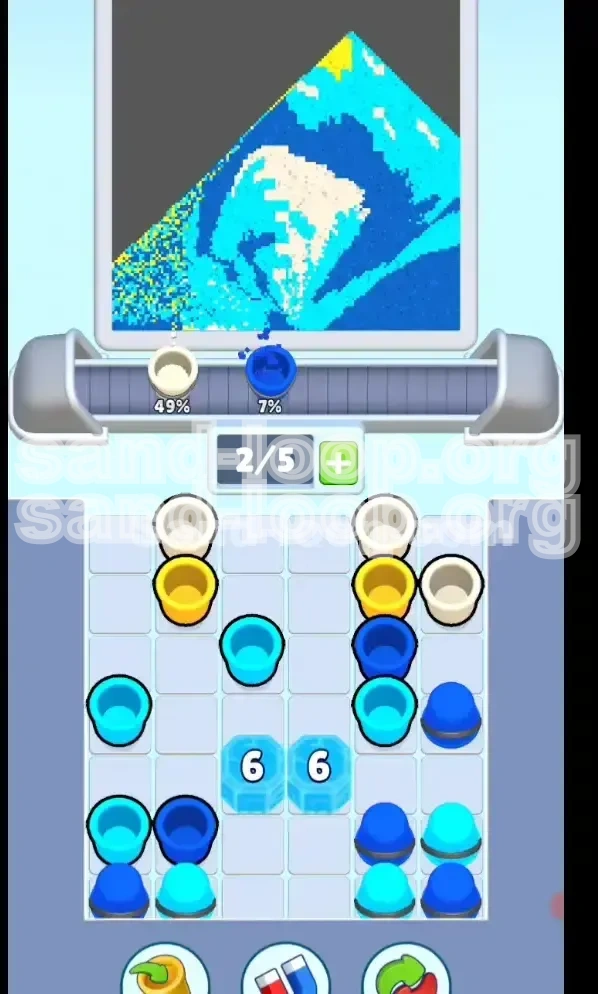
Step-by-Step Walkthrough: Phase 2 (The Clear)
You are now 15-30% through the level. The top is open, and the crate is gone. Now you must deal with the "Body" of the level.
Step 5: The "Mountain" Transition
As the sky fills, the dispenser will begin asking for Royal Blue. This signals the start of the mountain range painting.
- Access: Now that the center crate is gone, you can finally access the Royal Blue cups at the bottom of the tray.
- Caution: Do not spam Royal Blue. The mountain range is usually thin. If you send 5 Royal Blue cups in a row, you might overfill the mountains and start contaminating the water area below.
- Technique: Send 2 Royal Blue cups, then check the belt. If a Yellow or White cup is moving up, stop sending Blue.
Step 6: Shattering the Bottom Ice
Remember the "20" labeled Ice Blocks at the bottom? You need to clear them now to finish the level efficiently.
- The Strategy: While the dispenser is painting the mountains (Royal Blue), use the adjacent cups to break the bottom ice.
- The Combo: Ideally, you are breaking the bottom ice using the Royal Blue cups you are sending for the mountains. This maximizes efficiency.
Step 7: The "Sun" Completion
By now, the Yellow Sun should be complete. If it isn't, finish it.
- Check: Ensure no Yellow pixels remain in the sky. If the dispenser stops asking for Yellow, do not force Yellow cups. Move them out of the way to make room for White and Cyan.
Step 8: Tray Reorganization
With the top and middle gone, your tray should be consolidating. You will likely have a large reserve of White and Cyan cups.
- Goal: Try to position White cups in an accessible row. The final phase requires rapid switching between White and Cyan, so having them next to each other is vital.
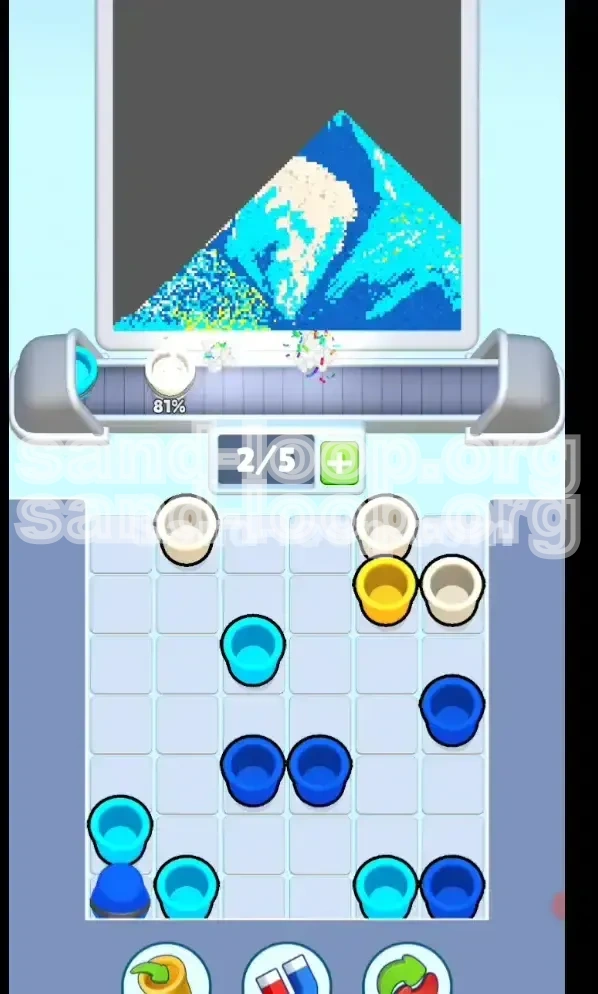
Step-by-Step Walkthrough: Phase 3 (The Reflection Trap)
This is the final 40% of the level. This is where 90% of players fail. The image is the water reflection, which is a jagged mix of White, Cyan, and Royal Blue.
Step 9: Identifying the Reflection Pattern
Watch the painting nozzle closely. It is no longer making broad strokes. It is "dabbing" pixels.
- The Pattern: The dispenser will likely cycle: Cyan -> White -> Royal Blue -> Cyan -> White.
- The Stress: This cycle happens fast. If you queue three Blue cups while it needs White, the White cups will get stuck behind the Blue ones on the belt, causing a deadlock.
Step 10: The "One-Tap" Rhythm
Adopt a rhythmic tapping style for this section. Do not hold down the screen.
- Action: Send one cup. Watch it leave the belt. Wait for the dispenser to finish the stroke. Send the next cup.
- Why: This prevents overfeeding. If the dispenser changes its mind mid-stream (e.g., switches from Cyan to White), a single tap allows you to react instantly. Holding the screen sends 3-4 cups before you can let go.
Step 11: Handling the White Cups
White is the most dangerous color here because it is often the least abundant in the tray.
- Prioritization: If you see a White cup in a good position, clear it as soon as the dispenser hints at White. Do not wait.
- Mistake Prevention: Do not send White cups if the dispenser is painting deep water (Royal Blue). It is better to waste a turn waiting than to clog the belt with the wrong color.
Step 12: The Final Sprint
Once the reflection is roughly 80% done, the game will switch to "Cleanup Mode."
- Sight: You will see large blobs of unpainted color remaining.
- Action: Now you can speed up. Spam the remaining color. The precision requirement drops significantly in the last 5%. Just feed the belt everything you have left of the required color.
Color Order & Logic Analysis
To master Level 95, you need to understand the logic behind the color processing. This section explains why the dispenser acts the way it does.
The Standard Color Queue
While randomness plays a role, the algorithm follows a hierarchy of needs.
- Background Fill (Cyan): Highest priority initially. The game wants to cover the white canvas quickly.
- Contrast Objects (Yellow/Sun): Second priority. It defines the focal point.
- Structural Lines (Royal Blue/Mountains): Third priority. These separate the background from the foreground.
- Detail Work (White/Reflection): Lowest priority, but most complex execution.
Managing "Bottle-necks"
A bottleneck occurs when you need a color that is physically blocked by ice or other cups.
- The Cyan Bottle-neck: Early game, you have plenty of Cyan. The bottleneck is the ice blocking the path. Solution: Break ice using Cyan.
- The White Bottle-neck: Late game, you have plenty of White, but the belt is full of Blue. Solution: Stop sending Blue.
The "Similar Color" Trap
Level 95 exploits the similarity between Cyan (Light Blue) and Royal Blue (Dark Blue).
- Visual Confusion: In the heat of the moment, it is easy to mistake a Royal Blue cup for a Cyan one if your tray is cluttered.
- Consequence: Sending a Dark Blue cup when the nozzle is painting the Sky (Light Blue) creates a dirty smudge that is very hard to fix later.
- Advice: Look for the "rim" of the cup or the brightness. Cyan is significantly brighter than Royal Blue.
Predicting the Dispenser's Mood
Sometimes the dispenser gets "stuck" on a color.
- Scenario: You have sent 5 Cyan cups, but it keeps asking for Cyan.
- Diagnosis: There is a large patch of unpainted Sky you missed, a "Pixel Island."
- Action: Scan the top screen for a single dot of white in the blue area. Once you send the cup for that, the dispenser will switch to the next color.
Advanced Tips & Common Mistakes
Even with a walkthrough, small errors can ruin a run. Here is how to play like a pro.
Common Mistake: Overfilling the Belt
This is the #1 cause of failure.
- The Error: Players see a color they need and tap three cups in a row immediately.
- The Result: The first cup paints the target. The second and third cups sit on the belt, taking up slots. Then the color switches, and the new required cups can't enter the belt because it's full of the old color.
- The Fix: One cup at a time. Always leave 2 empty slots on your belt for flexibility.
Common Mistake: Ignoring the "Big Number" Blocks
Players focus on the "10" blocks and ignore the "20" blocks.
- Why it's bad: The "20" ice blocks take twice as long to break. If you leave them until the end, you will be frantically breaking ice while trying to manage the complex reflection colors.
- The Fix: Start chipping away at the "20" blocks as soon as they are accessible, even if you are still working on the "10" crates.
Speed Run Strategy: The "Combo" Breaker
If you are aiming for a high score or time bonus, you need to combo your actions.
- Technique: Try to time your cup delivery so that it hits the belt exactly as the nozzle finishes the previous stroke.
- The "Ice + Paint" Combo: The ultimate efficiency move is sending a cup that paints a picture AND breaks an ice block simultaneously. Always prioritize cups that touch ice blocks over cups that don't.
What to Do When Stuck
Sometimes, despite everything, the board locks up.
- If the belt is full: Stop tapping. Look at the cups on the belt. Can you use a Bomb booster (if you have one) to clear them? If not, look at the tray. Is there ANY cup on the tray that matches the current dispenser request? If yes, tap it. If no, you may be forced to use a "Shuffle" or restart the level.
- If you run out of a color: This usually means you painted the wrong area earlier (e.g., used Blue to paint the reflection area that should have been White). You cannot fix this without boosters. Restart immediately.
Final Checklist for Victory
Before you hit "Start," keep these final thoughts in mind:
- Patience > Speed: This level is a marathon, not a sprint.
- Ice First: The center column must die.
- Watch the Reflection: Slow down during the final 40%.
- Manage Slots: Keep 2 slots open whenever possible.
By following this guide, you will transform Level 95 from an impossible chaos into a solvable logic puzzle. Good luck, and enjoy the Sunset Seascape!