
Level 97
HARDHow to solve Sand Loop level 97? Get instant solution for Sand Loop 97 with our step by step solution & video walkthrough. Sand Loop 97 tips and guide.
Play Sand Loop Now
Experience the puzzle challenge firsthand
Game Screenshots
Sand Loop Level Guides
Level 97 Walkthrough: Mastering the Pixel Shark Challenge
Understanding the Level Objective
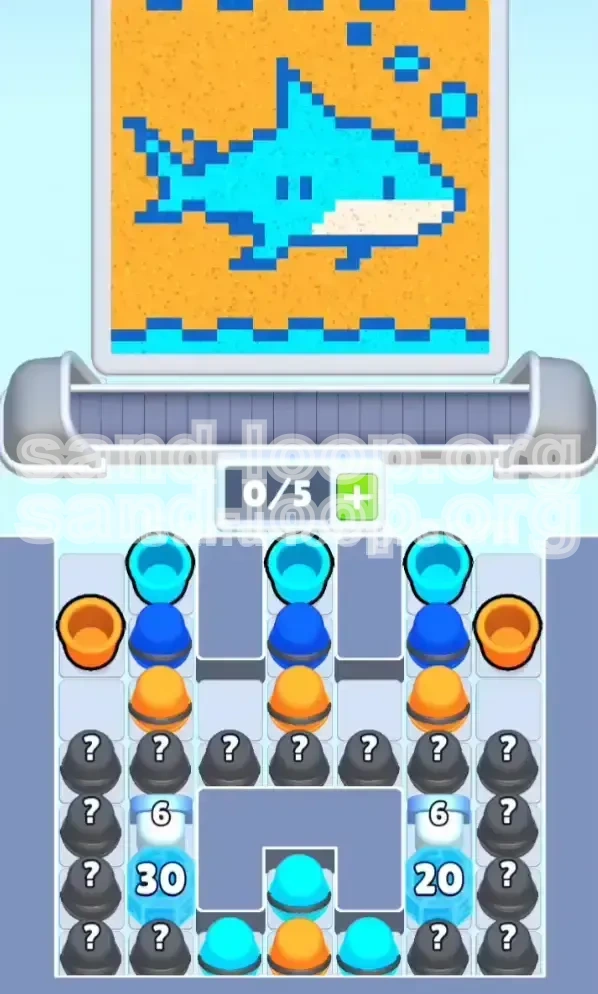
Sand Loop Level 97, titled "Pixel Shark," is a deceptive puzzle that masquerades as a simple coloring task but is fundamentally a resource management crisis. The primary objective is to reveal a pixel-art shark swimming in an ocean of yellow sand. However, the core challenge lies not in the artistic application but in breaking through the game's specific mechanic: the Ice HP (Health Points) Walls. You must clear a path to the bottom reservoirs while managing a critically limited slot capacity of only five units. If you fail to manage your inventory correctly, you will face a deadlock situation where you cannot pick up essential tools, forcing a restart.
Primary Challenge: The Slot Economy
The most critical constraint in this level is the 5-slot limit on your conveyor belt. Unlike previous levels where you could hoard items, here you must be surgical with your inventory. The level generates a high volume of useless "junk" items (specifically the Orange background paint) early on. If you greedily tap every available color, your belt will fill up with Orange cups while you desperately need Cyan to break ice. The challenge is maintaining 2-3 empty slots at all times to ensure you can grab the Cyan cups required for progression.
The Ice Wall Mechanics
The level features a unique "Ice Breaking" mechanic disguised within a painting stage. At the bottom of the screen, two massive stacks of ice blocks obstruct your path to the supply reserves. On the left, a 6 HP block sits atop a 30 HP block. On the right, a 6 HP block sits atop a 20 HP block. These are not just obstacles; they are gates. You cannot access the majority of the paint needed to finish the shark until you grind down these HP numbers using the specific "Ice Breaker" color, which is Cyan.
Visual Analysis: Shark vs. Sand
Visually, the canvas is divided into two distinct layers. The foreground is the Shark, requiring Cyan, Dark Blue, and White. The background is a massive expanse of Yellow/Orange sand. The "Pixel Shark" is detailed, with isolated pixels for bubbles and fins that are extremely vulnerable to "contamination" by background colors. The visual trick here is that the background looks like the largest area, tempting you to fill it first. However, doing so is the fastest way to fail. You must mentally suppress the urge to fill the background and focus entirely on the shark's outlines first.
Why This Level Is Difficult
Level 97 induces failure through "panic clutter." As you tap Mystery Boxes, you will randomly generate colors. When you see Orange appear, you might instinctively grab it. When the board floods with Dark Blue, you might worry about missing it. However, grabbing the wrong color at the wrong time clogs your machine. The difficulty spikes because the "Key Breaker" color (Cyan) is statistically outnumbered by the "Filler" colors. You are forced to make difficult decisions about which resources to discard and which to keep, all while a timer (or your patience) ticks away.
Step-by-Step Walkthrough Guide
Phase 1: The Setup and Mental Prep
Before you tap a single cup, pause and observe the conveyor belt at the bottom. Do not start the level until you have a plan. Identify the location of the Mystery Boxes (?) on the far left and right columns. These are your lifelines; they are the only source of unlimited ammunition. Your immediate goal is not to paint, but to clear space. Ensure your slots are empty or nearly empty before the first wave of cups arrives. This preparation prevents the common "stuck hand" error where you are holding a cup you cannot use.
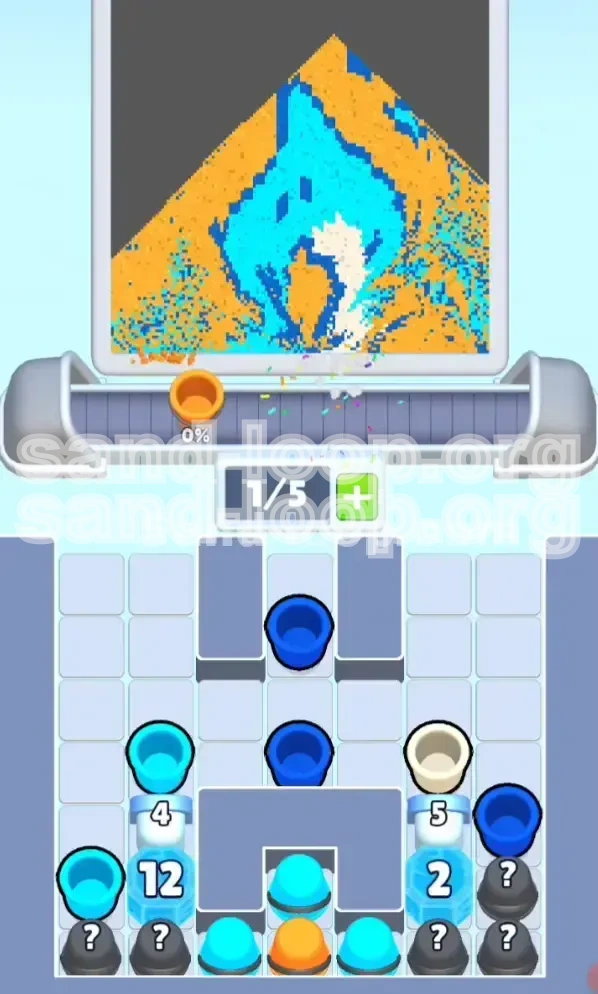
Phase 2: Targeting the Top Layer (6 HP Ice)
As the level begins, ignore the vast amount of Orange and Yellow cups spawning. Scan the board specifically for Pastel Cyan cups. Your first tactical move is to tap and acquire 2 to 3 Cyan cups. Immediately pour these onto the small 6 HP ice blocks located at the top of the stacks on both the left and right sides. Do not aim for the bottom blocks yet; they are too thick. By removing the top 6 HP layer, you expose the thicker 30 HP and 20 HP blocks underneath. This step is crucial as it activates the gravity mechanics for the Mystery Boxes, allowing them to slide into the playable area.
Phase 3: The Ice Breaking Grind (Cyan Management)
With the top ice shattered, you now face the 30 HP (left) and 20 HP (right) blocks. This is the longest phase of the level. You must now enter a rhythm of "Cyan Mining." Look at the Mystery Boxes you exposed. Tap them one at a time.
- Scenario A: The box reveals Cyan. Immediately add it to your belt and fire it at the 30 HP block.
- Scenario B: The box reveals Orange or Blue. Do not touch it yet. Leave it on the board.
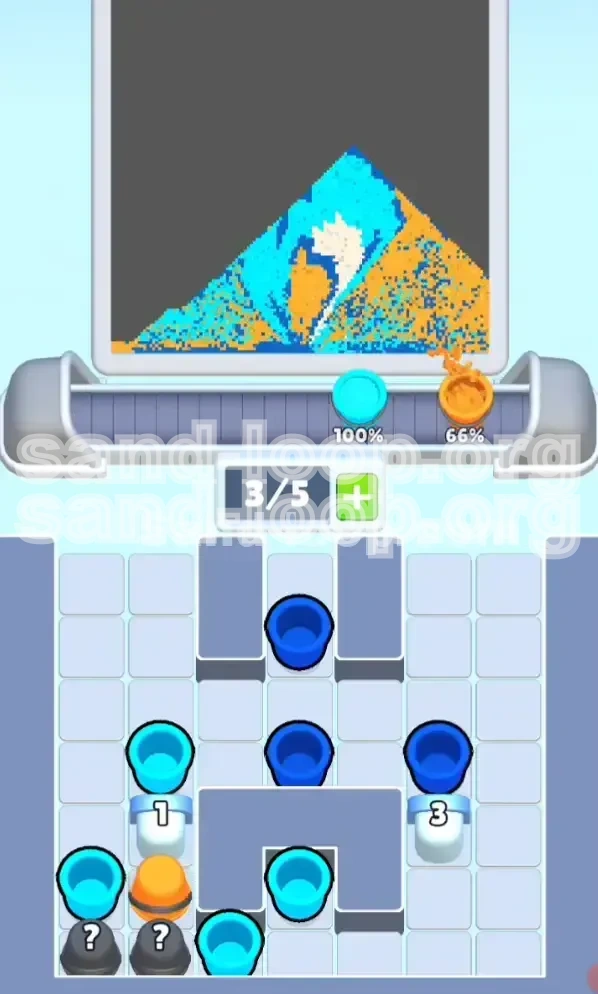
You must keep your belt fluid. If you pick up a non-Cyan cup now, you risk clogging a slot that could have been used for a critical Cyan drop. Focus 90% of your effort on the left side (30 HP) first, as it takes longer to break. The right side (20 HP) will naturally crumble faster with runoff.
Phase 4: The Resupply and Mid-Game Shift
Once the right-side 20 HP block shatters, a massive cache of cups will be released from the bottom right corner. This is your "resupply event." You will likely see a flood of Dark Blue and White cups. Now, your strategy shifts. You have likely broken enough ice to access the shark's body. Pause the Ice Breaking assault if you have made a dent in the 30 HP block. Clear your belt of Cyan and start picking up the White cups. Pour White onto the shark's underbelly. This is a high-priority target because it is a distinct color that requires precision before the background sand floods the area.
Phase 5: Detailing the Fins and Bubbles
With the body mostly Cyan and the belly White, switch to Dark Blue. This is the most dangerous step. The shark has fins and floating bubbles that are single pixels wide. If you pour aggressively, the "flow" of the sand might bleed into the background or overlap the fins. Use short, controlled taps rather than holding the pour. Aim for the dorsal fin first, then the tail. Save the bubbles for last. The bubbles are often high-impact, small targets; ensuring your nozzle is directly over them before pouring prevents wasting the precious Dark Blue resource.
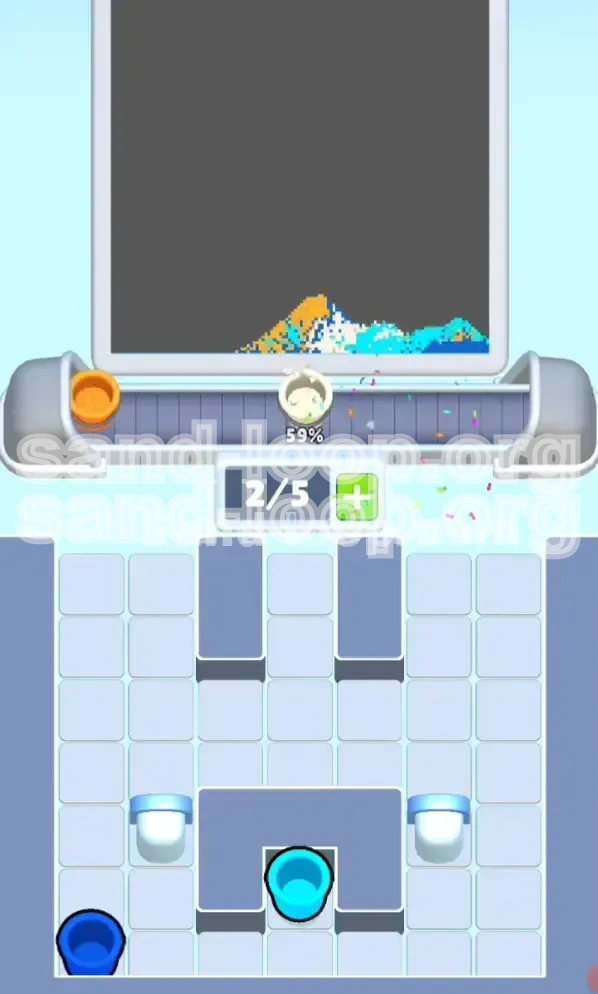
Phase 6: The Final Background Fill
Only when the shark is a complete, vibrant masterpiece (Blue body, White belly, Dark fins) should you even look at the Orange cups. By now, you likely have a backlog of Orange cups clogging your conveyors or sitting on the table. Now is the time to "burn" them. Tap every Orange cup you see and pour them into the remaining empty space. Since the background is the largest area and contiguous, this step goes quickly. There is no risk of error here because the detailed shark is already protected by the dried paint of its own colors.
Correct Color Processing Order
Priority 1: Cyan (The Key Breaker)
Cyan is undisputedly the most critical color in Level 97. It serves a dual purpose: it is the primary color for the shark's skin and the only weapon against the Ice Blocks. If you run out of Cyan, you are stuck. You cannot finish the level. Therefore, every decision you make must prioritize the acquisition and conservation of Cyan. Even if the shark looks a little patchy, if you have Cyan, use it on the ice first. The paint on the shark can be fixed later; the ice must be broken to win.
Priority 2: White (The Belly)
White is second because it is the most isolated color region. The shark's underbelly is a distinct shape surrounded by Cyan. If you wait too long to do this, the background sand (Orange) might start encroaching, or you might accidentally cover it with Blue. It is best to apply White while the canvas is relatively clean, ensuring you get crisp edges for the shark's underside.
Priority 3: Dark Blue (Details)
Dark Blue is third because it is used for "details"—fins, eyes, and bubbles. Details are risky to do early because you might accidentally splash another color over them while working on the large HP blocks. However, you must do them before the background fill. Trying to paint bubbles into a field of Orange sand is impossible; the paint will blend. Secure the Dark Blue details before unleashing the Orange flood.
Priority 4: Orange (The Background)
Orange is last. It is the "cleanup" color. It has zero strategic value other than filling empty space. In fact, in the early game, Orange is a liability. It clogs your slots and tempts you to make mistakes. Treat Orange cups as obstacles until the very end. Only when the intricate work of the shark is 100% complete should you engage with the Orange cups.
The Danger of "Color Bleed"
The order is designed to prevent "Color Bleed." If you do Orange first, the boundary between the Orange sand and the White belly becomes blurry. If you paint the Dark Blue fins before the Cyan body, you might misalign them. By following the Cyan -> White -> Dark Blue -> Orange hierarchy, you ensure that darker colors do not accidentally overwrite lighter, more critical details, and that the background does not contaminate the foreground subject.
Slot Optimization Based on Order
Your slot management should mirror this color order. If you have a Cyan cup and a White cup, keep the Cyan. If you have a Dark Blue cup and an Orange cup, keep the Dark Blue. The "value" of a cup is determined by how early it appears in this priority list. Never hold a lower-priority color (like Orange) if it means dropping a higher-priority color (like Cyan) due to slot limits.
Common Mistakes to Avoid
The "Full Belt" Syndrome
The number one error in Level 97 is filling your 5-slot conveyor belt too early. Players see 5 slots and think, "I should fill these." This is wrong. You need to keep 2 slots empty (or at least 1) to act as a buffer for the random Mystery Box drops. If your belt is full of White and Blue, and a Mystery Box reveals a crucial Cyan cup, you cannot pick it up. You are forced to watch it slide by, or worse, dump a useful cup to grab it. Always maintain "Slot Elasticity."
Over-Pouring on Bubbles
The bubbles are tiny, requiring maybe 1% of a single cup. A common mistake is treating them like large blocks and holding down the pour. This results in a massive overflow of Dark Blue splashing onto the sand or the shark's fin. The fix is the "Tap and Release" method. Tap the cup once, let a small amount out, and release immediately. It is better to under-pour and tap again than to over-pour and ruin the pixel art.
Wasting Cyan on the Shark Body
It is tempting to paint the shark's body blue immediately because it looks satisfying. However, using Cyan on the body while the 30 HP Ice Block is still active is a waste of resources. Every drop of Cyan used on the shark's body is a drop NOT used on the ice. You need every single drop of Cyan to break that wall. Only the "runoff" (the excess paint that misses the ice) should be used to color the shark. Focus your aim on the ice blocks; let the shark color itself as a side effect of your attack on the wall.
Ignoring the 30 HP Disparity
Players often treat both sides of the screen equally, pouring 5 cups on the left and 5 cups on the right. This is inefficient. The left side has 50% more HP (30 vs 20). You should allocate your Cyan resources in a 3:2 ratio—focusing heavily on the left. If you balance your attacks evenly, the right side will break open long before the left, leaving you frustrated with a half-opened gate.
Premature Mystery Box Spamming
When players see the Mystery Boxes line up, they often tap them all in a frenzy to see what they get. This generates 5 random colors instantly. If 4 of them are Orange, you have now cluttered the board with useless items you have to manually clear or wait out. Tap Mystery Boxes one by one. Reveal a color, process it, and then tap the next. This "Just-In-Time" inventory management prevents board clutter.
Solutions for When You Are Stuck
Stuck at the Start: No Cyan Cups?
If the level begins and the conveyor belt offers only Blue, White, or Orange, do not panic. Do not pick them up. Wait. The game has a programmed "dispersal" logic. If you refuse to pick up the junk colors, the game will eventually be forced to spawn Cyan or a Mystery Box to get you moving. Picking up junk just signals to the game that you are willing to use it, leading to more junk spawns. Hold your ground and wait for the Cyan (or a ? Box) to appear.
Stuck Mid-Game: The Deadlock
You have 4 slots filled with Orange/White, 1 slot with Cyan, and a 30 HP Ice Block remaining. You are stuck because you can't break the ice fast enough with just 1 slot of Cyan turnover. Solution: You must "sacrifice" the lowest priority color. Identify which color on your belt is least useful right now (likely Orange). You must deliberately pour that Orange into a waste area (an already finished section or a corner you don't care about) just to free up the slot. You need to cycle your belt to get fresh Cyan into play. Sometimes you must waste a resource to gain a slot.
Stuck on Ice: HP Not Dropping?
Sometimes it feels like your cups aren't damaging the ice. Check your aim. Are you hitting the very top edge of the block? If you pour slightly off-center, the sand might bounce off the "collider" of the block and flow around it without registering a hit. Ensure your stream is hitting the flat surface of the ice block squarely. Also, ensure you aren't accidentally pouring on the "already broken" rubble, which absorbs paint without reducing the HP of the active block.
Stuck on Details: Bubbles Won't Fill
If you are pouring Dark Blue on the bubbles and they aren't filling, check the "Layers." You might have inadvertently filled that spot with Orange background earlier. The game mechanics usually prevent "filling" a color with another if the contrast isn't high enough, or you might be trying to fill a "transparent" part of the sprite. Zoom in (if possible) or ensure your nozzle is directly over the center of the bubble pixel. If it's still not working, you may have "contaminated" the pixel, requiring you to restart the level as that pixel is now technically "Orange" and won't accept Blue.
Stuck at the End: 99% Complete
If you are stuck at 99% completion, you are missing a single pixel. It is almost always located in the "Bubbles" or the "Eye" of the shark. Use a systematic scan. Don't look at the whole picture; look at the shark's eye. Is it completely dark? Look at the bubbles. Are they all solid? If they seem fine, check the corners where the shark meets the sand. Sometimes a single pixel of Cyan is missing at the tail tip. Tap those specific high-contrast areas to find the missing percent.
Speed Run Tips and Shortcuts
The "Mystery Box Gamble" Strategy
For advanced players looking to speed run, you can bypass the slow conveyor belt wait by relying heavily on the Mystery Box ( ? ). If you have a steady hand, you can tap the Mystery Box the instant it slides into view. If it reveals Cyan, you gain a cup seconds faster than waiting for the conveyor. If it reveals Orange, you must have the reflexes to ignore it immediately. This high-risk, high-reward strategy relies on your ability to process the color information within a fraction of a second and decide to keep or discard.
Prefiring the Nozzle
While a cup is traveling on the conveyor belt to the nozzle, you can already be planning your move. Don't wait until the cup is locked into the nozzle to look for the target. As the Cyan cup is sliding down, position your mouse/finger over the 30 HP Ice Block. The moment it "clicks" into place, tap. This saves 0.5 to 1 second per cup. Over 50 cups, this saves significant time. This technique is called "Prefiring" and is essential for sub-minute clears.
The "Runoff" Painting Method
Do not aim at the shark. Ever. To get the fastest time, treat the Shark as a collateral damage target. Aim exclusively at the Ice Blocks. Position your stream so that it hits the corner of the Ice Block. The sand will splash. Aim the splash direction towards the shark's body. This way, you are damaging the block (progress) and painting the shark (progress) simultaneously in a single motion. Stopping to paint the shark explicitly is a waste of time.
Batch Processing Colors
Instead of switching between Cyan and White constantly, try to group your actions. If you have 3 Cyan cups, fire them all in a row at the ice. Don't fire 1 Cyan, then 1 White, then 1 Cyan. Every time you switch targets, your brain has to reacquire the position. Grouping similar actions (e.g., "All Ice Breaking" then "All Detail Painting") reduces cognitive load and increases mechanical speed.
The "Endgame Flood" Shortcut
Once the Ice is gone and the Shark is roughly 80% colored (details done), you can trigger the end. You do not need to be precise with the Orange background. Simply tap every single remaining cup on your belt and the screen simultaneously. Create a "waterfall" of Orange. Since the shark is already painted with darker, more saturated colors, the Orange sand will flow around the "high ground" of the dried paint. This "flooding" technique finishes the last 20% of the level in 5 seconds, whereas doing it carefully takes 45.