
Level 18
HARDHow to solve Sand Loop level 18? Get instant solution for Sand Loop 18 with our step by step solution & video walkthrough. Sand Loop 18 tips and guide.
Play Sand Loop Now
Experience the puzzle challenge firsthand
Game Screenshots

Sand Loop Level Guides
Level Overview: Deconstructing the "Dithered" Trap
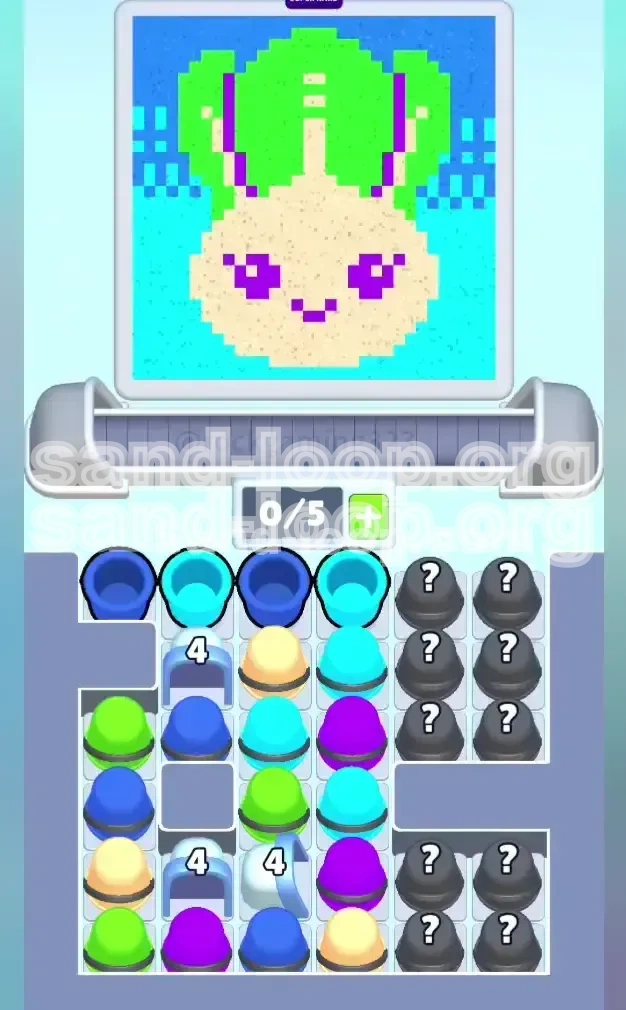
Level 18 of Sand Loop represents a significant difficulty spike, moving away from simple color matching and introducing the complex "Dithered Background" mechanic. The subject of the painting—a cute, green-eared alien against a cosmic backdrop—deceptively suggests a simple task. However, the canvas is composed of approximately 70% "noise," specifically a checkerboard pattern of Cyan and Dark Blue. This guide provides the strategies necessary to navigate the resource management tightrope required to clear this stage.
The "Dithered" Background Mechanic
Unlike previous levels where you could queue up three or four identical cups to clear a section, the background here is a texture. The scanner demands rapid switching between Cyan and Dark Blue. If you attempt to process this as a single stream of "blue-ish" colors, you will fail. You must actively match the checkerboard rhythm: Cyan, Blue, Cyan, Blue. This accounts for the vast majority of your clicks in the first half of the stage.
The "Mystery Wall" Structure
Visually, the level is dominated by a massive column of "Mystery Boxes" (black cups with question marks) on the right side of the tray. These are not optional; they are the primary source for rare colors like Purple and Cream. You cannot access them immediately. They are locked behind the physics of the tray, requiring you to clear the left-side structures to trigger a gravity drop that brings these boxes into the tappable zone.
Inventory Constraints (The 5-Slot Limit)
Your conveyor belt holds only five active slots. In Level 18, space is your most valuable resource. Because the background requires constant alternation between two colors, your slots will often fluctuate between 3/5 and 4/5 capacity. Hoarding colors early is a death sentence. You must maintain "flow," ensuring cups are moving from the tray to the scanner immediately, rather than sitting in your hand.
The 4-Layer Composition
To beat the logic of this level, visualize the canvas in four distinct processing layers:
- Layer 1 (Bottom): The Cyan/Dark Blue checkerboard background.
- Layer 2 (Middle): The solid block of Cream (Beige) forming the face.
- Layer 3 (Top): The Bright Green ears protruding from the head.
- Layer 4 (Detail): The small, high-precision Purple clusters for eyes and ear stripes.
Why Speed Fails Here
This is not a level where raw tapping speed wins. Tapping too fast often results in picking up the wrong shade of blue or clogging your belt with a color you don't need yet. This is a game of rhythm and anticipation. The challenge is supply chain management: ensuring the right color arrives at the scanner exactly when the nozzle moves over the target pixel.
Clear Objectives: The Strategic Milestones
Before you start tapping, you need a clear roadmap. Randomly clearing cups will lead to a "Soft Lock," where you have a full inventory of useless colors while the scanner waits for a color you cannot reach. Follow these objectives in order.
Objective 1: Clear the "4-Gates"
Your immediate priority is the numerical gates marked "4" on the left grid. These gates block the lower tiers of the tray where essential colors are hidden. You must clear exactly 4 cups from the active columns beneath these archways to shatter them. This is the "Entry Key" to the level—until these gates break, you cannot access the volume of cups needed to succeed.
Objective 2: Satisfy the Background Noise
While working on the gates, you must keep the scanner moving. The scanner will rapidly alternate between Cyan and Dark Blue. Your goal here is not to "finish" the background, but to prevent a jam. You must alternate your taps to match the checkerboard. If you queue two Cyans when the pattern needs Blue, you will overflow your belt and lose precious time.
Objective 3: Trigger the Mystery Wall
Once the 4-Gates are down, your focus shifts to the right side. You must destabilize the tray to drop the Mystery Boxes. These boxes contain the rare colors (Purple, Cream) required for the later stages. You need to clear the supporting columns on the left to force these boxes to tumble down into the playable area.
Objective 4: Mass Production for the Face
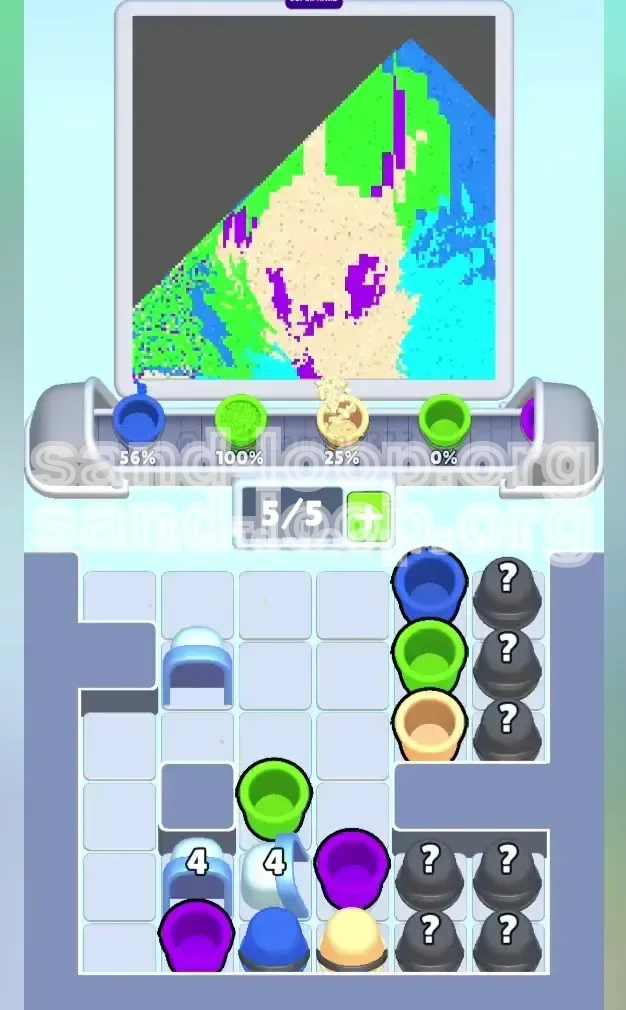
After the background is roughly 40% complete, the scanner will move to the alien's face. This is a large, solid block of Cream (Beige). Your goal shifts from "Alternating" to "Stockpiling." You need to deliver a high volume of Cream cups quickly. This is the safest phase of the level, but it requires you to have saved space in your inventory.
Objective 5: The Purple Precision Phase
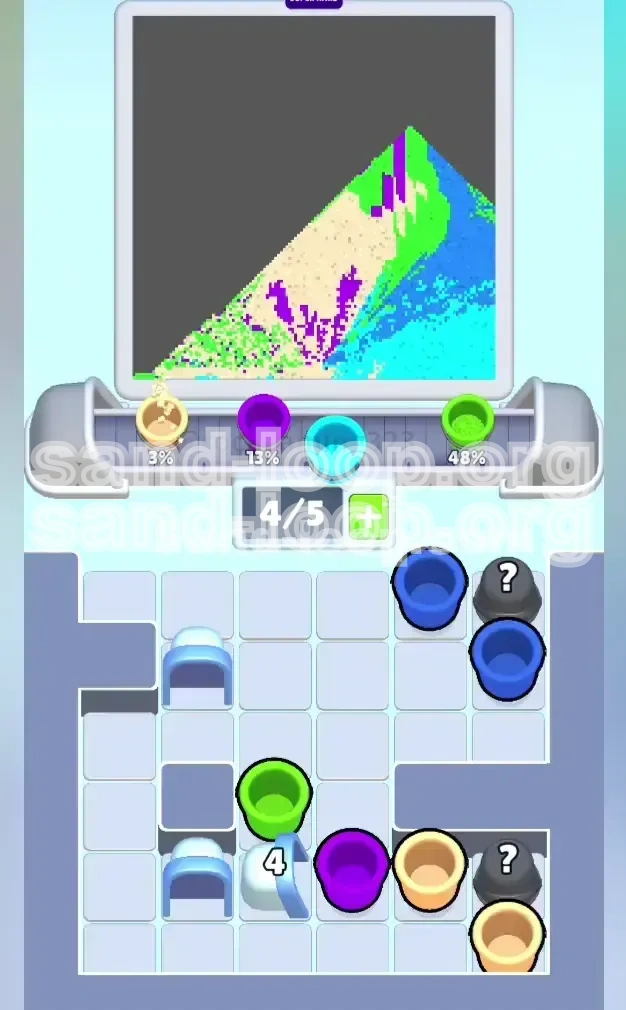
The final 10% of the level is the most dangerous. You must place Purple pixels in the eyes and ear stripes. These are small clusters. If you run out of Purple here, you fail. You must have secured Purple from the Mystery Boxes earlier in the level. There is no backup source for Purple; if you miss it in the boxes, you cannot finish the level.
Step-by-Step Instructions: The Execution Guide
Follow this sequence to maximize your efficiency. This walkthrough assumes a standard start with a full grid and focuses on actionable steps.
Phase 1: The Top-Layer Clear
As the level starts, ignore the tempting Cream or Green cups buried deep in the tray. Focus entirely on the top two rows. You will see a heavy concentration of Cyan and Dark Blue. Tap these immediately. Your goal is to create vertical space in the columns and get the cups flowing. Do not worry about perfect order yet; just clear the top layer to initiate the cycle.
Phase 2: Breaching the 4-Gates
Shift your focus to the columns directly beneath the "4" archways. The scanner is likely painting the background edges. Tap the cups in these specific columns aggressively. Every tap brings you closer to breaking the gate. As you clear these, watch the physics of the tray—when the countdown hits zero, the gate shatters, releasing new cups.
Phase 3: The Cyan/Blue Rhythm
Now the real challenge begins. The scanner is fully engaged in the checkered background. Look at the canvas pattern. Is the next pixel Cyan or Dark Blue? Find the matching cup. Tap it. Now look at the pixel *after* that. It is likely the opposite color. Establish a rhythm: Cyan -> Blue -> Cyan -> Cyan -> Blue. Keep your slot count flexible (3/5 or 4/5) to avoid getting stuck.
Phase 4: Unveiling the Mystery Boxes
Once the gates are broken, the Mystery Wall on the right will drop and mix with regular cups. When a Mystery Box settles into a tappable position, pause briefly. Check your inventory. If you have 4/5 slots full of Blue/Cyan, tap the Mystery Box. If it reveals Purple or Cream, excellent. If it reveals "trash" (more Blue/Cyan), use it immediately on the background to clear the slot. Do not let Mystery Box contents sit in your hand unless they are rare.
Phase 5: Transitioning to the Face
Watch the scanner nozzle closely. It will eventually finish the noisy background and move to the large, solid Beige area of the face. This is your signal to switch gears. Stop tapping Blue and Cyan exclusively. Look for the Cream cups you uncovered earlier. You can now queue multiple Cream cups. However, keep one "backup" slot open for a background color, just in case the scanner dips back into the noise.
Phase 6: The Endgame (Green and Purple)
The final stretch involves the Green ears and Purple eyes. The Green ears are straightforward—tap the Green cups you saved. The Purple eyes are the final hurdle. If you have a Purple cup in your hand, save it until the scanner is exactly over the eye cluster. Do not waste it on the background. Once the eyes and ear stripes are done, finish any remaining background pixels to clear the level.
Color Order Strategy: The Processing Hierarchy
Not all colors are created equal in Level 18. Understanding the hierarchy of colors is critical to managing your inventory. Treating all colors equally will lead to a jammed belt and a failed run.
Primary: Cyan and Dark Blue (The Fuel)
These are your "Workhorse" colors, making up roughly 65% of the canvas. However, they are "Low Value" individually. Your strategy should be to use them immediately. Never hoard Cyan or Blue. If you see them and the scanner needs them (even for a pixel 5 steps away), use them. They are the fuel that keeps the machine running; holding onto them is just blocking space for rare colors.
Secondary: Cream (The Bridge)
Cream (Beige) is a "High Demand" color. You need a large volume of it for the face, but it is mostly locked behind the 4-Gates. Once the gates are open, Cream becomes your priority. The danger here is picking up Cream too early while the scanner is still on the background. Only pick up Cream when the scanner is actively transitioning to the face portion.
Tertiary: Bright Green (The Burst)
Green is a "Burst" color. You don't need a constant stream, but rather 3-4 cups in rapid succession for the ears. It is usually plentiful but often buried. Don't panic if you don't see Green immediately; it will appear naturally as you clear the upper layers of the tray to find the Blues.
Quaternary: Purple (The Bottleneck)
Purple is the most critical color in the level. It is rare, heavily guarded in Mystery Boxes, and required for the final pixels. The scanner needs very little of it (roughly 4-5 cups total), but without it, you cannot finish. You must actively hunt for Purple in the Mystery Boxes. Treat Purple cups like gold—secure them and protect them in your inventory.
The Order of Operations
1. Cycle: Process Cyan and Dark Blue rhythmically to clear the background.
2. Unlock: Use the flow of Cyan/Blue to break the 4-Gates.
3. Stockpile: Collect Cream and Purple once the gates are down.
4. Execute: Burn Cream on the face and Green on the ears.
5. Finish: Place the final Purple details.
Common Mistakes to Avoid
Level 18 is designed to punish specific bad habits. Recognizing these errors before you make them is the key to survival.
Mistake 1: Pre-loading Colors
Do not pick up a Green or Cream cup just because you see it, unless the scanner is seconds away from needing it. Picking up a Cream cup and holding it while the scanner paints the background reduces your effective capacity from 5 to 4. Only pick up a cup when you are ready to use it within the next 5-10 seconds.
Mistake 2: Treating Background as Solid
The background looks like a single color from a distance, but it isn't. If you treat it like a solid block of Blue and just tap whatever is closest, you will eventually feed the scanner the wrong hue. This jams the machine. Always glance at the canvas to confirm if the specific pixel needed is Cyan or Dark Blue.
Mistake 3: Ignoring the Mystery Wall
Some players focus so hard on the background that they forget to clear the left side columns. If you don't clear the left, the Mystery Boxes on the right won't drop. If the boxes don't drop, you won't get Purple. If you don't get Purple, you fail at 90% completion. Always keep an eye on the right-side stack.
Mistake 4: Wasting Purple on the Background
In a panic, you might be tempted to use a rare Purple cup just to clear a slot if the scanner is waiting. Don't do it. It is better to trash a Cyan or Blue cup or wait for the scanner to move. Wasting Purple is the fastest way to get a "Game Over" on the final pixels.
Mistake 5: Full Inventory Panic
Having a full hand (5/5) is a death sentence in this level. If you have 5 cups and a Mystery Box reveals a crucial Purple cup, you cannot pick it up. Always try to keep one slot empty (4/5) to accommodate surprises.