
Level 19
HARDHow to solve Sand Loop level 19? Get instant solution for Sand Loop 19 with our step by step solution & video walkthrough. Sand Loop 19 tips and guide.
Play Sand Loop Now
Experience the puzzle challenge firsthand
Game Screenshots

Sand Loop Level Guides
Level Overview: The "Hip-Hop Goose" Challenge
The Visual Theme and Atmosphere
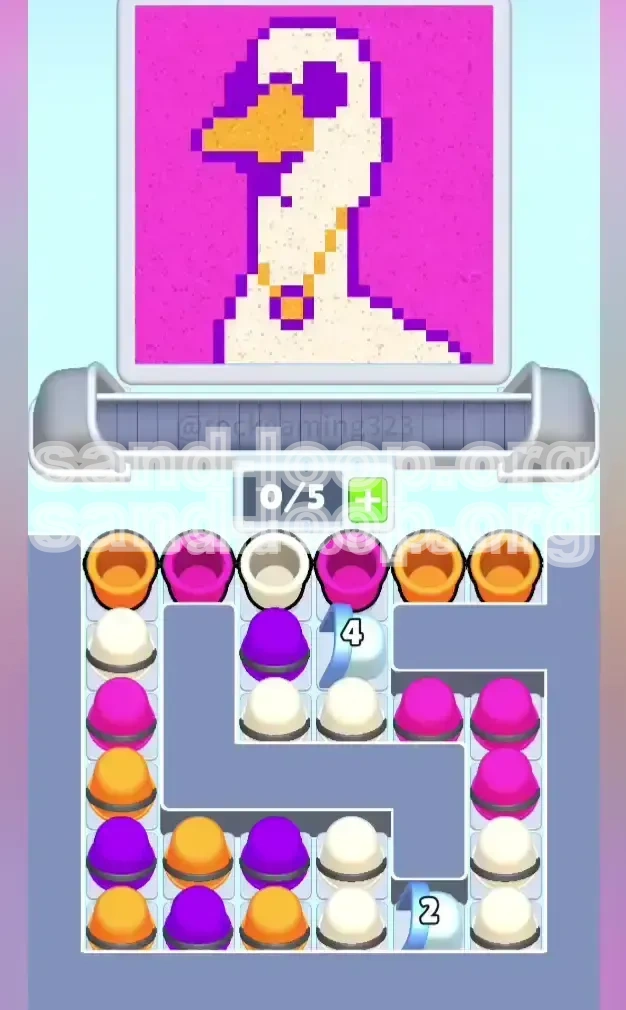
Level 19 presents players with a striking piece of pixel art titled the "Hip-Hop Goose." The subject is a white goose portrayed with pure swagger, sporting purple sunglasses and a prominent gold chain, all set against a vibrant hot-pink background. While the artwork is humorous and stylish, it serves as a backdrop for a serious logic challenge. The visual contrast between the white goose and the pink background creates a deceptive simplicity that hides the logistical nightmare of managing the conveyor belt effectively.
Core Gameplay Mechanics
The primary mechanic tested in this level is spatial resource management. You are restricted to a 5-slot conveyor belt, which acts as your temporary inventory. Unlike previous levels where you might grab colors freely, here every slot counts. The "buried" nature of the White sand supply—your most critical resource—means you cannot simply grab it whenever you want. You must unlock it strategically while managing the other three colors (Pink, Orange, Purple) without clogging your limited belt space.
The "S-Wall" Obstacle
A unique feature of this level is the grey S-shaped divider winding through your supply tray. This physical barrier segments the cups, creating tight clusters that are difficult to access. It forces players to plan their pathing carefully. You cannot simply sweep across the tray; you must navigate around the curves of the "S" to reach specific color clusters, often requiring you to clear "trash" cups just to reach the valuable ones.
Strategic Importance of White Sand
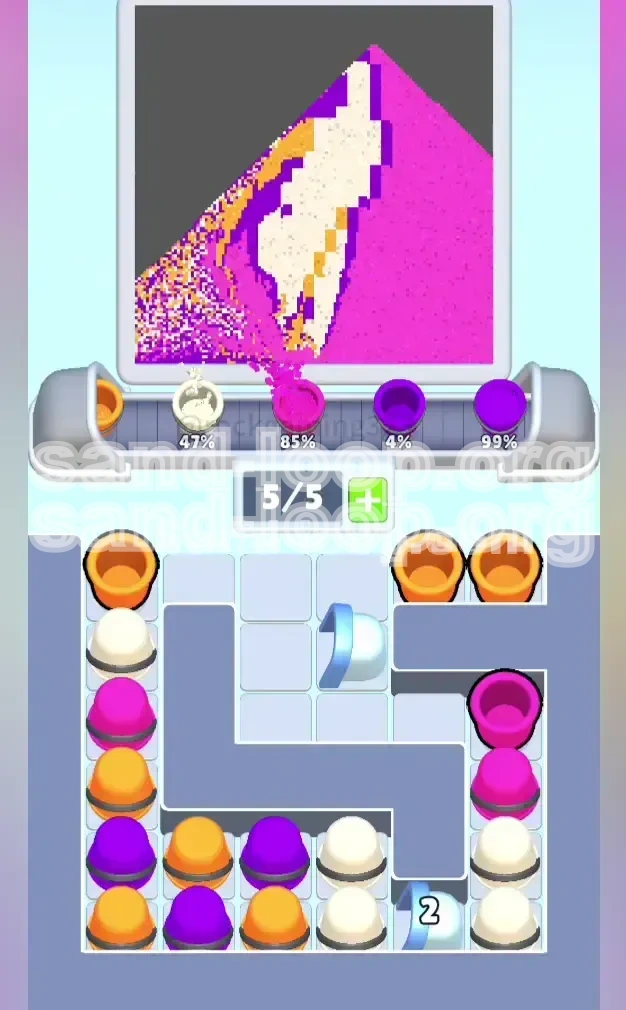
White sand is the lifeblood of this level, comprising approximately 60% of the total canvas volume. It forms the goose's body, neck, and head. The challenge is that the White cups are initially locked behind Blue Gates (numbered '4' and '2'). Failing to prioritize the unlocking of these gates will result in an immediate deadlock. You will find yourself with a half-filled goose and no way to source the necessary White pigment to continue.
Conveyor Belt Capacity
Your 5-slot conveyor belt is your most valuable asset and your biggest potential liability. Filling it with the wrong colors at the wrong time will cost you the level. For example, if you fill your belt with Orange cups (needed for small details) while the canvas is demanding White for the neck, you will have no space to pick up the White cups once they are unlocked. Mastering the rhythm of picking and pouring is essential to prevent bottlenecks.
The Difficulty Spike
Level 19 is considered a significant difficulty spike, acting as a "gatekeeper" level. It requires a shift from reactive gameplay (grabbing what you see) to proactive gameplay (grabbing what you need next). The "Hip-Hop Goose" is not just a test of aim; it is a rigorous test of memory, queue management, and prioritization. Expect to restart several times as you learn the specific unlock order required to clear the S-Wall and Gates efficiently.
Clear Objectives: What You Need to Accomplish
Establish a Strong Foundation
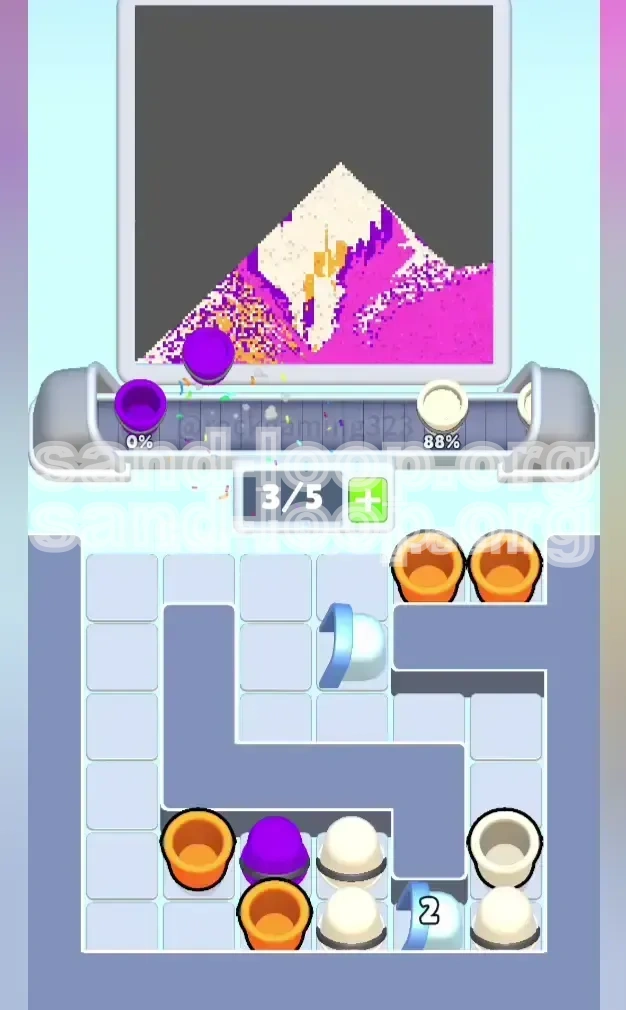
Your first objective is to build a solid base layer of White and Pink sand. The bottom of the canvas consists entirely of the goose's white chest and the pink background. You must focus on clearing the top-middle White cups and the flanking Pink cups immediately. Establishing a rhythm here prevents panic later. Do not focus on the details yet; just get the bottom 20% of the canvas filled to stabilize the structure.
Unlock the White Supply
The most critical early objective is breaching the Blue Gate Locks. These gates protect the bulk of your White sand supply. You must clear adjacent cups to decrement the counters on these locks. Until these gates open, your White supply is finite and dangerously low. Making the opening of these '4' and '2' gates your primary focus ensures that you have a steady stream of White sand for the middle section of the level.
Execute the Gold Chain Sequence
Mid-level, your objective shifts to precision detail work. The Gold Chain appears on the goose's neck. This requires a sudden, brief influx of Orange sand. The objective here is not just to fill the chain, but to stop pouring Orange the moment the chain is complete. Over-pouring Orange here will spill into the Pink background or White neck, creating a mess that is hard to fix later without wasting precious time.
Manage the Top-Layer Complexity
The final objective is to complete the face, which is the most color-intensive part of the puzzle. You must balance Orange (beak), Purple (sunglasses), White (head), and Pink (background) simultaneously. The goal here is to maintain an open slot in your conveyor belt at all times to act as a buffer, allowing you to swap between these colors rapidly as the canvas requirements shift from pixel to pixel.
Minimize Conveyor Clogging
Throughout the level, a constant objective is to keep your belt fluid. You must avoid "dead picks"—grabbing cups you don't need immediately. If you have a full belt of 5 cups and none of them match the current canvas section, you are stuck. Your objective is to always have at least one or two cups on your belt that are relevant to the immediate future of the canvas.
Achieve 100% Completion Speed
While simply finishing is the first goal, mastering the level requires speed. The final objective is to minimize idle time. This means knowing exactly where the next cup is located before you even finish pouring the current one. Efficient movement reduces the time the sand spends in the air, giving you more margin for error during the complex color transitions in the final phase.
Step-by-Step Instructions: From Start to Finish
Phase 1: The "Pink and White" Opening (0-25% Progress)
Start the level by immediately locating the White cups in the top-middle of the tray and the Pink cups flanking them. Ignore the Orange cups in the corners completely. Your first 10-15 moves should be an alternating pattern: Pick White, Pour Chest; Pick Pink, Pour Background. Repeat this. Focus entirely on the bottom edge of the canvas. Do not try to build upwards yet. Just secure the base. If you accidentally pick up a Purple or Orange cup this early, pour it into a non-critical area or trash it immediately to free the slot. The priority is flow.
Phase 2: Breaching the Blue Gates (25-40% Progress)
Once the base is stable, look at the Blue Gates attached to the S-Wall. You will likely see a '4' lock. Identify the cups immediately adjacent to this lock. These might be Pink or Purple cups that are blocking the mechanism. You must clear these specific cups to open the gate. You may need to temporarily hold a "trash" color (like Purple) in your belt to get it out of the way. As you decrement the counter, the gate will pop, revealing a stack of White cups. Immediately swap your current load for these White cups.
Phase 3: Building the Neck and Body (40-60% Progress)
With the gates open, you should have a healthy supply of White sand. Now, begin filling the main body of the goose. Alternate White (body) and Pink (background) as you move up the torso. As you approach the neck area, keep one eye on the incoming sand layer. You will see the outline of the Gold Chain appearing. Do not fill the neck completely yet. Stop about 80% of the way up the neck. You need to leave space to insert the Gold Chain without overflowing Orange into the White neck feathers.
Phase 4: The Gold Chain Precision Insert (60-75% Progress)
This is the most dangerous moment. Pick up 1 or 2 Orange cups. Pour them carefully into the Gold Chain area located in the middle of the neck. Watch the pixels closely. The moment the Chain is filled, stop pouring Orange. You might have leftover Orange in your hand or on the belt. Do not pour it onto the canvas. Instead, prioritize getting back to White and Pink to finish the neck and close the gap around the chain. You are essentially "inlaying" the orange into the white.
Phase 5: The Face and Sunglasses (75-100% Progress)
The final stretch is a four-color mix. Fill the head with White. The Beak requires a tiny bit of Orange—use the last of your Orange stock here. The Sunglasses require Purple. Since Purple is likely buried under other cups in the tray by now, you may need to dig for it. Keep one slot open on your belt. Pour the Purple only on the glasses. Do not let it touch the pink background. Once the glasses are done, fill the remaining Pink background areas to complete the portrait.
Color Order: Prioritizing Your Palette
Tier 1: Primary Colors (White and Pink)
These two colors are your bread and butter, representing roughly 80% of the canvas. White is the highest priority because it is locked and forms the subject. Pink is the background and is usually abundant. You should process White and Pink in a 1:1 or 2:1 ratio depending on the width of the goose's body at any given height. Never let your White supply run dry. If you have to choose between picking a White cup or a Pink cup, always choose White first to secure the resource, then Pink.
Tier 2: The Detail Colors (Orange and Purple)
Orange is a "Tier 2" color despite its small volume because of its awkward placement. It is needed in two distinct spots (Chain and Beak) with a large gap in between. You should only process Orange when the canvas explicitly demands it. Do not queue it up early. Purple is the lowest priority in terms of volume, but a high priority in terms of "lock-in." Because it is only used at the very top (the sunglasses), you can pick Purple cups early to clear the tray, but you must never pour them until the very end. Treat Purple cups as "placeholders" on your belt until the final phase.
The Processing Sequence
The correct logical order of operations is: Unlock White → Pour Base (White/Pink) → Insert Orange (Chain) → Resume White/Pink → Finish with Orange/Purple. Following this sequence ensures you never have a color on your belt that you cannot use immediately. If you pick Purple before the base is done, you are wasting a slot that could be used for White.
The "Buried" Resource Strategy
Understanding the "Buried" mechanic is vital. Often, the White cups are buried under Purple or Pink cups. You must clear the top layers (Purple/Pink) to access the bottom layer (White). However, you don't want to pour that Purple yet. The trick is to pick the Purple cup, hold it on your belt, and then dig out the White cup underneath. Pour the White, and then deal with the Purple. This uses your belt as a temporary storage buffer for colors you aren't ready to use.
Transition Timing
Switching colors is costly in terms of time. Group your moves. Don't pour White, then Orange, then White, then Pink. Instead, pour all the accessible White pixels in a region, then switch to Pink for that region, then switch back. Batching your color changes reduces the number of times you have to hunt for specific cups in the messy tray. Minimize context switching to maximize efficiency.
Key Tips: Insider Strategies for Success
Tip 1: The "One Empty Slot" Rule
Always try to keep at least one slot empty on your conveyor belt. This is your "lifesaver." If you see a cup you need (like a White cup revealed by a gate), you need a slot to pick it up immediately. If your belt is full (5/5), you have to make a panic-pour, which often leads to mistakes. Keeping a buffer slot allows you to react to the board dynamically rather than getting stuck waiting for a pixel to open up.
Tip 2: Pre-Planning for the S-Wall
The S-Wall makes movement predictable. Plan your route around the curve of the "S." If you are working on the right side of the screen, focus on clearing the right side of the tray. Don't cross the wall unnecessarily unless it's for a critical White cup. Minimizing the travel distance of your cursor saves seconds, which adds up over the course of a level.
Tip 3: Trash Cup Management
Sometimes you have to pick a cup you don't need (a "trash cup") to get to the one underneath. If you pick a Purple cup early to dig for a White cup, don't just pour it on the pink background immediately if it's not time. Hold it. If you pour it too early, you might mess up the pixel perfect fill required later. If your belt is full, sometimes it's better to pour a "trash" color into a corner of the canvas that you know you will overwrite with the correct color later, rather than clogging your belt.
Tip 4: The Gold Chain Checkpoint
Use the Gold Chain as a mental checkpoint. Before you start pouring the chain, verify you have at least 3-4 White cups readily available or accessible. Why? Because as soon as you finish the chain, you need to go right back to White to finish the neck and head. If you use your last White cup to clear the path to the Orange cups, you'll get stuck halfway through the head. Always have an "exit strategy" (enough White sand) before starting the Chain sequence.
Tip 5: Visualizing the Layers
Think of the canvas in 3D layers. The bottom layer is Pink. The middle layer is White. The top layer is details (Orange/Purple). If you pour Orange before the White is filled underneath it, you can't fix it easily. Always ensure the foundation (White) is filled in a specific area before adding the details (Orange/Purple) on top of it. If you see a pixel that is "behind" another in the stack, you must fill the front one first to avoid pixel collision issues.
Common Mistakes: What to Avoid
Mistake 1: The Early Orange Grab
The most common error for new players is grabbing the Orange cups for the beak or chain at the very beginning of the level. They see the orange in the art and think, "I need this." This fills your belt with Orange while the canvas is demanding White for the body. By the time you need the White cups, your belt is full, and the White cups are locked behind gates you can't clear because you have no space. Lesson: Ignore Orange until the neck appears.
Mistake 2: Ignoring the Blue Gates
Players often focus on filling the canvas and ignore the tray mechanics. They keep picking easy cups from the edge while the White cups remain locked behind the '4' and '2' gates. Eventually, the easy cups run out, and the player is left with a half-empty canvas and a full belt of useless colors, unable to clear the gate because they can't reach the adjacent cups. Lesson: Make opening the Blue Gates your first mechanical priority.
Mistake 3: Over-Filling the Gold Chain
When pouring the Gold Chain, it's easy to get trigger-happy and pour too much Orange. The neck pixels are right next to the chain pixels. If you over-pour, the Orange bleeds into the White neck, creating a permanent orange stain on the white feathers. This is very hard to correct without wasting a lot of White sand to cover it up. Lesson: Tap the pour button gently for the Chain. Stop as soon as it looks full.
Mistake 4: Clogging the Belt with Purple
Purple is only needed for the sunglasses at the very top. However, there are often Purple cups scattered near the start. If you pick up 2 or 3 Purple cups early because they were "in the way," they will sit on your belt taking up space for 75% of the level. This reduces your effective capacity from 5 slots to 2 or 3. Lesson: Leave Purple in the tray until you reach the sunglasses, or pick it up only if you can immediately dump it safely.
Mistake 5: Panic Pouring
When the belt gets full and the colors don't match, players tend to panic and pour colors into the wrong spots (e.g., pouring White into the Pink background) just to free up a slot. This creates "pollution" on the canvas that you have to fix later. It wastes time and sand. Lesson: If you are stuck, it is better to pause and look for a valid pixel, even if it's small, than to pollute a large area.
Stuck Solutions: Troubleshooting the Puzzle
Solution 1: Belt Full, No Matching Pixels
The Problem: Your 5 slots are full, but none of the colors match the available pixels on the canvas.
The Fix: Look for the "lowest" unfilled pixel on the screen. Usually, this is the bottom corner or edge of the background (Pink). Pour a "close enough" color or a non-critical color there just to free one slot. Once you have 1 empty slot, you can dig through the tray to find the specific color you actually need. Opening up a single slot is often enough to break the deadlock.
Solution 2: Cannot Reach the Blue Gate
The Problem: You need to clear the Blue Gate to get White, but the cups adjacent to it are blocked by other cups.
The Fix: Identify the specific cup blocking the path to the gate mechanism. You might need to pick up a "garbage" cup (e.g., a Purple cup that is sitting on top of a White cup near the gate). Pick the garbage cup, move it out of the way (hold it or pour it in a safe spot), and then clear the cup holding the gate. It may take 2-3 moves of "shuffling" just to clear one gate lock.
Solution 3: White Sand Supply Depleted
The Problem: You are out of White sand, but the goose isn't finished.
The Fix: You likely missed a cluster of White cups hidden in a corner of the tray or behind the S-Wall. Scan the entire tray carefully. Is there a group of cups you haven't touched because they were hard to reach? Go there. If there are genuinely no White cups left, you may have over-poured White somewhere. You might need to restart, as you cannot finish the goose without it.
Solution 4: Purple Cups Are Buried
The Problem: You are at the final stage (sunglasses), but you can't find any Purple cups.
The Fix: Purple cups are often small and get buried under the larger stacks of White and Pink. You need to clear the remaining White and Pink cups in the tray to "dig" to the bottom layer where the Purple is hiding. This is why you leave some Pink/White work for the very end—it acts as a mining operation to uncover the final Purple cups.
Solution 5: Restart Strategy
The Problem: The situation is hopeless (too much pollution, wrong colors).
The Fix: Don't be afraid to restart immediately. Level 19 is heavily memory-based. If you restart, you now know exactly where the S-Wall is and where the Gates are. Use the first 10 seconds of the restart to clear the path to the Gates immediately, before you even start filling the canvas heavily. This "preparation" turn prevents the deadlock from happening again.
Speed Run Tips: Optimizing Your Time
Tip 1: The Gate Rush
For a speed run, ignore the canvas almost entirely for the first 5-10 seconds. Focus 100% of your effort on clearing the cups around the Blue Gates. If you can open the '4' and '2' gates within the first 15 seconds, you will have a massive supply of White sand available early. This prevents the mid-level slowdown where you have to stop filling the goose to hunt for more White. Opening the gates early is the single biggest time-saver.
Tip 2: Bulk Pouring
Don't pour cup-by-cup. Pick up 2-3 cups of the same color (e.g., White) if you have the slots, and pour them in rapid succession into the same general area. Filling the chest requires many White pixels. Doing this in one fluid motion is faster than switching back and forth. Group your pickup and pour actions by color to minimize cursor travel time.
Tip 3: Tray Optimization
Learn the layout of the tray. The S-Wall is static. Memorize where the dense clusters of White and Pink are located. Instead of looking for colors, you should be moving your cursor towards the location you *know* they are in based on your previous runs. Anticipating the position of the cups removes the "search" time from your run.
Tip 4: The "Look-Ahead" Technique
While you are pouring a color, look at the tray, not the canvas. Watch where the sand is hitting the canvas with your peripheral vision, but focus your eyes on the supply tray. Identify the next cup you need while the current one is pouring. This allows you to snatch the next cup the millisecond the current pour is finished. This technique, called "buffering," shaves seconds off your total time.
Tip 5: Skip the Perfection
In a speed run, don't aim for 100% pixel perfection on the first pass. It is faster to fill the general area (e.g., the whole chest) with White, and then do a quick "cleanup pass" later to fix any stray Pink pixels that leaked in. Trying to be perfect on every pour slows down your rhythm. Get the sand on the canvas, then fix the edges later.