
Level 118
HARDHow to solve Sand Loop level 118? Get instant solution for Sand Loop 118 with our step by step solution & video walkthrough. Sand Loop 118 tips and guide.
Play Sand Loop Now
Experience the puzzle challenge firsthand
Game Screenshots


Sand Loop Level Guides
Sand Loop Level 118: The Ultimate Flower Field Strategy Guide
Welcome to the most comprehensive guide for Sand Loop Level 118, the "Flower Field" challenge. This level represents a significant difficulty spike in the Logic stages, shifting the focus from simple color matching to resource management and bottleneck solving. In this stage, you are not just painting pixels; you are managing a factory floor where a single massive obstruction—the "20-unit Cyan Ice Block"—threatens to halt your entire production line. This guide will break down exactly how to navigate the pink skies, intricate stems, and the deadly ice block to secure your victory with a three-star rating.
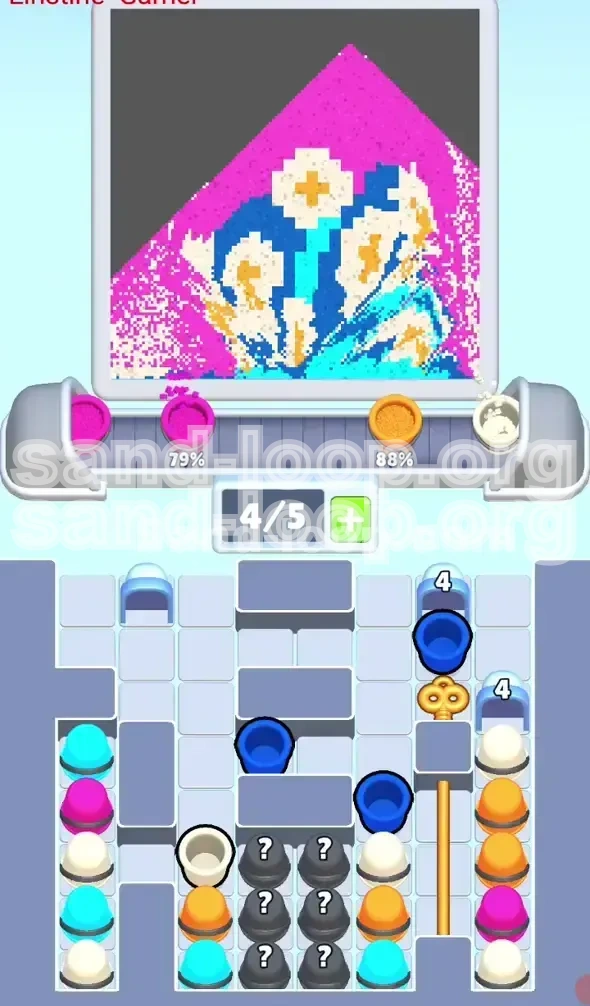
1. Level Overview: Decoding the Flower Field
Before you tap a single cup, you need to understand the battlefield. Level 118 is visually deceptive, featuring a split-level design that requires two completely different approaches. The top half is an open canvas, while the bottom half is a precision puzzle. Here is what you need to know about the environment you are stepping into.
The Split Canvas Dynamic
The artwork is distinctly divided horizontally. The upper 50% is a "Pastel Pink" sky, which acts as a massive buffer for your resources. The lower 50% is a dense cluster of white daisies with blue and cyan stems. This division is critical: the top half is your "dumping ground" for excess cups, while the bottom half is your "precision zone" where mistakes are fatal. Understanding this duality is the first step to success.
The "Tank" Mechanic Explained
This level introduces a heavy "tank" mechanic in the form of a Cyan cup encased in ice, requiring 20 units of sand to fill. To put this in perspective, a standard cup in this game typically requires 3 to 5 units. This "20 Block" is not just a big cup; it is a time sink that will occupy your conveyor belt for roughly 45-60 seconds depending on your dispenser speed. If you manage your belt poorly while this is processing, you will face a soft lock.
The Dispenser Layout
You start with limited dispensing capabilities. The initial setup provides access to basic Pink and Blue flows. However, the essential Cyan and high-volume White/Orange flows are locked behind Golden Keys. Specifically, the left side unlocks a steady stream of Blue/Cyan hybrids, while the right side (blocked by the "20" ice) unlocks the critical Mystery Cup spawners that fuel the final petals.
The Risk of Soft Locks
The primary failure condition in Level 118 is not running out of time, but running out of space. Because the "20 Block" moves so slowly, it creates a traffic jam. If you queue up 3 or 4 cups behind it, and those cups are colors you currently don't need (e.g., Blue when you need Pink), your tray fills up. Once your tray is full (5/5 or 7/7 depending on upgrades), you cannot tap new cups, and the game stalls out.
Palette and Volume Analysis
Breaking down the pixel volume by percentage helps prioritize your taps:
- Pastel Pink (40%): High volume, low risk. Always acceptable.
- Cyan/Dark Blue (30%): Medium volume, high risk due to thin lines.
- White (20%): Low volume, medium risk. Needed late game.
- Orange/Yellow (10%): Low volume, high urgency. Critical for finishing flowers.
Victory Conditions
To clear Level 118, you must achieve 100% completion of the flower field artwork. This requires melting the ice blocks to unlock the Golden Keys, which in turn unlocks the spawners necessary to get the specific colors (White and Orange) required for the flower centers and petals. You cannot win by simply painting the sky; the stems must be perfect.
2. Color Order and Strategy: The Logic Chain
Winning this level relies on following a strict logic chain. Processing colors in the wrong order—specifically, filling the "20 Block" too early or ignoring the keys—will guarantee a loss. Follow this priority hierarchy to manage your flow.
Priority 1: The Left Ice Block (Blue 3)
Before you do anything else, locate the small ice block sitting on a Blue cup labeled "3". This is your first objective. It requires minimal investment and unlocks the left side of the board. By clearing this immediately, you increase your capacity to handle Blue and Cyan stems, preventing a buildup of these colors in your tray early on.
Priority 2: Pastel Pink (The Safety Valve)
Pink is your best friend in this level. Because the sky is so vast, Pink cups are never truly a waste. Whenever your tray feels cluttered or you are unsure of the next move, tap a Pink cup. It clears space in your tray and adds progress to the easiest part of the painting. Never hold onto Pink cups if you are near capacity; send them to the belt immediately.
Priority 3: The "20" Cyan Block (The Bottleneck)
This is the main event. You must trigger the Cyan "20" block only when you have prepared your tray. The best time to tap this is when you have 2 empty slots in your tray and no urgent Blue cups waiting. Once this block is on the belt, you have a limited window to clear other cups before it clogs the system. Do not tap this until you have cleared the initial wave of easy Pink and White cups.
Priority 4: Stem Definition (Cyan vs. Blue)
The stems require careful separation. You will often have both Cyan and Blue cups available. The logic here is spatial: look at the artwork. If the stems in the lower quadrant are predominantly Cyan, prioritize the Cyan dispenser. Do not flood the belt with Blue if the artwork requires Cyan for the next section. If you are unsure, pause the dispenser and wait for the belt to clear.
Priority 5: Mystery Cups (?)
Once the Right Golden Key is unlocked, Mystery Cups will begin to spawn. These usually yield White or Orange. These are high-value because they finish the level, but dangerous because they are random. Only tap these when you have full control over the conveyor belt. A bad Mystery Cup roll (giving you White when you need Orange) can clog your tray if you aren't careful.
Priority 6: Flower Centers (Orange/Yellow)
Save Orange for the absolute end. The flower centers are small, high-contrast dots. If you paint them too early, you might accidentally cover them with sloppy White petal strokes later. Wait until the stems (Cyan/Blue) and petals (White) are 90% done before finishing with the Orange centers.
3. Step-by-Step Walkthrough: The Critical Path
This is the exact sequence of actions you need to take from the moment the level starts to the moment you finish. Follow these steps in order to avoid the common traps.
Phase 1: The Opening Salvo (0:00 - 0:30)
As soon as the level loads, scan your tray for the Blue Ice (3) cup. Tap it immediately. Do not worry about any other cups. Once it is on the belt, look for the Left Golden Key that appears. Tap the key the second it is clickable. This unlocks the Left Spawners. Now, rapidly tap any Pink cups you see to clear your initial tray and start filling the sky.
Phase 2: The Stem Foundation (0:30 - 1:15)
With the left side unlocked, you will see a stream of Cyan and Blue cups. Your goal here is to draw the connecting lines for the flower stems. Alternate between Cyan and Blue to match the pattern on the screen. Do not send more than two cups of the same color consecutively without checking the belt. If you see the "20" Cyan Ice Block in your tray, do not tap it yet. Keep it in your tray as a "placeholder" to take up a slot while you manage the smaller stem cups.
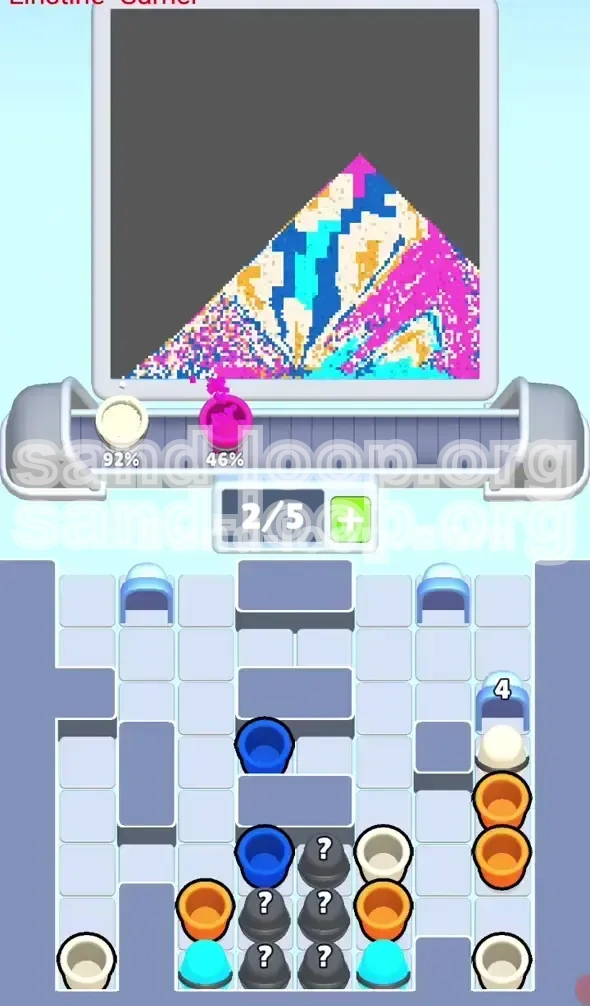
Phase 3: Executing the "20" Block Maneuver (1:15 - 2:00)
This is the most dangerous phase. Ensure your conveyor belt is relatively empty. Now, tap the Cyan Ice (20) cup. For the next minute, this cup will sit under the dispenser, absorbing Cyan sand. During this time, do not send any other Cyan cups. They will stack up behind it. Instead, focus entirely on Pink cups to fill the top sky or White cups if the belt has a gap. Keep your tray count low (3/5 or 4/5) to absorb new spawns.
Phase 4: Unlocking the Right Side (2:00 - 2:30)
Once the "20" block melts, it will unlock the Right Golden Key. Tap this key immediately. This action unlocks the Mystery Cup spawners. This is a turning point in the level. The pressure is now off the stems and onto the flowers. You should have about 60% of the Pink sky done and about 70% of the stems done.
Phase 5: The Mystery and Petal Rush (2:30 - 3:15)
With the right side open, start tapping the Mystery Cups (?). You need a heavy influx of White for the petals. When you get White cups, send them in pairs. If you get Orange, you can either send them (if you have space) or hold one if the flower centers aren't ready yet. The key here is speed—clear the tray rapidly to make room for more Mystery Cups. The "20" block is gone, so your belt flow should be smooth.
Phase 6: The Final Polish (3:15 - End)
You are now in the cleanup phase. The sky is pink, the stems are blue/cyan, and the petals are white. All that remains are the small details. Look for isolated pixels or "stray" colors in your tray. If you have a single Orange cup left, tap it to finish the flower centers. If you have a mixed tray, prioritize the colors that cover the largest remaining gaps. Do not overthink; just empty the tray.
4. Key Tips and Strategic Advice
To maximize your score and minimize frustration, keep these strategic pillars in mind. These tips apply specifically to the mechanics of Level 118.
The "Tray Slot Management" Rule
Always keep one slot in your tray empty. Why? If you have a full tray (5/5) and a "Critical" cup spawns (like a color you desperately need to finish a section), you cannot tap it without first dispatching a cup to the belt. That split-second decision can lead to mistakes. Keeping a buffer slot allows you to react instantly to the board's needs.
Visualizing the Layers
Think of the painting in layers. Layer 1 (Bottom) is Stems (Cyan/Blue). Layer 2 (Middle) is Petals (White). Layer 3 (Top) is Sky (Pink). Layer 4 (Detail) is Centers (Orange). Never work on a higher layer if a lower layer is messy. For example, don't paint White petals over an unfinished stem, or the stem color might bleed into the petal area visually.
The Ice Block Timer
Internalize the timing of the "20" block. It takes roughly the equivalent of 4 standard cups to fill. Use this mental timer. If you send the "20" block, count to 4 in your head. During that count, resist the urge to queue up more cups. Use that time to survey the board and plan your next 3 moves.
Belt Velocity Awareness
The conveyor belt moves at a constant speed, but the "processing" time varies. The "20" block effectively reduces your belt velocity to zero for that specific color. Treat the belt as a limited resource. If the belt is full, you lose the ability to control the order of painting. Only dispatch a cup if the destination dispenser is free or moving fast.
Utilizing the "Holding" Strategy
Sometimes, holding onto a cup is better than sending it. If you have a White cup but the White area on the canvas is tiny and not yet accessible (blocked by unfinished stems), keep that White cup in your tray. It serves as a "reservation" for that color, preventing you from accidentally filling that slot with a useless color later.
Pre-Blast Preparation
Before you unlock the Right Side (Phase 4), try to have your tray as empty as possible. The moment you unlock the Mystery Cups, the game speed picks up. Entering this phase with a full tray leads to chaos. Entering with an empty tray leads to a rapid-fire victory.
5. Common Mistakes and How to Avoid Them
Every player loses this level a few times before figuring out the tricks. Here are the most common reasons for failure and how to fix them.
Mistake #1: The Early "20" Trigger
Many players see the ice block and think, "I need to get rid of this big obstacle immediately." They tap it as the first move. This is fatal. It blocks the belt while you are still trying to sort out your basic Pink and Blue flows. By the time it melts, your tray is a mess of mixed colors, and the left key isn't even unlocked yet. Fix: Always clear the "3" Blue Ice and Pink sky first.
Mistake #2: Queue Congestion Behind the Block
You trigger the "20" block correctly, but then you keep sending other cups behind it. Suddenly, you have a line of 4 cups stuck behind the slow-moving block. You cannot cancel them. You are stuck watching the slow animation while your tray fills up with new spawns you can't handle. Fix: When the "20" block is on the belt, treat that lane as closed. Send colors to different dispensers or wait.
Mistake #3: Neglecting the Mystery Cups
Some players are so relieved to have the stems done that they ignore the Mystery Cups, trying to finish the remaining Pink sky instead. Then they run out of paint because the Mystery Cups hold the necessary White/Orange for the flowers. Fix: As soon as the Right Key is used, Mystery Cups become your #1 priority.
Mistake #4: Precision Failure on Stems
Sending too many Blue cups at once can result in "overfilling" the stem areas, causing the sand to bleed into the White petal zones. While Sand Loop is forgiving, gross overfilling can make the end game tedious as you wait for exact pixels to clear. Fix: Alternate stem colors (Blue -> Cyan -> Blue) to keep the lines sharp.
Mistake #5: Panic Tapping
When the tray gets full and the belt is stuck, players often start tapping random cups out of panic. This usually results in sending a color you don't need (like Orange) to a dispenser that is already busy, wasting valuable seconds. Fix: If you are stuck, pause. Look for the Left or Right Golden Key—did you miss a tap? Usually, clearing a key unlocks a new outlet for your overflow.
6. Speed Run Tips and Stuck Solutions
For those looking to achieve the fastest time or those who are currently stuck and need a way out, this section provides advanced techniques.
What To Do If You Are Stuck
If you are mid-level and the belt is jammed, check your keys. Did the Left Key pop but you didn't tap it? Tapping a key often clears immediate visual clutter. If you are truly stuck with a full tray and a full belt, you have no choice but to wait for the current cup to finish. Use this time to aggressively plan your next 5 taps. Do not random tap.
Speed Run: The "Double Tap" Technique
Advanced players use a technique called "Double Tapping" for the Pink sky. Since the sky requires no precision, you can tap two Pink cups in rapid succession, sending them to the belt one after another. This keeps the dispenser constantly flowing without pause, shaving seconds off your clock. Only do this with Pink.
Speed Run: Pre-Loading the Tray
Before unlocking the Right Side, try to have your tray contain 1 White and 1 Orange cup. When the Mystery Cups spawn, if they give you colors you don't want, you already have the essentials in your tray to immediately finish the flower details without waiting for RNG (Random Number Generation) luck.
Shortcuts: Skipping Non-Essential Painting
While you need 100% to finish, you don't need to be meticulous. The Pink sky can be filled in broad, messy strokes. The algorithm usually fills adjacent pixels. Don't worry about covering every single pixel of the sky perfectly; focus on the clusters. The game's "splash" mechanic will often finish the job for you.
Advanced Key Management
The keys appear for a limited time. If you are too slow, they fade. Always prioritize the Key over a cup. The Key unlocks a multiplier of resources (new spawners), whereas a cup is a single unit of resource. Missing a key is the biggest time loss possible in this level.