
Level 137
EXPERTHow to solve Sand Loop level 137? Get instant solution for Sand Loop 137 with our step by step solution & video walkthrough. Sand Loop 137 tips and guide.
Play Sand Loop Now
Experience the puzzle challenge firsthand
Game Screenshots

Sand Loop Level Guides
Level 137 Strategy Guide: Mastering the Neon Snail Traffic Jam
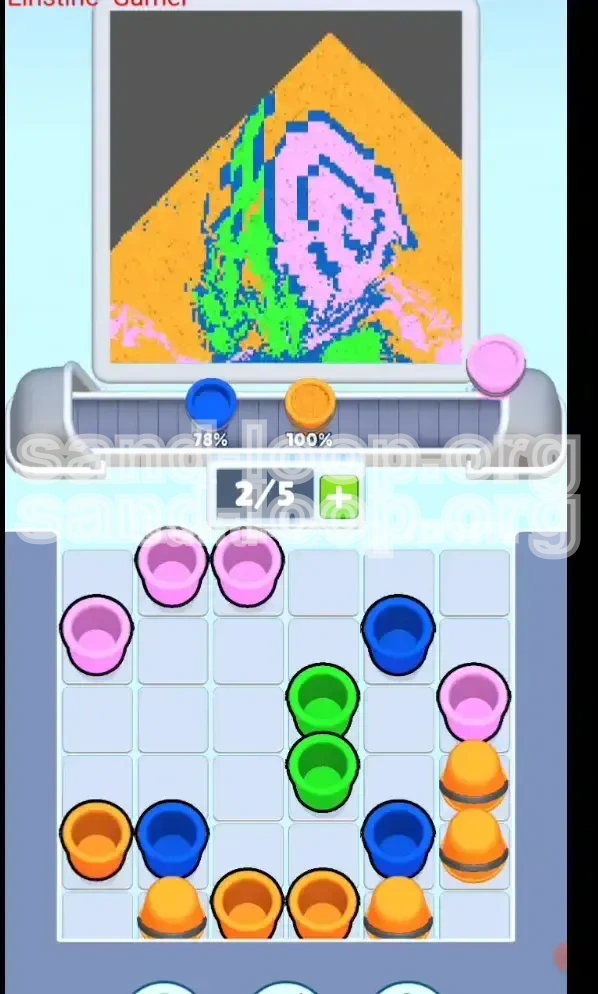
Welcome to the most congested level you have faced in Sand Loop so far. Level 137, titled "The Neon Snail," is less about artistic flair and more about logistical management. Unlike previous stages where you could pick and choose your colors freely, this level locks you into a rigid opening sequence. The challenge here is managing the "Supply Chain Crisis"—your tray is packed so tight that one wrong move creates an unsolvable deadlock. The visual complexity is moderate, featuring a vibrant pixel-art snail against a striped background, but the physical constraints of the cup tray will test your patience and planning skills.
Analyzing the "Neon Snail" Canvas
Before you tap a single cup, you need to understand what you are building. The canvas is divided into four distinct color zones. You have the Bright Green body of the snail occupying the center-left. You have the Light Pink shell and the alternating background stripes taking up the majority of the top and bottom real estate. You have Orange filling the remaining horizontal stripes in the background. Finally, you have Dark Blue, which is used sparingly but critically for the snail's outline, the spiral of the shell, and the eyes. The difficulty arises because the Blue cups, which are usually your starting point for outlines, are buried deep within the tray.
The "Zero-Wiggle Room" Supply Tray
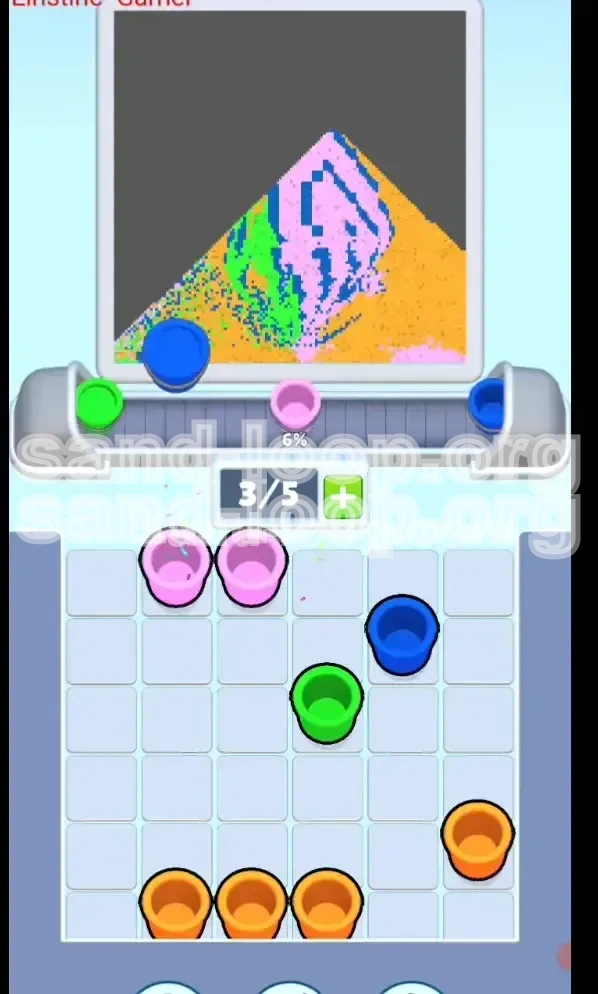
The defining feature of Level 137 is the U-Shape Lock Pattern in your supply tray. If you look closely at the starting grid, you will see that the Green cups are surrounded by Blue and Pink cups, which are in turn boxed in by Orange cups at the corners. There is virtually no space to shuffle cups around. The top row consists entirely of Light Pink cups, blocking access to everything underneath. This means you cannot start with the Dark Blue outline as you normally would. The game forces you to break standard protocol immediately.
Capacity and Dispenser Mechanics
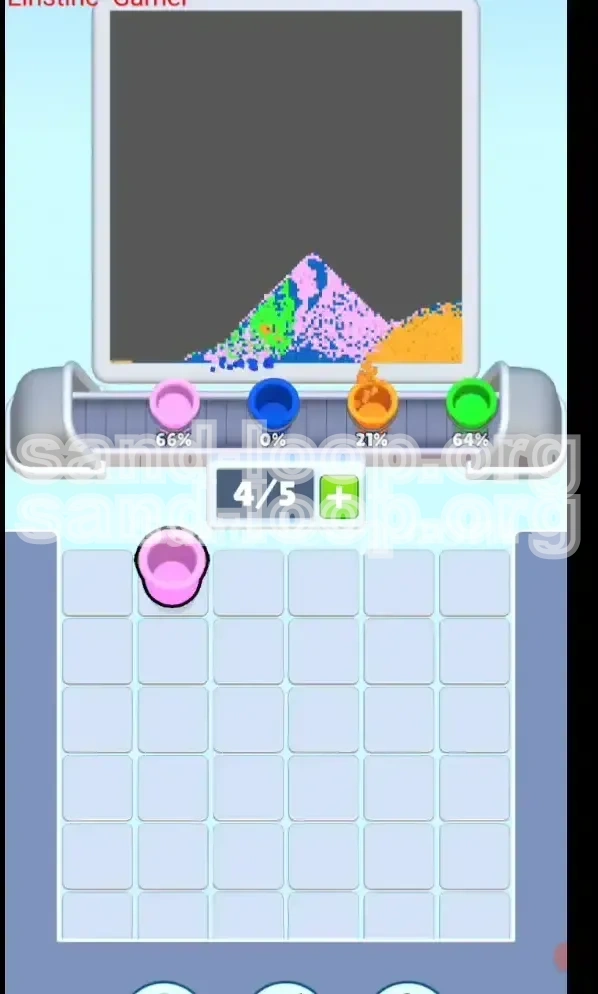
In this level, you are working with a 0/5 slot capacity. This is a double-edged sword. On one hand, five slots allow you to preload multiple cups to prepare for a complex sequence. On the other hand, if you fill your slots with the wrong colors (e.g., filling up on Orange when you need Blue), you will have no way to access the buried cups you need. The dispenser nozzle moves rhythmically, and your job is to sync your cup releases with its position. Speed is not the goal; precision release is.
The "Backwards" Logic of This Level
Standard Sand Loop strategy dictates "Outlines First, Fill Second." Level 137 breaks this rule. Because the Blue outline cups are trapped under the top row of Pink cups, you are forced to pour background or shell colors *before* you can define the edges. This creates a risk of color bleeding. If you pour the Pink shell first, you must be incredibly careful that your subsequent Blue pours don't get lost in the Pink field. You must mentally invert your usual workflow: Fill the background to unlock the tools to finish the details.
Success Metrics and Objectives
To achieve a perfect clear on Level 137, your objective is not just to fill the canvas, but to do so without getting stuck. A "deadlock" occurs when you have a full slot of cups, but none of them can be used effectively, and the remaining cups in the tray are inaccessible. You need to maintain a constant flow of "Unlocks"—every time you pour a cup, it should ideally expose a color you need next. Your success metric here is efficiency: can you clear the top Pink block, access the Blue, and finish the Green body without leaving stray cups that block your final moves?
Decoding the Color Palette and Fill Order
The colors in Level 137 are not just aesthetic choices; they represent a hierarchy of access. You cannot treat them equally. Understanding which color is the "Key" and which is the "Lock" is the secret to beating this level. We will break down the specific utility of each hue and the order in which you must tackle them to avoid trapping yourself.
Priority 1: Light Pink (The Key)
Light Pink is the most critical color because it is the only one freely available at the start. It is used for the snail's shell and the top and bottom horizontal bands of the background. This color is your "Key" because it forms the ceiling of the cup grid. You have a high volume of Pink cups (roughly 40% of the tray), so you do not need to be conservative with them. In fact, using them aggressively is the only way to dig down to the other colors. Think of Pink as your excavation tool.
Priority 2: Dark Blue (The Outline)
Dark Blue is the "Lock" pick. It is the second most important color, despite occupying the least amount of space on the canvas (likely less than 15% surface area). It is used for the thin outline of the snail's body, the spiral on the shell, and the eyes. The challenge with Blue is that it is buried under the initial Pink layer. Once you access it, you must pour it quickly while the nozzle is in the right position, but you must also stop pouring to switch back to Green. You cannot "save" Blue for the very end; you must integrate it as soon as it is unearthed.
Priority 3: Bright Green (The Body)
Bright Green is the "Fill" color. It occupies the main body of the snail. It is located in the center of the tray, effectively insulated by the Pink and Blue cups. This is the most straightforward color to paint, as it requires broad strokes rather than precise lines. However, you must be careful not to pour Green over the snail's eyes. If you flood the head area with Green before you have placed the Blue eyes, you will fail the level. Green must wait until the Blue eyes are secured.
Priority 4: Orange (The Background)
Orange is the "Filler" color. It creates the horizontal stripes between the Pink bands in the background. This color is located at the bottom corners of the tray, buried the deepest. It is the least critical color because the Orange stripes are isolated and wide. You can pour Orange almost anytime the nozzle passes over the middle section of the canvas, provided you haven't already messed up the layer order. Orange is your "cleanup" color—use it to clear the tray once the main image is defined.
The Risk of Color Bleeding
The biggest risk in this palette is the Pink and Blue interaction. Since you must pour Pink (Light) before Blue (Dark), you risk the Blue sand sinking into the Pink layer and losing contrast. To counter this, you need to use the "Gap Method." When you pour your initial Pink, leave a tiny bit of room (about 5-10% capacity) in that section of the canvas. When you eventually pour the Blue, it will sit on top or mix sharply, defining the spiral. If you simply fill the area to 100% Pink immediately, the Blue outline will vanish.
Step-by-Step Walkthrough: Executing the Solution
This is the actionable portion of the guide. Follow these steps in order. Do not skip steps, and do not try to rush. The logic here builds upon itself. We will navigate the tray grid column by column, ensuring that every cup you pull exposes the next necessary color.
Step 1: The "Pink Curtain" Drop
As soon as the level starts, ignore the Green body. Ignore the Orange stripes. Your eyes must be on the top row of the tray. You will see a solid wall of 4 to 6 Pink cups. Tap them immediately. Add them to your conveyor queue. Do not worry about where the nozzle is right now. Your primary goal is to create physical space in the tray. As these Pink cups move to the dispenser, the heavy blockade pressing down on the Blue cups will be relieved. Wait for the nozzle to align with the top or bottom background bands, then release these Pink cups to start filling the canvas background.
Step 2: Unearthing the Blue "Treasure"
Once the top row of Pink is cleared, look at the "Next Row" in the tray. You should now see the tips of the Dark Blue cups exposed. Do not pour any more Pink if you can avoid it. Switch your focus immediately to these Blue cups. Tap them to add them to your queue behind the Pink ones. Now, watch the dispenser nozzle like a hawk. You want to release the Blue sand only when the nozzle is directly over the snail's shell spiral or the edge of the body. If the nozzle is over a blank background area, hold the cup. You have a 5-slot capacity, so use the buffer time to wait for the perfect position. This creates the crisp outline that defines the snail.
Step 3: Securing the "Eyes" Detail
This is a micro-step that many miss. While you are handling the Blue cups, pay attention to the snail's head area. The eyes are tiny dots of Blue inside the Green head. Before you flood the head with Green, you must ensure these Blue dots are placed. If you haven't placed the eyes yet, pause your Green pouring. Force the dispenser to hit the head area with a Blue cup. Only once those pixel-perfect dots are placed should you consider moving to the main body fill. If you paint the head Green first, you effectively seal the eyes shut.
Step 4: The Green Body Injection
With the Blue cups extracted and the eyes placed, the central mass of Green cups is now accessible in the tray. The nozzle should be moving toward the center of the canvas where the snail's body lies. Tap a cluster of Green cups (usually 4 to 6 of them) to fill your slots. Since the body is a large, contiguous shape, you have more margin for error here. Release the Green cups steadily. Do not dump them all at once if the nozzle drifts too close to the shell edges; you want to avoid Green mixing with the Pink shell. Keep the Green contained within the outline you drew in Step 2.
Step 5: Digging for the Orange Cornerstones
By now, the top half of your tray should be empty, and the middle Green section cleared. This leaves the bottom corners, which hold the Orange cups. These are the hardest to reach because they were at the bottom of the "U" shape. You might need to shuffle any remaining Pink or Blue side cups to get to them. Once you tap the Orange cups, they are low priority. You can send them to the conveyor. When the nozzle passes over the middle background stripes, release the Orange. If the Orange stripes are already full, you can use these cups as "burners"—pour them into already-finished areas just to clear your slot capacity, but be careful not to overflow the canvas.
Step 6: The Final Cleanup and Fill
At this stage, the canvas is likely 90% complete. You might have a few sparse Pink cups remaining in the side columns or a final Green cup for the tail. Check the "Current/Total" counter. If you are at 4/5 cups in the conveyor, look at the canvas. Is there a specific empty spot? Use the remaining cups to fill that spot. If the tray is nearly empty but the canvas isn't perfect, use the last few pours to "touch up" the lightest areas. Often, a final splash of Pink on the shell will cover any minor imperfections in the Blue spiral.
Pro Tips: Common Mistakes to Avoid
Even with a strategy, Level 137 can go wrong in a heartbeat. Most failures in this stage are caused by impatience or misunderstanding the physics of the sand pile. Here are the specific pitfalls that trap players in the "Traffic Jam" and how to steer clear of them.
Mistake 1: The "Blue Starvation" Trap
The most common way to fail is by using up all your easily accessible Pink cups to fill the background, leaving you with a full slot of Green but no Blue to do the outline. Because the Blue cups are buried, if you fill your conveyor with 5 Green cups prematurely, you might block the tray and be unable to reach the Blue at all. Always ensure you have "pathways" open to the Blue cups before filling your slots with other colors. A good rule of thumb is to never have more than 2 non-Blue cups in your queue until the Blue outline is finished.
Mistake 2: Overfilling the Shell Spiral
The snail's shell is a spiral. If you treat it like a bucket and just dump Pink sand into it until it's full, you lose the spiral definition. The spiral needs to be a line of Blue (or empty space) winding through the Pink. When you are pouring the initial Pink layer for the shell, stop at about 80% capacity. Leave room for the Blue to trace the spiral line. If you fill it 100% with Pink first, the Blue will just sit on top like a dot, rather than looking like a spiral groove.
Mistake 3: Ignoring the Nozzle Position
In lower levels, you could get away with pouring cups whenever your slots were full. In Level 137, the nozzle position is critical because the color zones are narrow. Pouring a Blue cup when the nozzle is over the Orange stripe is a waste of a rare resource. Since the cups return to the tray slowly (or are consumed), wasting a Blue cup can mean waiting 30 seconds for another cycle, which might be enough time for your conveyor to jam. Be patient: hold the cup until the nozzle is in the right "zone."
Mistake 4: The "Green Flood" Error
Players love filling things in. The Green body is satisfying to pour. However, if you pour the Green body before the snail's eyes (Blue dots) are placed, you create a logical contradiction. The eyes *must* be inside the head. If the head is already Green, where do the eyes go? You would have to pour Blue on top of Green, which often looks muddy. Always place the "Details" (Blue) on the empty canvas, *then* place the "Fill" (Green) around them. This ensures crisp, pixel-perfect edges.
Mistake 5: Mismanaging the 0/5 Capacity
Having 5 slots is tempting. You might think, "Great, I can load up all my colors at once!" But loading 5 different colors limits your flexibility. If you have 5 cups in the queue, you cannot tap any new cups in the tray until you pour one. If the nozzle is in a bad position, you are stuck watching it go round and round. It is often better to keep 2 or 3 slots open. This gives you the agility to tap a newly exposed cup without waiting for the nozzle to align with your current load.
Stuck Solutions & Speed Run Strategies
So you followed the guide, but something went wrong. Maybe the cups shuffled weirdly, or maybe you just want to finish this level in record time to get three stars. This section covers emergency procedures for when you are boxed in, and shortcuts for players who want to optimize their play.
Emergency Fix: The "Soft Lock" Release
If you find yourself in a "Soft Lock"—where you have cups in your slots but none of them match the nozzle's current position—you need to force a reset. Stop tapping new cups. Look at your conveyor. Is there a color that can go *somewhere* without ruining the picture? For example, if you have an Orange cup and the nozzle is over the Green body, pour the Orange there anyway. It will look ugly, but it might free up the slot to get the Blue cup you actually need. You can fix the ugly spot later if you have a spare cup, but getting the flow moving again is priority #1.
What to Do If Blue Is Buried Forever
In rare shuffles, the Blue cups might end up at the very bottom of a stack that is covered by heavy Green cups that you can't move. If this happens, you have to "Burn" the tray. This means aggressively tapping the Green cups to get them out of the way, even if it means overfilling the Green body on the canvas. It is better to have an overfilled Green body and access to the Blue outlines, than a perfect Green body and no way to outline the shell. Sacrifice the perfection of one layer to save the level.
Speed Running: The "Blind Tap" Method
For advanced players looking to speed run, you can use the "Blind Tap" method. As soon as the level loads, start tapping the top row of Pink cups without even looking at the canvas. You know they are there. Immediately tap the Blue cups in the second row as soon as the Pink clears. You don't need to wait for the nozzle to align perfectly before tapping; you can load your conveyor *while* the previous cups are pouring. This "Queuing" strategy shaves seconds off your time, ensuring that as soon as one color finishes, the next is ready to go.
Shortcuts: Using Orange as a Buffer
If you are waiting for the nozzle to travel from the top (Pink zone) to the bottom (Green zone), use the middle (Orange zone) as a buffer. If you have an Orange cup in your slot, pour it while the nozzle is transitioning. This prevents "dead air" time where the nozzle is moving but no sand is coming out. Keeping the conveyor constantly moving is the key to a fast time. Even a half-second of idle movement adds up over a 2-minute level.
Optimizing for 100% Completion
To get the perfect score, you must fill the canvas to 100% without overflow. The hardest part to fill 100% is usually the corners of the background stripes. Once the main snail is done, don't just finish the level. Look at the "Current/Total" counter. If it says 98%, you have a tiny gap somewhere. Use a spare cup to scan the edges of the canvas. A common miss spot is the very tip of the snail's tail or the outer rim of the shell spiral. A quick tap of a Pink or Green cup usually fixes this.