
Level 343
HARDHow to solve Sand Loop level 343? Get instant solution for Sand Loop 343 with our step by step solution & video walkthrough. Sand Loop 343 tips and guide.
Play Sand Loop Now
Experience the puzzle challenge firsthand
Game Screenshots
Sand Loop Level Guides
Sand Loop Level 343: Complete Ice Skate Strategy Guide
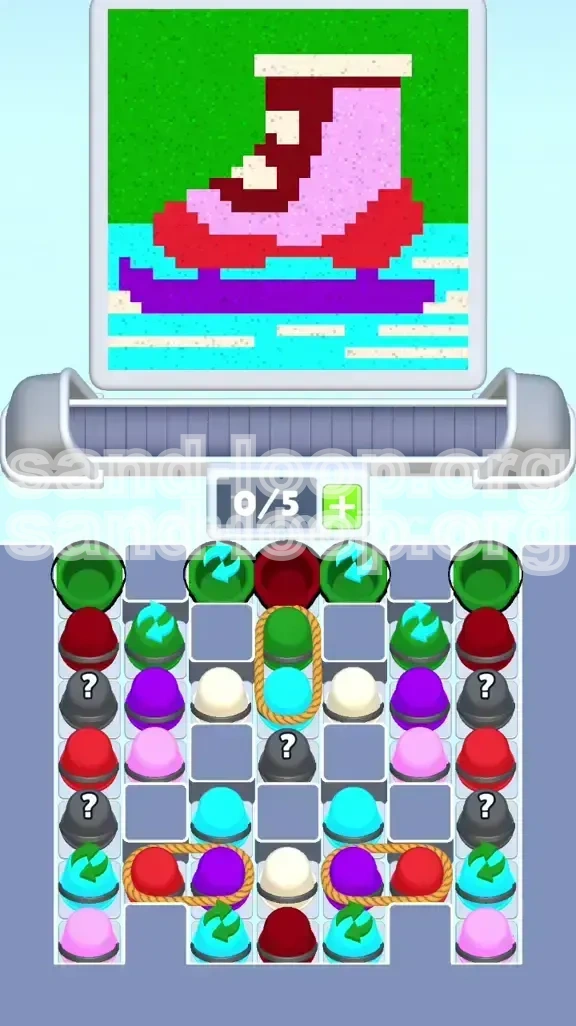
Welcome to the ultimate walkthrough for Level 343 in Sand Loop. This stage presents a unique artistic challenge: painting a detailed Ice Skate pixel art against a dual-tone background. Unlike faster-paced levels, this is a logic puzzle that tests your ability to manage color layers and navigate complex rope mechanics within the supply tray. This guide will break down every aspect of the level, from color mixing theory to the precise order of operations needed to secure a "Perfect" rating.
Level Overview: The Ice Skate Challenge
Level 343 is a medium-difficulty logic stage that prioritizes precision over speed. The canvas depicts a winter scene featuring a single ice skate, requiring you to carefully stack colors to create depth without bleeding shades into the wrong areas. The main difficulty arises from the "Vertical Rope" mechanic in the tray, which forces you to manage your conveyor belt slots aggressively. You are not just filling colors; you are excavating them from a cluttered pile of mystery cups and roped pairs.
Primary Objective: Layering the Skate
Your main goal is to construct the ice skate from the bottom up. This requires establishing the purple blade on the canvas before the surrounding cyan "ice" background covers it. If you pour the cyan ice layer first, you will bury the blade's thin pixel line, making it impossible to fill correctly later. The objective is to keep the blade distinct while filling the rest of the boot.
The Slot Economy Problem
This level introduces a strict resource management challenge known as the "Slot Economy." Because multiple colors are tied together with ropes (Green/Cyan, Red/Purple), you often need two empty slots on your conveyor belt simultaneously to fetch them. If your belt is full (5 slots), tapping a roped pair will do nothing, causing frustration and timer loss.
Visual Analysis of the Canvas
The image is divided into two distinct zones: the Top Background (Green/Sky) and the Bottom Foreground (Cyan/Ice). Nestled in the bottom center is the skate. The skate uses three colors (Pink, Red, Purple) and features tiny details in White (laces). Understanding this vertical split is crucial, as the tray will try to force you to take background colors before foreground details.
The Vertical Rope Obstacle
The most significant physical obstacle in the tray is a vertical rope connecting a Green cup in the second row to a Cyan cup deep in the fifth row. This connection creates a "dependency nightmare." You cannot grab the Cyan without also taking the Green, and you cannot grab either if you don't manage your belt space to accommodate two cups dropping at once.
Danger Zones
There are two critical areas where runs are often ruined. The first is the Purple Blade: a 1-pixel wide strip at the very bottom. If this is overfilled by Cyan, the level fails. The second is the White Laces: small, isolated pixel clusters in the center of the boot. These are easily flooded by the Pink body color if not protected or filled early.
Why Speed Matters (Eventually)
While this is a logic stage, the timer is still tight. The challenge isn't just thinking; it's the delay caused by the tray mechanics. Every time you have to wait for a cup to pour or shuffle your belt, you lose seconds. Efficient movement is required to clear the "overburden" (useless top colors) to reach the critical colors at the bottom of the tray.
Step-by-Step Walkthrough Instructions
This section provides a linear path to conquering the level. Follow these steps in order to minimize confusion and prevent color bleeding.
Phase 1: Clearing the "Overburden" (Top Rows)
The top two rows of the tray are mostly filled with Green Loop cups and Mystery cups. You must clear these to reach the useful colors underneath.
- Tap Green Loop Cups (Top Left/Right): Start by grabbing the Green cups on the top edges. Send them to the belt immediately. This begins filling the top "Sky" background.
- Isolate the Dark Red Cup: Look for the single Dark Red cup in the top center row. Tap this next. It is likely part of the boot's trim and is safe to pour early.
- Reveal Mystery Cups: The second row contains Grey Mystery cups. Clear the cups directly above them. This reveals if they are Pink or Red, allowing you to plan your belt usage.
- Initial Pour Strategy: Pour the Green and Dark Red cups. Do not worry about the Pink yet; you need to save belt space for the upcoming roped pairs.
Phase 2: The Vertical Rope Maneuver
Once the top is cleared, you will see the Vertical Rope connecting Green and Cyan in the center column.
- Check Your Slots: Ensure your conveyor belt has at least 2 empty slots. If you have 4 or 5 cups, pour or dispose of them immediately.
- Tap the Roped Pair: Tap the center column. The Green and Cyan cups will drop onto the belt simultaneously.
- Prioritize the Green: Pour the Green cup first to finish the top background. This gets it out of the way.
- Hold the Cyan: CRITICAL: Do not pour the Cyan cup yet! It is for the ice background. If you pour it now, you will bury the Purple blade area. Keep it on the belt as a "placeholder" to occupy a slot until you are ready for the final phase.
Phase 3: The Boot Builders (Horizontal Ropes)
At the bottom of the tray, you will find Red and Purple cups connected by horizontal ropes. These are essential for the skate.
- Locate the Red/Purple Pair: Find the ropes connecting the Dark Red (trim) and Purple (blade) cups.
- Clear the Belt: Again, ensure you have two empty slots. You might need to pour the held Cyan cup temporarily if space is tight, but only if the Purple blade area is already secured (which it usually isn't at this stage). Better strategy: Pour any accumulated Pink/Red cups first.
- Fetch the Pair: Tap the roped pair to bring them to the belt.
- Execute the Purple Blade First: Before dealing with the Red or the rest of the boot, pour the Purple cup. Target the bottom center of the canvas to establish the blade line.
Phase 4: Body Work and Laces
With the blade established, you can safely fill the rest of the boot.
- Fill the Pink Body: Grab the Pink cups from the tray. Pour them to fill the main body of the skate.
- Watch the White Laces: As you pour Pink, be careful not to overflow the tiny White pixel clusters in the middle. If the White laces are already filled (from Mystery Cups), you can be aggressive. If not, pour slowly or stop just short of the lace area.
- Dark Red Trim: Use the Dark Red cup you fetched earlier (or the one from the rope pair) to define the heel and toe cap.
- Check for Gaps: Inspect the boot. There should be no Green or Cyan bleeding into the Pink/Red areas.
Phase 5: The Ice Background Finale
Now that the skate is fully defined and floating in space, you can create the environment.
- Release the Cyan: Remember that Cyan cup from Phase 2? Now is the time. Pour it to fill the bottom "Ice" background.
- Flood the Tray: By now, the tray should be mostly empty of useful colors. Grab any remaining Cyan cups.
- Fine-Tuning: The Cyan background is forgiving. You can pour it rapidly to fill the remaining voids around the blade.
- White Scratches: If there are White pixel "scratches" on the ice that haven't filled, a heavy stream of Cyan usually pushes the white sand into place or covers it sufficiently to pass the level.
Color Processing Order Guide
The order in which you process colors is the single most important factor in achieving a Perfect rating. Here is the optimal hierarchy:
1. Priority Alpha: Purple (The Blade)
Purple is the foundation of the level. It represents the metal blade of the skate. Because it is a thin line at the very bottom of the image, it is extremely vulnerable to being overwritten by the larger Cyan background. You must process Purple first, or immediately after the initial Green clear, to ensure the pixels stick.
2. Priority Beta: Dark Red (The Structure)
Dark Red serves as the outline for the heel and toe cap. Processing this early helps define the boundaries of the boot. If you fill the Pink body first, you might lose the contrast needed to see where the Red trim goes. Treat Dark Red as the "skeleton" of the skate.
3. Priority Gamma: Pastel Pink (The Body)
Pink is the "meat" of the image. It takes up the most space on the boot. It is safer to process Pink after the Purple and Red outlines are in place. This prevents the Pink from spilling into the blade area or blending into the background.
4. Priority Delta: White (The Details)
White is used for the laces and scratches. These are often found in Mystery cups. You should process these whenever they appear, but be careful not to let them get contaminated by the wet Pink or Red sand. Ideally, fill White slots before flooding the adjacent Pink areas.
5. Priority Epsilon: Cyan (The Ice)
Cyan is the "Great Flood." It takes up the entire bottom background. It must be processed last. Why? Because once the ice is filled, it becomes very difficult to add pixels to the blade or the bottom of the boot without messing up the smooth ice surface. Save Cyan for the final 20% of the level.
6. Priority Omega: Green (The Sky)
Green is the "Overburden." While it needs to be filled, it is mechanically the easiest because it sits at the very top, isolated from the complex layering of the skate. You process Green first just to get it out of the way, clearing the tray for the harder colors below.
Key Tips and Notes for Mastery
These tips will help you transition from just passing the level to mastering it.
Mystery Cup Management
Don't treat Mystery cups (Grey cups with '?') as random. In Level 343, they are strategically placed to hide the White laces or extra Pink/Red trim. Always clear the cup sitting directly on top of a Mystery cup first. This "reveals" the color without committing it to your belt. If it's White, grab it immediately before it gets buried by a large Pink pour.
The "Two-Slot" Buffer Rule
Make it a habit to keep 2 empty slots on your conveyor belt at all times after the first 10 seconds. This is your "buffer." If you maintain this buffer, you can instantly react to roped pairs (Vertical or Horizontal) without having to stop and pour three cups just to make room. This single habit prevents 90% of the "stuck tray" situations in this level.
Dealing with "Wet" Sand
When you pour a color, it remains "wet" for a few seconds. You can use this to your advantage. If you pour the Purple blade, and immediately follow it with a thin stream of Dark Red, the colors will blend slightly at the edge, creating a smoother transition than if you let the Purple dry completely. This is useful for the connection between the blade and the heel.
Visualizing the Negative Space
Don't just look at the skate; look at the space around it. The Cyan ice must act as a negative space frame for the Purple blade. If you visualize the Cyan rectangle *around* the blade first, you are less likely to pour carelessly. Imagine a box where the blade goes, and ensure that box is Purple before you let Cyan touch it.
Conveyor Belt Loading
Do not feel pressured to load your belt to maximum capacity (5 cups) immediately. In the early game, load 3 cups (Green, Red, Mystery). Pour them. Then load the next batch. Keeping the belt lighter allows you to pivot quickly if the Vertical Rope becomes available. A heavy belt is a slow belt.
Pre-emptive Pouring
If you have a Green cup on the belt and the tap is cooling down (refilling), pour the Green immediately even if you aren't perfectly finished with the top corner. It is better to have 95% of the Green filled and an empty slot for a sudden rope drop than to have 100% Green filled and miss the Purple cup because your belt was full.
Common Mistakes to Avoid
Learn from the errors that commonly cause players to fail or restart Level 343.
The "Cyan Flood" Error
This is the number one killer. Players see Cyan cups and instinctively pour them to clear space. Do not do this. Pouring Cyan before the Purple blade is established guarantees a restart. The thin Purple line will be lost under the Cyan, and no amount of trying to "draw" it back will work. Treat Cyan as radioactive until the boot is done.
The "Full Belt" Stall
You see the Vertical Rope (Green/Cyan) ready to drop. You tap it. Nothing happens. You tap again. Nothing. You panic. This happens because your belt has 5 cups. You are now stuck watching the timer tick down while you frantically pour cups to make space. Always anticipate the rope drops and clear slots beforehand.
Ignoring the White Laces
The White laces are small. Many players ignore them, planning to "fill them in later." However, late in the level, you will be flooding the area with Pink and Cyan. Once those heavy colors are down, adding a tiny drop of White is nearly impossible without spilling over. Fill the White details as soon as the Mystery cups reveal them.
Wasting the Vertical Rope's Green
When you pull the Vertical Rope, you get a Green and a Cyan. A common mistake is pouring the Green immediately (good) but then leaving the Cyan sitting on the belt taking up space (bad). While you shouldn't pour the Cyan *onto the canvas*, you should "dispose" of it (drag it off the belt) if it is blocking you from grabbing a critical Red or Purple cup. Don't let a held Cyan cup clog your logistics.
Mixing Trim and Body Colors
Don't try to fill the Dark Red trim and the Pastel Pink body simultaneously. Switching back and forth between them on the belt often leads to accidental cross-contamination where the Red spills onto the Pink body. Finish one color segment (e.g., all the Red trim) before moving to the next (the Pink body).
Misjudging the Mystery Cup Timer
Mystery cups have a short delay before they reveal their color. A common mistake is tapping a Mystery cup and then immediately tapping a roped pair next to it. The game might register the tap on the pair first, pulling two cups to your belt, and then the Mystery cup reveals, but you have no room for it. Always reveal Mysteries *before* triggering complex rope pulls.
What to Do If You Get Stuck
Even with a plan, things can go wrong. Here is your emergency recovery guide.
Stuck with No Matches?
Sometimes the tray seems to offer nothing but Green and Cyan, but your boot isn't finished. Solution: Look closer at the remaining pile. There are likely Mystery Cups hiding at the bottom of the stack. You must tap the cups above them (even if they are "wrong" colors) to excavate the Mysteries. Temporarily load the wrong colors onto your belt, then drag them to the trash/bin (if available) or just pour them into a safe corner to clear the belt.
The "Buried Blade" Crisis
You accidentally poured Cyan too early, and the Purple blade is half-gone. Solution: You have a small window of opportunity. Immediately stop pouring Cyan. Look for a Purple cup. If you pour Purple *now*, it will mix with the wet Cyan to create a dark, muddy blue. This won't pass. You need to restart. However, if only a *tiny* corner is buried, you can try to over-pour the Purple to widen the blade slightly, eating into the Cyan space. This is risky but better than a guaranteed fail.
Conveyor Belt Traffic Jam
Your belt is full of cups you don't need (e.g., three Greens), and you need a Purple that is now available in the tray. Solution: Rapid fire pouring. Tap the nozzle to pour the Greens as fast as possible into the top section (which is likely already full). Even if the Green overfills slightly in the top corner, it's better than losing the level because you couldn't grab the Purple. Prioritize getting the critical colors (Purple/Red) over perfecting the easy ones (Green).
Missing the White Laces
You reached the end of the level and the White laces are still empty, but the surrounding area is already filled with Pink. Solution: This is tough. You have to try to "sneak" the White sand in. Tap the White cup lightly to get a single pixel drop, rather than a stream. Aim precisely for the lace hole. If the Pink is still wet, the White will displace it. If the Pink is dry, you are likely stuck. In future runs, prioritize White.
Timer Running Out with Full Tray
You have 30 seconds left, but the bottom half of the tray is still full of roped pairs. Solution: Stop trying to be precise. Abandon the "2-slot buffer" rule. Start tapping roped pairs wildly. Yes, you might overfill, but you need volume on the belt to beat the clock. Pour colors in broad strokes. The game is lenient on minor overfills if the core structure is correct. Speed > Perfection in this specific emergency scenario.
Glitched Rope Physics
Occasionally, a rope pair might visually look ready but won't drop. Solution: This is usually a visual desync. Tap the cup *above* the rope pair once. This often resets the physics check for the row below. Then try tapping the rope pair again.
Speed Run and Shortcuts
Once you have mastered the logic, use these strategies to shave seconds off your time.
The "Quick Tap" Vertical Rope
Advanced players don't wait for the belt to empty completely. They use the "Quick Tap" method. As soon as the Vertical Rope (Green/Cyan) is exposed, tap it. The moment the two cups hit the belt, tap the Green cup to pour it immediately. This leaves only the Cyan cup on the belt, effectively using the rope mechanic to transport the Cyan to a safe holding position while freeing up the slot for the next grab.
Pre-Filling the Boot
If you have a good memory of the pixel art, you can start filling the Pink body of the boot before the Dark Red trim is 100% finished. Since the Pink covers a large area, you can pour aggressively in the center of the boot, leaving the edges (where the Red goes) slightly empty. This allows you to clear Pink cups from the tray faster, revealing the deeper colors sooner.
Bulk Dumping Green
Don't tap individual Green cups on the top left and right. Tap one, then immediately tap the other. Get them both on the belt. Then pour them in rapid succession. Treating the top background as a single "bulk task" rather than individual cup tasks saves several seconds of animation time.
The Mystery Cup Gamble
If you are speedrunning, you don't have time to wait for Mystery cups to reveal themselves safely. If you see a Mystery cup in the bottom row and a cup above it, tap the top cup. Immediately tap the Mystery cup. If it turns out to be a color you need (like White), you've saved a second. If it's a color you don't need, you've wasted a second. High-level play requires taking this gamble to keep the flow moving.
Ignoring the "Perfect" Edge
To get a fast time, you must ignore pixel-perfect edges on the background. It is faster to pour the Cyan background until it touches the skate, rather than painstakingly filling every pixel gap. The game's collision detection is usually forgiving enough that a 99% fill on the background counts as complete. Focus your precision on the skate, not the sky.
Nozzle Discipline
Keep your cursor (or finger) hovering over the nozzle, not the tray. The moment a cup finishes pouring, move to the next cup on the belt. Minimize the travel time of your cursor. This "micro-optimization" saves valuable milliseconds over the course of a 2-minute level.