
Level 344
HARDHow to solve Sand Loop level 344? Get instant solution for Sand Loop 344 with our step by step solution & video walkthrough. Sand Loop 344 tips and guide.
Play Sand Loop Now
Experience the puzzle challenge firsthand
Game Screenshots

Sand Loop Level Guides
Level 344 Comprehensive Walkthrough: The Orange Slice Logic Puzzle
Welcome to the ultimate guide for Sand Loop Level 344. This stage is a significant departure from the standard "fill the bucket" levels. It is a strict Logic and Resource Management Puzzle. If you try to play this quickly by reacting to colors, you will fail. The level is defined by a severe resource bottleneck caused by a Golden Lock that hides your most essential paints. In this guide, we will break down the pixel-perfect strategy to manage your conveyor belt space, unlock the necessary colors in the correct order, and paint the Orange Fruit without contaminating the background.
1. Understanding the Level Architecture
Unlike standard stages where both sides of the machine are accessible, Level 344 introduces a vertical dependency chain. You must understand the map before you make your first move.
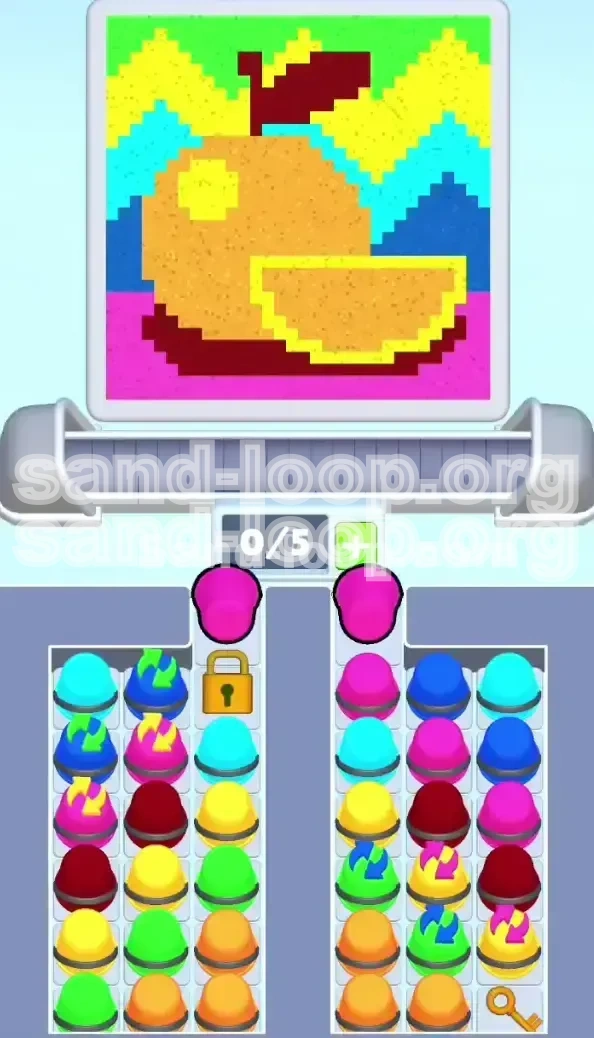
- The Right Tray (The Starter): This is your only active zone at the start. It contains the Golden Key buried at the bottom, but it is covered in cups of Pink, Dark Blue, and Red. You cannot access the Key until you clear the debris on top of it.
- The Left Tray (The Reward): This side is locked behind a Golden Gate. It contains the bulk of your Orange (the main fruit color) and the Yellow (the fruit flesh). You cannot start the actual fruit until this side opens.
- The Conveyor Capacity: You only have 5 slots. In this level, 5 slots is a dangerous luxury. You should aim to keep 2 slots empty at all times to avoid "gridlock" when the Key finally frees the left side.
2. Analyzing the Color Palette
The target image is an Orange Fruit Slice against a geometric background. The difficulty lies in the order of operations. If you paint the background first incorrectly, you won't have space for the fruit. If you paint the fruit too early, the background colors will spill over it.
- Pink (Priority 1): The absolute bottom layer. This occupies the lowest 15% of the canvas. It is the safest color to start with because gravity fills the bottom first.
- Dark Red (Priority 2): The shadow under the orange. This is a thin, critical layer. If you miss this, you will have to restart, as you cannot paint shadow *under* the orange body once the orange is placed.
- Dark Blue (Priority 3): The mountains/triangles on the sides. These act as a barrier for the zig-zag patterns above.
- Orange (The Bulk): The main body. This requires approximately 40-50% of your total sand volume.
- Yellow (The Detail): Used for the fruit slice interior and the top chevrons. This is a "high risk" color because it can easily bleed into the Blue or Orange zones if poured carelessly.
- Cyan (The Filler): Middle background patterns. Safe to pour later.
3. Primary Objectives for Success
To achieve a 3-star rating or simply complete the level, your mindset must shift from "painting" to "logistics." Here are your concrete goals:
- Objective A: Rapid Key Excavation. Your first 10-15 moves should be dedicated exclusively to digging out the Key on the right tray. Do not focus on painting the picture perfectly yet; focus on clearing the vertical stack on the right.
- Objective B: Bottleneck Management. Once the Key is used, the Left Tray will dump 10+ new cups into the selection area. If your conveyor is full (5/5), you will be forced to waste moves dumping cups, leading to a "Game Over" due to time or space constraints.
- Objective C: Precision Layering. You must paint the Pink base, then the Red shadow, and *then* the Orange body. Any deviation (e.g., pouring Orange before the Shadow) results in a permanent visual error.
Phase 1: The Excavation (Steps 1-10)
This phase is purely mechanical. The dispenser on the left (active side) will cycle colors. You cannot control the color, but you can control which cup you send to the dispenser.
1. Clearing the Top Debris
Look at the right-hand stack. The Key is buried at the bottom. You will see layers of Pink, Dark Blue, and maybe Red cups blocking access to the bottom.
- Strategy: Check the dispenser. If it is Pink, tap a Pink cup from the stack. If it is Blue, tap a Blue cup.
- The Mistake: Tapping a Green or Yellow cup (if available) just to clear space. If the dispenser is Pink and you send a Green cup, you have wasted a slot on your conveyor and failed to paint the canvas. Always match the dispenser color if possible.
2. The Conveyor "Two-Slot" Rule
As you clear cups, they move to the conveyor belt.
- The Rule: Stop sending cups if your conveyor has 3 or more cups waiting to be painted.
- Reasoning: You need space for the "flood" of cups that arrives when you unlock the left side. If you are at 5/5 capacity when the lock opens, you will enter a "Panic State" where you are forced to dump good colors.
3. Managing the "Waste" Colors
Sometimes, you have to clear a cup to get to the Key, but the dispenser is the wrong color (e.g., you need to move a Blue cup, but the dispenser is pouring Red).
- Action: Wait. Watch the dispenser cycle. If the next color is useful (e.g., Pink for the base), send the cup. If the dispenser cycles to a useless color (e.g., Green for the leaf, which is at the top), hold your tap. Let the dispenser rotate until it matches a color you can actually use.
- Calculation: It is better to wait 5 seconds for the correct color than to waste a cup and clutter your conveyor.
4. Unearthing the Golden Key
After clearing the top 3-4 layers, the Golden Key will be visible at the bottom of the right-hand tray.
- Trigger: Tap the Key cup immediately. It will fly to the left side of the machine.
- Result: The Golden Lock on the Left Tray will shatter.
- Warning: The moment the lock breaks, the Left Tray (which was previously hidden) will reveal a massive stack of Orange, Yellow, and Cyan cups. Do not tap them yet!
Phase 2: The Foundation & Base Layers
Now that both trays are active, the real puzzle begins. You must secure the bottom of the painting before you can build the fruit in the middle.
1. Establishing the Pink Ground
The bottom of the canvas requires a solid block of Pink.
- Action: Scan all available cups (Left and Right trays). Prioritize sending Pink cups whenever the dispenser allows.
- Threshold: You need enough Pink to fill the bottom 10-15% of the screen. Once the dispenser indicates the "Pink" section is full (it stops accepting pink or the meter fills), move on.
2. The Critical Dark Red Shadow
This is the most common failure point. The shadow sits directly on top of the Pink layer but under the Orange fruit.
- Timing: You must pour the Dark Red immediately after (or intertwined with) the Pink layer, but definitely before the main Orange body.
- Visual Check: Look for the dark red shadow shape on the top screen preview. It is a thin crescent shape under the orange.
- Execution: If you have a Dark Red cup ready, send it. If you pour Orange first, the Dark Red spot will be filled with Orange, and you cannot fix it. Do not proceed to Phase 3 until the Shadow is placed.
3. Early Stage Zig-Zags (Optional)
While you are waiting for the dispenser to cycle to Red or Orange, you might have spare slots on the conveyor.
- Strategy: If the dispenser turns Dark Blue, and you have no urgent Red/Orange needs, you can fill the side triangles.
- Note: Do not fill the top Yellow/Cyan zig-zags yet. They are high up and safe, but they are a distraction. Focus on the center and bottom first.
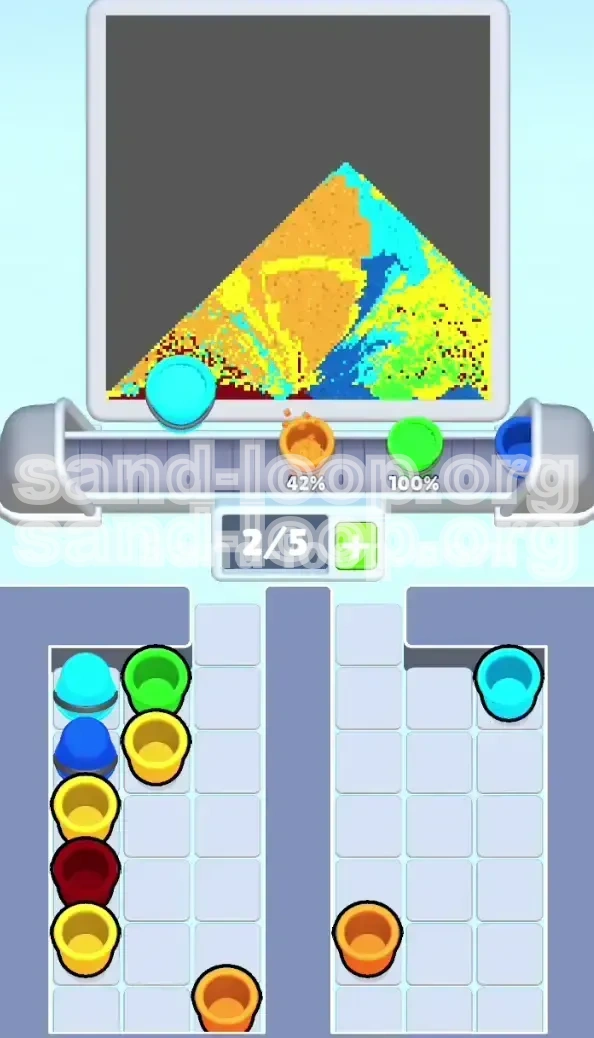
Phase 3: The Main Body (The Orange Fruit)
The foundation is set (Pink and Red). Now we build the hero of the painting: The Orange. This is the largest color block and requires the most sand.
1. The Orange Strategy
The Orange body is large and circular. It requires coordination between the Left and Right trays.
- Volume: Expect to pour 3 to 5 full cups of Orange sand to complete this section.
- The "Sandwich" Method: You will likely need to alternate between Orange and Yellow. The dispenser will switch colors frequently. Do not force Orange if the dispenser is Blue. Use that time to clear Blue cups from your inventory to make room for more Orange.
2. Protecting the Slice Area
Inside the Orange body, there is a "bite mark" or slice that is Yellow. This creates a dangerous situation: pouring Orange over a Yellow spot, or Yellow over an Orange spot.
- Tip: Try to pour the main bulk of the Orange first, leaving the "slice" area empty.
- The Rind: Ensure the Orange sand creates a thick border around the yellow slice area. Think of it as drawing a circle (Orange) and filling the inside later (Yellow).
3. Managing the Yellow Interference
The dispenser loves to give you Yellow when you need Orange.
- Action: If you have a Yellow cup ready, but you aren't ready for the slice yet, look at the top of the canvas. There are Yellow "Chevrons" (zig-zags) at the very top.
- Tactic: Send the Yellow cup to fill the top background pattern. This gets the Yellow cup out of your inventory without risking a spill on the fruit body.
Phase 4: Precision Finishing & Cleanup
You are in the final stretch. The big blocks of color are done. Now you are dealing with small, annoying details that can ruin your accuracy percentage.
1. The Yellow Slice (Fruit Flesh)
Now that the Orange body is mostly defined, the empty spot in the middle is your target.
- Requirement: Usually 1 full cup of Yellow sand.
- Precision: Aim carefully. The dispenser stream can be wide. If the surrounding Orange is not high enough, the Yellow will spill out. Ensure the Orange "walls" are high before filling the Yellow "pool".
2. The Cyan Zig-Zags
These are the middle patterns at the top of the background.
- Priority: Low. These are the last things to fill.
- Why: They are bordered by Dark Blue and Yellow. If you spill Cyan here, it turns the Blue into a muddy mix or contaminates the Yellow.
- Execution: Only fill these when you have a Cyan cup and the dispenser is Cyan. If the dispenser is cycling through other colors, wait. Do not force a Cyan pour if the target isn't perfectly aligned.
3. The Green Leaf (The Final Touch)
There is a small stem and leaf on the top left of the Orange.
- Access: The Green cup is likely buried at the very bottom of the Left Tray. You might need to clear remaining Cyan or Yellow cups to reach it.
- Pouring: This is a tiny target. Use a short tap on the pour button rather than holding it down. You only need a speck of Green here. Overfilling the Green leaf is a classic way to lose a star at the very last second.
4. Conveyor Belt Clearing
In the last 10% of the level, you might have leftover cups (e.g., extra Blue or Pink).
- Strategy: If the dispenser color matches a filled area, you can "top up" that area to get rid of the cup.
- Warning: If you have a cup for a color that is already 100% full (e.g., an extra Pink cup but the pink bottom is complete), you are stuck. You must wait for the "Dump" mechanic or hope for a "Clear All" bonus if available (though rare in this mode). Ideally, you managed your inventory in Phase 1 to avoid this.
Advanced Tactics & Troubleshooting
Even with a plan, things go wrong. Here is how to handle the chaos of Sand Loop 344.
1. The "Gridlock" Emergency Protocol
Situation: Your conveyor is full (5/5). The Key unlocks the Left Tray, but you have no room to pick up the new Orange cups. The dispenser is pouring a color you don't need.
- Solution: You must sacrifice a cup. Look at your conveyor. Is there a cup that is "low priority" (like a background color) that you can dump? Or, wait for the dispenser to cycle to a color that matches a cup on your belt, send that cup, and immediately free up a slot.
- Prevention: This is why the "Two-Slot Rule" in Phase 1 is vital. If you enter Phase 3 with 3 empty slots, you will never gridlock.
2. Contamination Spills
Situation: You poured Yellow into the Orange slice, or Orange into the Blue background.
- Analysis: Small spills (under 5%) are usually tolerated by the accuracy meter. Large spills are fatal.
- Fix: You cannot "erase" sand in Sand Loop. You can only cover it up. If you spill Orange in the Blue zone, you must fill the rest of the Blue zone to match it. This wastes precious sand. Moral: It is better to wait 10 seconds for the dispenser to align than to try to "fix" a bad pour.
3. Speed Running Tips (For High Scores)
If you are aiming for a time bonus, the standard "wait and see" strategy is too slow.
- Pre-Loading: While the dispenser is filling the Pink base, visually scan the Left Tray (even if locked) to memorize where the Orange cups are stacked.
- Belt Management: As soon as the Key is free, don't just watch the animation. Be ready to tap the specific Orange cups you identified earlier. Don't clear the whole left side; just cherry-pick the Orange cups you need for the current pour cycle.
- Combo Pouring: Try to chain colors. If the dispenser is cycling Red -> Orange -> Yellow, clear your conveyor to have those three cups ready in that exact order to keep the flow constant.