
Level 348
HARDHow to solve Sand Loop level 348? Get instant solution for Sand Loop 348 with our step by step solution & video walkthrough. Sand Loop 348 tips and guide.
Play Sand Loop Now
Experience the puzzle challenge firsthand
Game Screenshots
Sand Loop Level Guides
Level 348 Overview: The Strawberry Cat Endurance Test
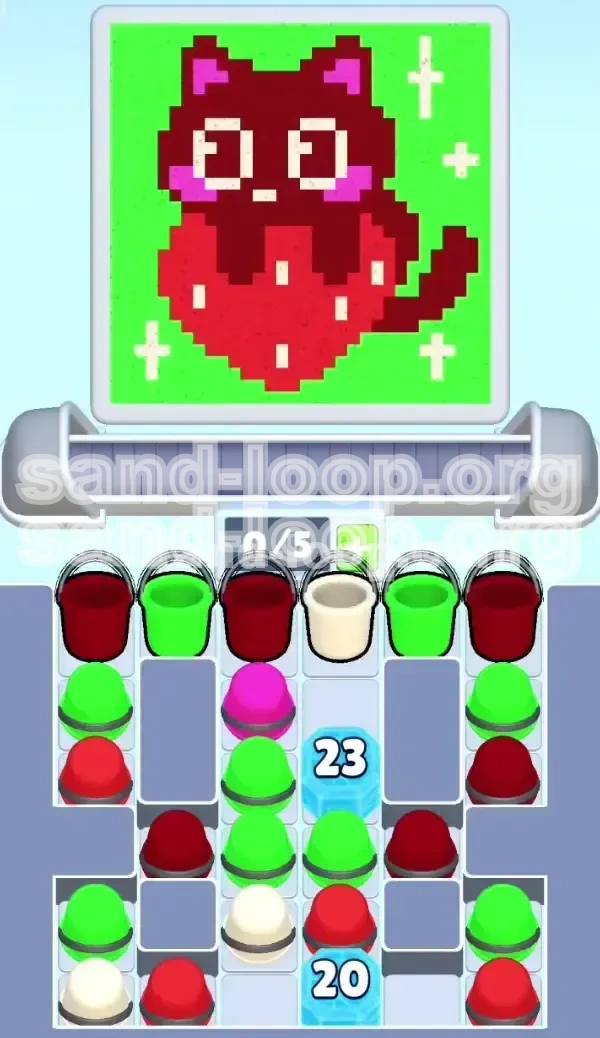
Sand Loop Level 348 presents a deceptive challenge. At first glance, the image of a maroon cat nestled inside a vibrant red strawberry appears simple and charming. However, this level is fundamentally an endurance trial designed to test your resource management rather than your speed. Unlike standard stages where you can immediately access the entire board, Level 348 locks away critical resources behind "Countdown Ice Blocks."
The core difficulty lies in the bottleneck created by these ice blocks. They prevent you from accessing essential colors—specifically White and Hot Pink—until you have manually cycled through roughly 20-25 moves on the outer columns. This creates a high-risk environment where "deadlocking" (filling your conveyor belt with unusable colors) is a constant threat. Success in this level depends entirely on your ability to predict color shortages and manage your conveyor belt capacity strictly.
The Visual Layout and Grid Structure
The canvas is divided into two distinct horizontal zones, each demanding a different color strategy. Understanding this layout is crucial for planning your moves.
- The Upper Zone (The Cat): Occupies roughly 40% of the grid. It requires Maroon (Dark Red) for the body and small amounts of Hot Pink for the cheeks and White for the eyes.
- The Lower Zone (The Strawberry): Occupies the bottom 60%. This is a massive block of Bright Red, dotted with White seeds.
- The Background: Fills the negative space with Neon Green.
The Mechanics of "Countdown Ice"
This level introduces a specific obstacle type: the Shift Counter Ice Block. Unlike standard ice that breaks when you match adjacent colors, this block tracks your total moves.
- Top Block: Starts at 23.
- Bottom Block: Starts at 20.
- The Mechanism: The counter decreases by 1 for every single cup you place on the belt, regardless of whether it paints a pixel or is wasted.
This means you must execute 20+ moves using only the side columns before the center unlocks.
Resource Scarcity Analysis
A statistical analysis of the cup distribution reveals a significant imbalance that dictates your strategy:
- Bright Red: Abundant (~40% of total cups). You will rarely run out.
- Neon Green: Very Abundant (~35% of total cups). Acts as a "filler" color.
- Maroon: Moderate (~15% of total cups). Concentrated on the left.
- White: Scarce (~8% of total cups). This is your bottleneck resource.
- Hot Pink: Extremely Rare (~2% of total cups). Only 3-4 cups exist in the entire level.
Why Players Fail (The Deadlock)
The most common reason for restarting is the "Deadlock Scenario." This happens when the game logic demands a White pixel (for a strawberry seed or eye), but your belt is full of Red and Green, and the White cups are still trapped under the unbroken ice in the center column. You have no moves left, forcing a reset. This guide focuses on preventing this exact situation.
Primary Objectives and Strategy
To clear Level 348, you must shift your mindset from "painting quickly" to "logistics management." Your goal is to keep the conveyor belt moving (lowering the ice counter) without clogging it with colors you can't use yet.
Objective 1: The Ice Break Phase (Moves 1-20)
Your sole focus for the first 20 moves is reducing the counters on the middle ice blocks.
- Target: Reduce the counter from 20 to 0.
- Method: Aggressively pull cups from the Left and Right columns.
- Constraint: Do not worry about perfect accuracy. If you have a Red cup and the current pixel is Green, it is better to play the Red cup (to lower the counter) than to wait for Green, provided you have belt space.
Objective 2: Maintain "Belt Elasticity"
Never fill your conveyor belt to maximum capacity (5/5 cups) during the Ice Break phase.
- The 3/5 Rule: Try to keep 2 slots empty on your belt at all times.
- Purpose: This buffer allows you to grab a newly available color from the tray without being forced to play a cup that doesn't match the current pixel.
- Risk: If your belt is full (5/5) and the game switches to a color you don't have, you are forced to waste a cup, which costs you a turn and delays the ice breaking.
Objective 3: Reserve White and Pink Resources
Identify the location of White and Pink cups immediately.
- Visual Scan: At the start of the level, look at the center column (behind the ice). Note how many White cups are there.
Strategy: Do not plan to use these until the ice breaks. If you need White pixels before the ice breaks, you must rely on White cups located on the far left or right wings, if any exist. - Pink Management: Pretend the Pink cups do not exist until the very end of the level. Using them early is a waste of a valuable belt slot.
Objective 4: Efficient Background Filling
The Neon Green background is your "safety net."
- Usage: When you are unsure which color to play, or if the current pixel is part of the background (Green), prioritize playing Green cups.
- Benefit: Green cups are plentiful. Using them clears space in the supply tray, allowing new cups to cycle in from the bottom.
Step-by-Step Walkthrough
Follow this precise action plan to navigate the level from start to finish.
Phase 1: The Dig (Moves 0-15)
The game starts with the center column inaccessible. You will rely heavily on the left and right stacks.
- Step 1: Check the current pixel target. If it is Green (Background) or Bright Red (Strawberry Base), pull matching cups from the wings immediately.
- Step 2: If the pixel is Maroon (Cat) but you only have Green/Red available, play the Green/Red anyway if the belt is empty. You need to lower the ice counter.
- Step 3: Watch the Ice Counter. Keep pulling cups. If you see a White cup in the side stacks, grab it, but hold it in reserve unless a White pixel is immediately active.
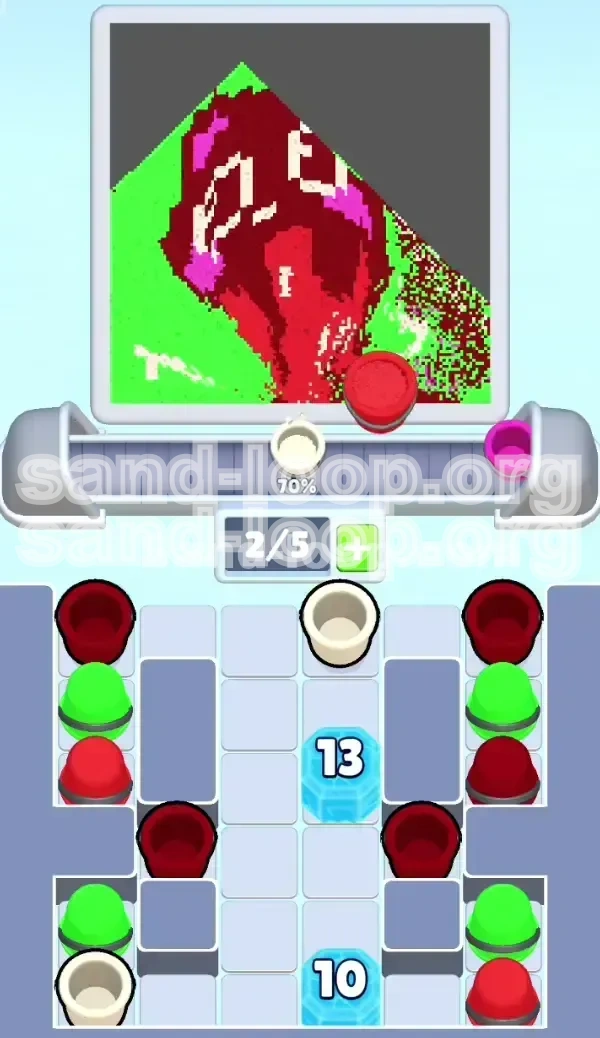
Phase 2: The Thaw (Moves 16-23)
The ice is getting close to breaking. This is the most dangerous moment.
- Step 1: As the counter hits "5", stop pulling from the wings aggressively. Clear your belt of any unwanted colors.
- Step 2: Ensure you have at least 2 empty slots on your belt.
- Step 3: The moment the ice breaks, the center column will become available. You will likely see a burst of White and Pink cups.
- Step 4: Do NOT grab the Pink yet. Grab the White cups immediately to clear the backlog of strawberry seeds or eyes that likely built up during the Dig phase.
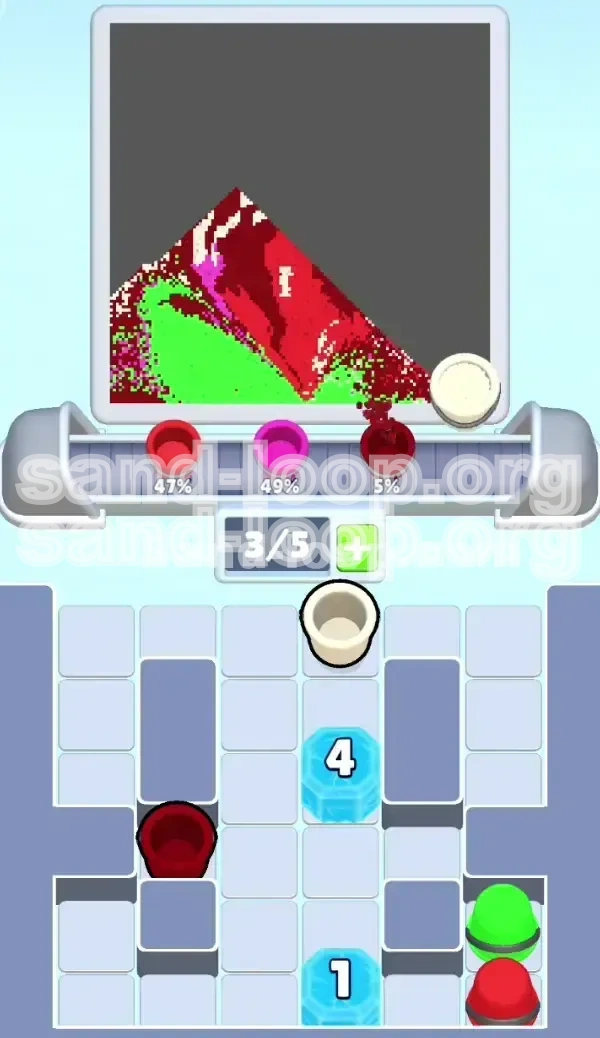
Phase 3: The Cat's Details (Mid-Game)
With the center open, you now have access to the full palette.
- Step 1: Shift focus to the Maroon body. Use the center cups to finish the Dark Red sections.
- Step 2: Monitor the Hot Pink availability. There are usually only 2-3 Pink cups needed for the cheeks.
- Step 3: Play Pink only when the brush is literally hovering over the cheek pixels.
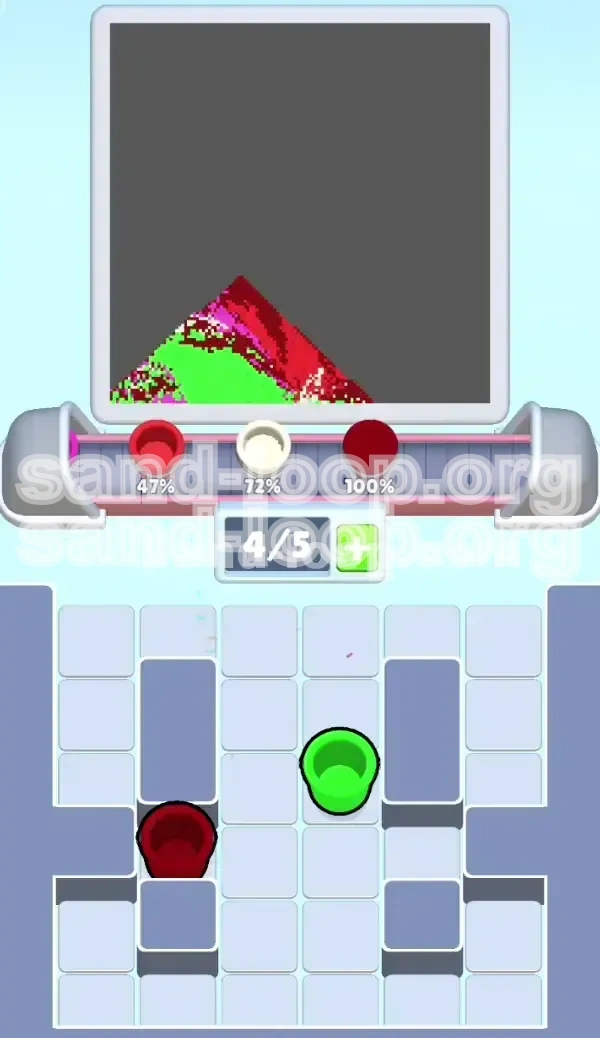
Phase 4: The Final Polish (End-Game)
The main red and green areas are done. Now you clean up the leftovers.
- Step 1: Use any remaining White cups for the cat's eyes and background sparkles.
- Step 2: If you have stray Green or Red cups left, cycle them through to finish any minor background pixels.
- Step 3: If you are missing just one pixel but have no cups left, check the tray—sometimes the final cup is hidden under a stack you haven't clicked yet.
Color Processing Order
The order in which you tackle colors determines your success rate. Do not follow the brush; follow the supply.
Priority Tier 1: Neon Green (The Filler)
- Why: It is the most common color and makes up the background.
- When: Always play Green when you see a background pixel. It is the safest move to keep your belt flowing.
Priority Tier 2: Bright Red (The Base)
- Why: The strawberry is the largest object.
- When: Play immediately whenever the brush is on the lower half. Do not save Red cups; you will not run out.
Priority Tier 3: Maroon (The Body)
- Why: The cat is large, but the color is less frequent than Red.
- When: Tackle this after you have secured a steady flow of Green/Red. Ensure you have Maroon cups in the tray before starting a large Maroon section.
Priority Tier 4: White (The Seeds & Eyes)
- Why: Limited supply.
- When: Only play White when the brush is actively on a seed or an eye. If the brush moves to Red/Green, switch colors immediately. Do not queue White cups "just in case."
Priority Tier 5: Hot Pink (The Cheeks)
- Why: Extremely rare and specific.
- When: Dead last. Only play Pink when the cat's face is being filled and the brush hits the cheek pixels.
Key Tips and Common Mistakes
Master these nuances to turn a frustrating level into a relaxing logic puzzle.
Key Tip: The "Color Swap" Rhythm
Sand Loop levels often lock colors if you don't use them. If the game offers you a White cup but you don't take it, the dispenser might switch to Green.
- Advice: If you see a critical color (like White) appear in the tray, grab it immediately, even if you have to hold it on the belt for 2-3 turns. It is better to hold a cup than to wait for it to cycle back around, which might take 10+ turns.
Common Mistake: Pre-loading Pink
Players often see the Pink cup in the tray and drag it to the belt early, thinking they are preparing for the cheeks.
- The Error: The belt slot is occupied by Pink for 10 turns while you paint the strawberry background. This reduces your capacity to manage other colors.
- The Fix: Leave the Pink in the tray. It won't disappear. Only pick it up when the cat's face is the next area to be painted.
Common Mistake: Ignoring the Ice Counter
Some players try to paint "perfectly" by matching every pixel correctly, waiting for the right color.
- The Error: In this level, waiting is fatal. If you wait 5 turns for a Green cup while you have a Red cup ready, you have delayed the ice break by 5 turns.
- The Fix: Speed is less important than throughput. Play "wrong" colors on purpose if it means keeping the belt moving and lowering that ice counter.
Advanced Tip: Predicting the Brush Path
The brush usually paints in spirals or zig-zags.
- Observation: If the brush is currently filling the Green background near the cat's head, you know it will hit the Maroon cat next.
- Action: Start loading Maroon cups onto your belt before the brush touches the cat. This proactive loading prevents lag.
Solutions for When You Are Stuck
Even with a plan, things can go wrong. Here is how to recover from specific sticky situations.
Situation: "My Belt is Full of Junk"
You have 3 Red cups and 2 Green cups on the belt, but the brush is painting White seeds.
- Solution: You must burn the cups. Look at the upcoming pixels. If there is a Red or Green pixel coming up within 1-2 steps, play it. If not, you are in a "Deadlock" state.
- Emergency Move: If the ice is not broken yet, you can "waste" a turn by pouring a color on a non-matching pixel just to clear the slot. This is inefficient but necessary to free up space for the White cup that is likely trapped in the tray.
Situation: "The Ice Broke, But I Don't Have White"
The center opened up, but you only see Pink and Maroon.
- Solution: You likely missed a White cup in the side stacks earlier, or they are buried deep in the center stack under other cups.
- Action: Rapidly fire the Pink and Maroon cups onto the correct pixels. As you clear the center stack, the White cups buried at the bottom of the stack will rise to the top. Use Pink/Maroon to "dig" for the White.
Situation: "One Pixel Left, But No Cups"
You have one pixel remaining (e.g., a sparkle), but no cups of that color on the belt or tray.
- Solution: Check the tray columns (the stacks at the bottom). Sometimes a cup is visually hidden behind another.
- Alternative: If the tray is truly empty, the game will eventually force a "refresh" or "wildcard" cup after a few seconds of idling. Don't restart immediately; wait 5 seconds to see if a new cup spawns.
Speed Run and Optimization Tips
Once you understand the survival mechanics, you can aim for a faster completion time (under 60 seconds).
Shortcut: The "Green Buffer" Method
Instead of carefully sorting every cup, keep the conveyor belt filled with 2 Green cups at all times.
- Why: Since Green is the background, you can almost always dump a Green cup if you need to make space for a sudden color switch (like Red to White).
- Benefit: This prevents the "Full Belt" pause that slows down most players.
Optimization: Pre-Ice Cup Loading
While the ice is counting down (20-10), try to arrange your belt cups in the order they will be needed.
- Example: If the brush is moving from Background (Green) to Strawberry (Red), arrange your belt so the Green cup is closest to the dispenser, followed by the Red cup. This allows you to simply click "Dispense" twice without thinking.
Speed Trick: Ignore the Cat Until the End
Do not try to paint the Maroon cat while the ice is breaking.
- Strategy: Focus entirely on the Green background and Red strawberry for the first 40 seconds.
- Reasoning: These colors are plentiful. Save the "fussy" colors (Maroon, White, Pink) for the final 20 seconds when the board is mostly clear and you can focus entirely on the small details without stress.