
Level 383
HARDHow to solve Sand Loop level 383? Get instant solution for Sand Loop 383 with our step by step solution & video walkthrough. Sand Loop 383 tips and guide.
Play Sand Loop Now
Experience the puzzle challenge firsthand
Game Screenshots

Sand Loop Level Guides
Sand Loop Level 383: Comprehensive Strategy Guide
Level Overview
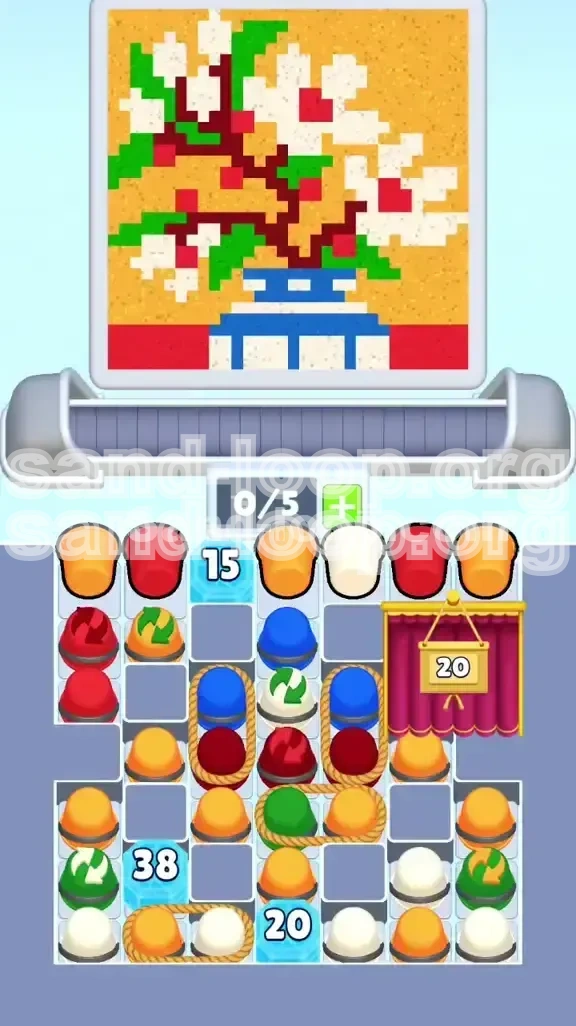
Welcome to the Cherry Blossom Vase challenge. Level 383 is widely considered a significant difficulty spike in Sand Loop, acting as a "gatekeeper" level that tests your logical planning rather than just your reflexes. This stage combines a high-density pixel art requirement with a restrictive board layout full of HP blocks and movement impediments.
The Visual Challenge
The artwork depicts a classical ceramic vase—blue and white stripes—holding cherry blossom branches with white petals, red stamens, and green leaves, all set against a deep golden-yellow background. The visual complexity lies in the sharp transitions between the blue vase, the white flowers, and the yellow background, which requires precise color management to avoid "bleeding" colors into the wrong sections.
Core Mechanics
This level operates on a strict dependency chain. Unlike previous levels where you could simply clear cups as they appeared, here you must actively manage the queue to ensure specific colors arrive at the scanner in the correct order. The board is divided into three zones: the Locked Right (Red Curtain), the Frozen Left (Ice Blocks), and the volatile Center (Roped Clusters).
Difficulty Rating
We rate this level 8/10 in terms of strategy. The margin for error is slim. You are often required to make moves that do not immediately benefit the picture (e.g., clearing a red cup when the background needs yellow) solely to unlock board space. Fail to manage the "HP" walls, and you will run out of moves with 30% of the board still locked.
Level Objectives and Strategy
Primary Goal: Unlock the Board
Your main objective is not just to paint, but to clear the board's obstructions. You cannot complete the image if you are restricted to only two-thirds of the playing field. The Red Curtain on the right and the Ice Blocks on the left must be your priority, effectively doubling your available workspace for the later, detailed stages of the painting.
Secondary Goal: Color Precision
The vase requires a strict alternating pattern of Blue and White. You must achieve this without a "color mixer" tool, meaning you must rely on the order of cups entering the scanner. You must learn to buffer unwanted colors or sacrifice them to HP blocks rather than disrupting the delicate Blue/White rhythm required for the vase.
Survival Metric: Move Efficiency
You have a limited number of moves before the conveyor belt jams. Every time you clear a cup that isn't the exact color needed for the current pixel, you are burning a move. Ideally, you want a 90% efficiency rate in the mid-game. However, in the early game, you must be willing to drop that to 60% to break the walls.
The Win Condition
Victory is achieved when the '38' HP block in the bottom left is destroyed, and the final yellow corner pixels are filled. Most players fail because they leave the '38' block for last, realizing too late that they needed the Green cups trapped underneath it ten turns ago.
Step-by-Step Walkthrough
Phase 1: The "Red Toll" (Moves 1-15)
The level begins with a bottleneck. A Red Curtain with 20 HP blocks the rightmost column. Do not focus on the vase or flowers yet. Look at your starting hand. If you see Red cups in slots 1, 2, or 3, prioritize them immediately.
Phase 2: Managing the Conveyor Belt
As you clear the initial Red cups, the belt will shift. Do not let Blue or White cups clog the top slots while you are hunting for Red. If you have a "filler" color like Orange or Gold that matches the background, use it to cycle the belt, but do not let it sit idle if it blocks a Red cup needed for the curtain.
Phase 3: Breaking the Initial Ice
On the left, you will see a '15' Ice block. This is relatively weak. As you clear the top-left cups (likely Orange or Green) to access the Red cups, you will naturally chip away at this ice. Do not make special trips to break it; let it shatter as a side effect of clearing the top row.
Phase 4: The "Roped" Bottleneck
In the center columns, you will encounter roped clusters. These act like chain reactions. You must clear the top cup of the cluster to unlock the bottom one. If the top cup is Blue and the bottom is Red, but the scanner needs Red, you are stuck until you clear that Blue. Clear these "rope tops" aggressively during the early phase to prevent mid-game traffic jams.
Phase 5: The Vase Rhythm
Once the Red Curtain falls (around move 20), the real challenge begins. The scanner will demand alternating Blue and White stripes for the vase. If you pour Blue into a White stripe slot, you create a "defect" that requires two extra moves to fix (one to clear the wrong color, one to apply the right one). Maintain the rhythm: Blue -> Pause -> White -> Pause.
Phase 6: The Flower Rush
After the vase body is complete, the image moves up to the flowers. This requires White clusters with single Red pixels. This is the most dangerous part for "color bleeding." Ensure you have a Red cup queued up and ready immediately after a White pour to nail the flower centers. If you miss the center, the flower looks unfinished.
Color Processing Order
The Priority Hierarchy
Not all colors are created equal in this level. Understanding the hierarchy is crucial.
- Red (Tier 1): Critical for unlocking the board and flower details.
- Blue (Tier 2): Essential for the vase stripes.
- White (Tier 2): Essential for the vase and flowers.
- Green (Tier 3): Needed only for leaves; rare appearance.
- Gold/Orange (Tier 4): Filler for the background; use only to cycle the belt.
The "Red Cup" Rule
Always clear a Red cup if it is accessible, even if the current pixel doesn't need it. Why? Because the '20' HP curtain and the '38' HP ice block are the biggest threats. If you wait until the pixel *needs* Red to clear the Red cups, you will find your board movement restricted by the remaining obstacles. Think of Red as your "currency" to buy board space.
Handling Blue and White
These two colors are "enemies" on the conveyor belt. If they are stacked adjacent to each other (e.g., Blue-White-Blue), you are in a good rhythm. If they are separated by Gold or Green, you risk timing out on the vase stripes. Try to keep the queue between the scanner and the cup dispenser clear of fillers when you are in the "Vase Phase" of the level.
Green Cup Management
Green cups are the rarest resource in this level. They appear late and are needed for the leaves in the upper branches. Never use a Green cup to chip away at the '38' ice block unless it is the absolute last resort. Save every single Green cup for the actual artwork. If you use Green for the ice block, you will likely fail the level due to a lack of leaf detail.
Key Tips and Tricks
The "Top-Row" Scan
Constantly scan the top row of the level (the conveyor belt source). Don't just look at what's entering the scanner; look at what is about to enter. If you see a Red cup coming up in 3 turns, hold off on using a Red cup currently on the belt if you can help it, or use a filler cup to synchronize the arrival of that future Red cup with a flower center pixel.
Sacrificial Clears
Sometimes, you must "sacrifice" a correct color to break a lock. For example, if the scanner needs Blue, but you have a Red cup that is the only thing keeping a roped cluster moving, take the Red. Pouring it into a Blue spot is a temporary setback, but leaving the rope locked is a permanent game-over condition.
Background Filling
Do not obsess over filling the yellow background corners early. These corners (top-left and top-right) are "dead zones" that can be filled in the final 10 moves when you are just clearing leftover dregs. Focus your early moves on the center and the bottom where the structural HP blocks are located.
Scanner Timing
Watch the scanner's animation. There is a brief delay between when the sand hits and when the pixel registers color. You can often queue up a cup, realize it's the wrong shade based on the pixel's color shift, and cancel or swap it if you are fast enough. This is an advanced technique but vital for the Blue/White stripes.
Dealing with Clusters
When you see a large cluster of roped cups, calculate the "order of operations." Usually, the color in the middle of the rope is the key. Freeing the middle cup often releases the top and bottom simultaneously. Prioritize the "linchpin" cup in any roped group.
Common Mistakes to Avoid
Ignoring the '38' Block
The biggest mistake is treating the left side like a normal puzzle. The '38' block is a timer. If you ignore it for the first half of the level, it will remain with 20 HP left when you run out of moves. You must chip away at it constantly throughout the mid-game, even if it means using non-ideal colors.
Over-Pouring Blue
Because the vase is predominantly blue, players tend to pour Blue whenever they see it. Resist this urge. The vase has specific horizontal stripes. Pouring Blue when a White stripe is active creates a messy blur that is hard to correct without wasting precious moves.
Wasting the Red Unlock
Some players clear the Red Curtain (the '20' block) and then immediately stop clearing Red cups. This is a mistake. The Red cups are still needed for the flower centers later. If you stop clearing Red, the cups will pile up and block the conveyor belt, preventing you from getting the Blue and White cups you need for the vase.
Precise vs. Spray
In previous levels, "spraying" (clearing cups rapidly to create a general shape) worked. Here, precision is mandatory. The flowers are small. Spraying Red sand over them will turn the whole flower red. You must wait for the specific pixel to activate before pouring the Red cup.
Stuck? Here is the Solution
Scenario: Locked Out of Moves
Symptom: The belt is full, but no cups are moving because the scanner wants a color buried under a locked cup.
Fix: Look for a "Sacrificial Cup." Is there any color on the belt that you can pour? Even if it's wrong? Pouring the wrong color will advance the belt by one slot, potentially bringing the correct color within reach. It's better to lose one pixel to a wrong color than to forfeit the level.
Scenario: The '38' Block Won't Break
Symptom: You are down to the last few moves, and the ice block still has 10 HP.
Fix: Stop trying to match the art. Switch to "Demolition Mode." Look at the cups directly adjacent to the ice block. Ignore the scanner's request. Simply pour every single cup that touches the ice block, regardless of color. You are trying to break the block to survive, not to paint.
Scenario: Color Bleeding on Vase
Symptom: Your vase looks messy; the blue and white are mixed.
Fix: You cannot fix it with the current strategy. You must wait for a "Correction Cycle." If the scanner asks for Blue but the spot is currently messed up with White, you may need to pour a "Filler" color (like Gold) to reset the pixel state, or simply wait if you have surplus moves. Prevention is better than cure here—stick to the rhythm strictly.
Scenario: Missing Flower Centers
Symptom: The white flowers are done, but you have no Red for the centers.
Fix: This usually means you didn't clear enough Red cups in the early game. If you are truly stuck, check if there are any Roped Red cups left on the board. Clearing the rope above them is your only hope. If no Red cups exist on the board, the level is unfortunately a restart, as you cannot generate Red paint from nothing.
Speed Run and Shortcuts
The "Belt Rush" Opening
For experienced players looking to clear the level in under 2 minutes, use the Belt Rush. Immediately tap the first available cup, regardless of color, to cycle the belt as fast as possible. The goal is to reach the deeper rows of cups where the Red "Toll" cups are hiding. Don't worry about imperfect pixels in the first 10%; they can be fixed later.
Pre-Loading Colors
While the scanner is processing a large pour (like a wide stripe on the vase), you can queue up your next move. Don't wait for the sand to finish falling. Look at the next pixel that needs filling and have your finger hovering over the correct cup color. This saves milliseconds per pour, adding up to significant time savings.
The "Ice" Strategy
If you are speed running, ignore the '15' Ice block entirely. Focus 100% of your attention on the '20' Red Curtain and the '38' Ice Block. The '15' block is weak enough that it will break naturally from the splash damage of clearing adjacent cups. Treating it as a non-issue saves mental processing power.
Late Game Cleanup
In the final 20% of the level, stop looking at the art. Look at the numbers. If the '38' block is gone and the art is 90% done, just rapidly tap any remaining cups. The background fill is generous enough that it will absorb any extra sand, allowing you to clear the board of remaining cups quickly to finish the timer.