
Level 57
HARDHow to solve Sand Loop level 57? Get instant solution for Sand Loop 57 with our step by step solution & video walkthrough. Sand Loop 57 tips and guide.
Play Sand Loop Now
Experience the puzzle challenge firsthand
Game Screenshots
Sand Loop Level Guides
Sand Loop Level 57: Complete Walkthrough and Strategy Guide
Level Overview: The Slot Management Puzzle
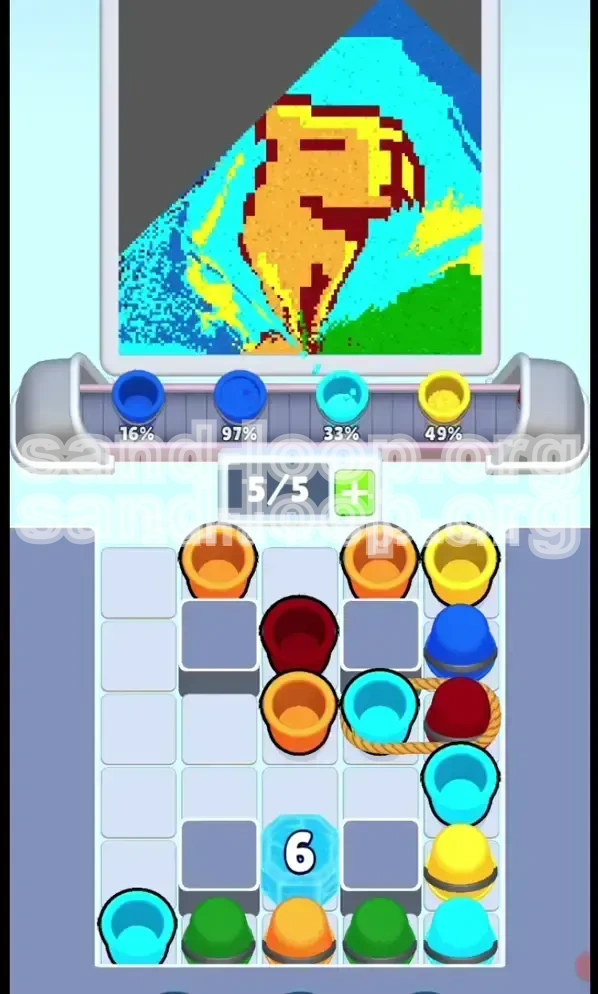
Welcome to the definitive guide for Sand Loop Level 57. This level is a significant difficulty spike that tests your ability to manage spatial constraints rather than just your pouring speed. The core challenge lies in the "Slot Economy Crunch"—you start with a completely full conveyor belt (5/5 slots occupied) and a supply tray that is partially blocked by obstacles. Unlike previous levels where you could freely load colors, Level 57 forces you to meticulously cycle the belt to unblock key resources like Dark Blue and Cyan. If you simply try to pour fast, you will fail; you must pour with surgical precision to clear the initial logjam.
Win Condition and Metrics
To clear this stage, you must fill the canvas to match specific color targets without triggering an overflow (waste) state. The four color progress meters at the bottom of the screen are your primary focus:
- Dark Blue: Starts at 16%. High Priority.
- Cyan: Starts at 33%. High Priority.
- Yellow: Starts at 49%. Moderate Priority (near completion).
- Orange: Starts at 16%. Low Priority (use sparingly).
The hidden metric here is the Conveyor Latency. There is a 2-3 second delay between tapping a cup and it arriving at the pour point. Managing this delay while juggling a full belt is the skill you must master.
Strategic Color Order and Priority
Phase 1: The "Unblocking" Priority (Start)
Your immediate goal is not to fill colors, but to create space. You cannot access the blocked Dark Red and Blue cups in the tray until you free up slots on the conveyor.
- Action: Prioritize pouring the colors currently on the belt (likely Orange or Yellow) to generate empty slots.
- Target: Clear at least 2 cups immediately to drop the belt from 5/5 to 3/5.
- Note: Do not worry about "wasting" Orange here if it means getting to the Dark Blue faster.
Phase 2: The "High Value" Cycle (Mid-Game)
Once you have 2 empty slots, the tray opens up. Your target efficiency shifts to Cyan and Dark Blue.
- Cyan (33% -> 90%): This is your workhorse color. Load the Cyan cup as soon as it's unblocked.
- Dark Blue (16% -> 90%): This is usually buried under Dark Red. You must clear the Dark Red cup first to reach the Blue.
- Ratio: Dedicate roughly 70% of your pours to Cyan and Blue. Only touch Yellow/Orange to clear jams.
Phase 3: The "Finish Line" Strategy (End-Game)
When all colors are above 80%, the risk of overflow is highest.
- Technique: Switch to single-tap pouring.
- Focus: Watch the Dark Blue meter. It often lags behind.
- Warning: Stop pouring Yellow immediately if it hits 100%. Any further Yellow pours are wasted potential that could have been used for Blue.
Step-by-Step Walkthrough
Step 1: The Initial Clear (Seconds 0-10)
The level starts with the belt locked at 5/5. Do not tap randomly. Look at the cup closest to the pouring mechanism (the "active" cup). Tap it once. Immediately count "one-one-thousand, two-one-thousand." This accounts for the travel time. While the first cup pours, identify the second cup. Tap it the moment the first cup leaves the nozzle. Your goal is to empty 2 cups to create 2 empty slots on the right side of the belt.
Step 2: Unlocking the Tray (Seconds 10-25)
With 2 empty slots visible, look at the supply tray below. You will see a Dark Red cup sitting on top of a blocked slot, and a Blue cup wedged in the corner.
- Load the Dark Red: Drag the Dark Red cup to the belt immediately. It is not a high-value color, but it is physically blocking the Blue cup you need.
- Hold the Line: Leave the second slot empty. Do not fill the belt back to 5/5 yet. This empty slot is your buffer.
- Pour the Dark Red: Once it cycles to the nozzle, pour it out to clear it from the belt.
Step 3: The Blue and Cyan Offensive (Seconds 25-60)
With the Dark Red gone, the Blue cup is now accessible. Drag the Blue cup and the Cyan cup onto the belt.
- Sequence: Load Blue, then Cyan. Leave one slot open.
- Execution: Alternate pours between Cyan and Blue.
- Monitoring: Keep an eye on the Yellow meter (starts at 49%). If Yellow is on the belt, pour it only if you are desperate for slots, otherwise, let it cycle through without pouring if possible, or use it minimally to top off.
Step 4: Micromanagement and Cleanup (Seconds 60+)
You are now in the endgame. The belt should be rotating with your remaining needed colors.
- Incremental Fills: Do not hold down the pour button. Tap once for a 1-second burst. Check the meter. Tap again.
- The "Sacrifice" Move: If you have a stray Orange cup on the belt and the belt is full, you may pour Orange onto a completed color just to clear the slot. It is better to waste a little Orange than to jam the belt and fail to load the final Dark Blue cup.
Common Mistakes to Avoid
The "Full Belt" Syndrome
The most common error players make is feeling the need to keep the conveyor full. In Level 57, a full belt is a death sentence. If you fill all 5 slots, you cannot load the specific cups you need from the tray. Always keep at least one slot empty (4/5 capacity or 3/5 capacity) to maintain maneuverability.
Ignoring the 2-Second Delay
This level punishes "twitch" reflexes. If you tap a cup and then immediately tap another because you think the first one didn't register, you will double-pour. Double-pours are the primary cause of overshooting the target. Rule of thumb: One tap, look away, check the progress meter, then tap again.
Overshooting the "Easy" Colors
Since Yellow and Orange start with higher percentages (49% and 16%), it is easy to accidentally finish them off while waiting for other cups to cycle. Once a color hits 100%, any further pours of that color are wasted. Avoid pouring Yellow or Orange unless you are actively trying to clear the belt slot.
Solutions for When You're Stuck
Stuck in a "Tray Jam"
Symptom: You need the Blue cup, but it's grayed out and unclickable in the tray.
Cause: There is likely a cup (usually Dark Red or Orange) physically on top of it or blocking the path.
Solution: You must clear the current active cups on the belt. Do not pour anything for 5 seconds. Let the belt cycle until the unwanted cups pass the nozzle without pouring (if you have space), or pour them out quickly to generate the empty slot needed to drag the blocking cup out of the way.
Progress Stalled at 80%
Symptom: You are close to the finish line, but keep running out of moves or overshooting on the last color.
Solution: Stop loading new cups entirely. Work only with what is currently on the belt. Use the "Tap and Wait" method. Pour 1 second of Blue, wait for the meter to update. Pour 1 second of Cyan. By slowing down, you prevent the accidental overflow that ruins the run.
Speed Run and Efficiency Tips
The "Slot Buffer" Technique
For a fast time, do not wait for cups to reach the nozzle before loading the next ones. As soon as a cup leaves the tray and enters the belt, drag the next cup in. However, always leave the far-right slot empty. This ensures that as the belt moves, you have a visual gap that helps you track the rhythm of the level without getting disoriented by the moving sprites.
Pre-Loading Strategy
If you know the Dark Red cup blocks the Blue cup, load the Dark Red cup before you actually need to pour it. Get it onto the belt so it clears the tray space. This pre-emptive loading saves precious seconds compared to waiting until you are desperate for the Blue cup to clear the path.
Visual Cues over UI
While the meters at the bottom are accurate, looking up at the canvas can sometimes be faster for judging "near full" status. Learn to recognize the saturation of the Cyan and Blue pixels on the balloon itself. When they look visually dense, switch to the next color immediately without waiting for the UI bar to catch up.