
Level 58
HARDHow to solve Sand Loop level 58? Get instant solution for Sand Loop 58 with our step by step solution & video walkthrough. Sand Loop 58 tips and guide.
Play Sand Loop Now
Experience the puzzle challenge firsthand
Game Screenshots
Sand Loop Level Guides
Level 58 Strategy Guide: The Cactus Canyon
Visual Breakdown and Composition
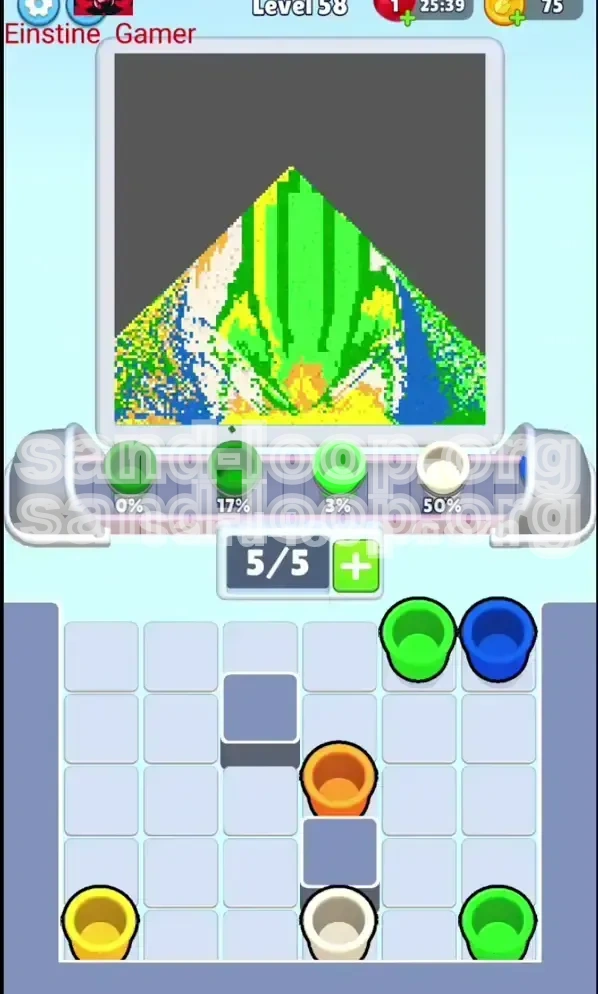
Level 58 in Sand Loop transports players to a vibrant desert setting. The canvas is dominated by a large, intricate cactus positioned centrally against a sandy beige backdrop. The cactus requires two specific shades of green for depth and yellow for the flower details, while the upper portion of the background features a clear blue sky. The challenge lies in the high volume of beige required for the background compared to the precision needed for the cactus details.
Primary Objectives
To secure a victory in this stage, you must manage three competing priorities simultaneously. First, you must fill the expansive beige background without clogging your conveyor belt. Second, you need to prioritize green cups to build the cactus structure early. Finally, you must save specific slots for yellow and blue accents to prevent getting locked out of the win condition. 100% completion is required on all four color meters.
The Slot Limitation Challenge
The defining constraint of Level 58 is the 5-slot conveyor belt. Because the beige background consumes approximately 40-45% of the total sand volume, there is a natural temptation to load multiple beige cups in a row. However, doing this will occupy your limited slots and prevent you from loading the green cups needed for the cactus, leading to a deadlock.
Color Distribution Analysis
Understanding the volume requirements is crucial for planning. Approximately 45% of your total pours will be Beige (sand/background), 35% will be Green (cactus body), 15% will be Blue (sky), and 5% will be Yellow (details). Unlike previous levels where you could focus on one color at a time, this level requires a strict 1:1 rotation between background and foreground colors to maintain flow.
Why This Level is Difficult
Most players fail Level 58 not because they run out of sand, but because they run out of space. The "stacking deadlock" occurs when large beige cups are loaded early, burying the smaller green and yellow cups at the bottom of the supply tray. If you cannot access green because beige is occupying the belt, the level becomes unbeatable.
Step-by-Step Walkthrough: The Winning Route
Phase 1: The Opening Sequence (Moves 1-5)
The beginning of the level sets the tempo for the entire run. Do not start with Beige. Instead, load Green into your first slot. Immediately follow this with a Beige cup in the second slot. While these are traveling down the conveyor, load a Green cup into the third slot. This "Green-Beige-Green" opening ensures the cactus construction begins immediately while the background starts filling passively.
Phase 2: Unblocking the Tray
After the initial three cups, observe the supply tray. You will likely see a Yellow cup buried under a stack of Beige cups. Do not load more Beige yet. Load the Yellow cup now (slot 4). This forces the game to clear the cups blocking it, giving you access to lower layers later. For your 5th slot, choose Blue. This diverse start (Green, Beige, Green, Yellow, Blue) prevents any single color from monopolizing your belt.
Phase 3: The Mid-Game Rotation (30-70% Progress)
Once the initial cups have poured, you should enter a rhythmic cycle. The optimal rotation for this phase is Green -> Beige -> Green -> Blue. Avoid loading Yellow again until the very end unless the meter is critically low. Keep an eye on the Green meter; if it hits 60% before Beige hits 40%, switch to pouring Beige exclusively for two turns to balance the scales.
Phase 4: Managing the Beige Deluge
As you hit the 50% mark, you will notice the Beige meter lags behind because the background is so large. You will need to double-up on Beige cups temporarily. Load Beige -> Beige -> Green. This is the only time in the level you should load two cups of the same color consecutively. This surge is necessary to prevent the background from being the sole reason for a failure at 98% completion.
Phase 5: The Final Polish (The Last 10%)
Approaching the finish line, the margin for error disappears. Stop loading Green and Beige entirely if they are above 90%. Your focus must shift entirely to Yellow and Blue. These colors often have smaller "hitboxes" on the canvas, meaning they require more precision. Load one cup, wait for it to pour, and assess. Do not queue up multiple cups here. One-by-one loading is the key to a clean finish.
Step 6: Avoiding the Last-Second Jam
A common failure point is having 98% Beige and 100% Green, but the remaining Beige cups are stuck behind Greens you no longer need. If you find yourself in this situation, you must use a "Slot Swap" strategy: if you have a full belt, discard a cup from the tray (if the game allows) or use a booster to clear a slot. If not, you must wait for the current belt to empty completely to grab the final Beige cup.
Optimal Color Processing Order
The Priority Hierarchy
Not all colors are created equal in Level 58. Your priority list should be: 1. Green, 2. Blue, 3. Beige, 4. Yellow. Green is priority #1 because it represents the largest object (the cactus) and takes the longest to fill. Blue is #2 because the sky area is often isolated and easy to miss. Beige is #3 because it is abundant. Yellow is #4 because it is a sparse accent color.
The "Gap" Strategy
To maintain mental clarity, use the "Gap" method. After every two cups of Green/Beige, leave one slot empty or fill it with a low-volume color like Blue. This gap acts as a buffer, preventing the conveyor from becoming a solid wall of sand that restricts your movement. A 2-cup cycle is easier to manage than a 5-cup continuous block.
Volume Control Logic
Think in percentages rather than cups. If Green is at 40% and Beige is at 30%, you are pouring too much Green. Pause Green pouring and cycle two Beige cups. The game physics allow for a bit of "overflow" (going slightly over 100%), but it is inefficient. Try to keep all color progress bars within a 15% range of each other at all times.
The Sky Trap
The Blue sky is located at the top of the canvas. Because it is separated from the central cactus, players often forget it until the end. Always check your Blue meter at the 50% completion mark. If it is below 15%, you are in danger of a "Sky Lockout" at the end of the level where you run out of conveyor space to fix it.
Accenting the Cactus
Yellow is used for the cactus flowers. These are small targets. Pouring Yellow when the belt is moving fast can lead to spillage. When you load a Yellow cup, try to time it so it pours immediately after a Green cup (which usually covers a large area) to minimize travel distance for the pour stream, ensuring accuracy.
Key Tips for Mastery
Tip #1: Watch the Supply Tray, Not Just the Belt
Beginners stare at the conveyor belt. Experts stare at the supply tray. Always look two moves ahead. If you see that the next three available Green cups are buried under Orange cups (trash/waste), you need to clear those Orange cups now, even if you don't want to waste the moves. Failing to clear "blocker" cups is the #1 cause of stuck levels.
Tip #2: The "Tap and Wait" Technique
Don't spam taps. Load a cup, watch it travel to the pour point, and *then* look for the next cup. This slight delay (1-2 seconds) gives your brain time to process the changing state of the supply tray. It prevents the mistake of loading a color you thought you needed, but actually filled up 3 seconds ago.
Tip #3: Understanding Sand Physics
In Sand Loop, wet sand spreads slightly. When filling the small Yellow flower details, you don't need to be pixel-perfect. A slightly off-center pour will still fill the meter due to the spread. Use this to your advantage by focusing on speed for the small details and precision for the large Beige background blocks.
Tip #4: Handling "Full" Meters
Just because a meter says 100% doesn't mean the color is perfectly done visually, but mechanically, you can stop loading it. Once a color hits 100%, it turns "gray" in terms of priority. Treat those cups in the tray as obstacles. Do not load them again unless you have absolutely no other moves, which shouldn't happen if you follow the rotation.
Tip #5: Use of Neutral/White Space
If the level provides White or Neutral cups, use them as spacers. If you have a full belt of colors you need but need to buy time for a cup to reach the pour point, a White cup is a safe placeholder. It fills space without altering your color balance percentages.
Common Mistakes and Solutions
Mistake: The "Beige Binge"
The Error: Loading 3 or 4 Beige cups in a row because the background looks so empty.
Why it fails: This consumes 80% of your belt capacity on one color. When Green inevitably runs out, you have no space to load more because you are waiting for Beige to pour.
The Fix: Limit yourself to a maximum of two Beige cups per cycle. Force yourself to load a Green cup in between.
Mistake: Ignoring the Yellow Stash
The Error: Leaving Yellow until the very end (95% completion).
Why it fails: Yellow cups are often placed at the bottom of the stack. If you wait until the end to dig for them, your other progress meters (Green/Beige) will hit 100% and refuse new inputs, causing a stalemate.
The Fix: Load the first Yellow cup around the 20% completion mark just to clear the path to it.
Mistake: Conveyor Deadlock
The Error: All 5 slots are full, and 3 of them are colors you don't currently need (e.g., Green when the meter is full).
Why it fails: You are locked out of interaction. You have to wait for the wrong colors to pour, wasting precious seconds.
The Fix: Never let the belt fill up if the colors don't match your current need. Leave an empty slot if you have to.
Mistake: Misjudging the Sky Size
The Error: Assuming the sky is small and neglecting Blue cups.
Why it fails: The sky is wider than it looks and connects to the sides of the canvas. Underestimating it leads to a frantic scramble for Blue at the end.
The Fix: Load Blue aggressively in the first half of the level. It is easier to "overfill" blue slightly (overflow to sand) than to run out of belt space to fix it later.
Mistake: Panic Tapping
The Error: When meters get close to 100%, players start tapping furiously.
Why it fails: You lose track of the cup order. You might accidentally load a cup you just poured, causing a jam.
The Fix: Slow down. The last 5% takes longer than the first 50%. Patience wins the race.
Speed Run and Advanced Tactics
Advanced Routing: Skipping the Middleman
For experienced players looking to optimize time, you can skip the "one-by-one" phase in the mid-game. If your color meters are balanced (all around 50%), you can pre-load the belt with a Green-Beige-Blue-Yellow combo. This allows you to take your hands off the screen for a few seconds to analyze the board while the machine does the work.
The "Hidden Cup" Trick
Sometimes, a cup you need is visually blocked by the UI or another cup. If you can't see a Green cup but your logic says one must be there, tap the empty space in the tray where it "should" be. Often, the game's hitbox is larger than the graphic, and you can grab a hidden cup without clearing the visual obstruction first.
Combo Multipliers
If Sand Loop includes a scoring system based on speed or combo chains, focus on alternating colors rapidly. Switching from Green to Blue to Yellow creates a "Combo" state that yields higher points than Green-Green-Green. Even if it feels less efficient, the combo bonus often offsets the slight inefficiency in movement.
Efficiency Calculations
To beat the level with the least amount of wasted sand (highest efficiency rating), aim to finish with all meters between 100% and 102%. Finishing a level at 110% efficiency means you wasted 10% of your time and moves. Treat 102% as your "golden cap" for each color.
Booster Usage for Speed
If you are using boosters, the "Time Freeze" or "Slow Belt" boosters are actually detrimental to speed runs. They make the game slower. The best booster for speed running is "Extra Slots". Increasing the belt from 5 to 7 slots allows you to queue up your entire color rotation (Green, Beige, Blue, Yellow, Green, Beige, Blue) in one go, minimizing pause time.