
Level 59
HARDHow to solve Sand Loop level 59? Get instant solution for Sand Loop 59 with our step by step solution & video walkthrough. Sand Loop 59 tips and guide.
Play Sand Loop Now
Experience the puzzle challenge firsthand
Game Screenshots
Sand Loop Level Guides
Level Overview: The Sliced Apple Challenge
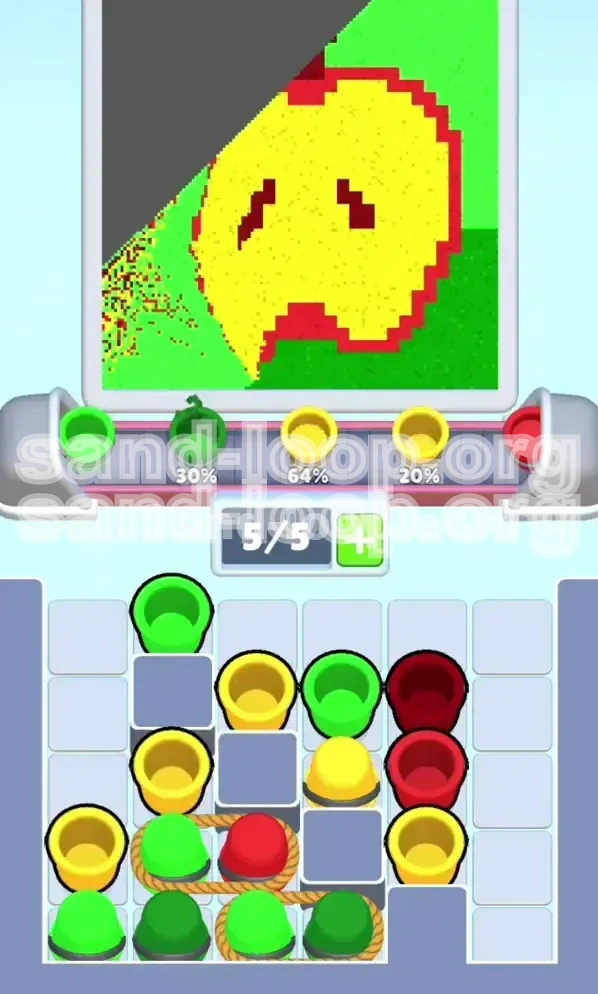
Welcome to Level 59, arguably one of the most intricate inventory management puzzles in Sand Loop. This level is visually deceptive; while the final image—a simple, pixelated Sliced Yellow Apple—looks innocent, the path to painting it is fraught with deadlock traps.
The primary obstacle here is not the painting itself, but the "Board Capacity." You have a conveyor belt limit of 5 cups. If you treat this like a standard speed level and tap rapidly, you will fill your belt with unused colors, preventing new cups from entering the field. This creates a "soft lock" where you cannot dig down to find the key.
The Conveyor Belt Constraint
The most critical mechanic in this level is the 5-slot capacity on your conveyor belt. Unlike earlier levels where you could spam taps, Level 59 requires you to treat every tap as a strategic investment. If your belt is full, physics in the tray stops functioning correctly, and cups won't settle properly after ropes are cut.
The Layout Geometry
The board is split into two distinct failure zones. The Left Side contains the Rope Chain and the Golden Lock. The Right Side contains the buried Key. The visual weight of the apple on the right side tempts players to start there, but the specific arrangement of ropes on the left acts as a trap for those who don't manage their inventory slots.
The Color Distribution
Understanding the pixel art ratio is crucial for inventory management. The Apple is approximately 50% Yellow (flesh), 30% Green (background corners), and 20% Red (outline and seeds). Because Red is the minority color, sending Red cups too early is a waste of precious inventory space.
The Rope Physics Trap
The ropes on the bottom left tie together a sequence of Green, Yellow, and Red cups. These are heavy clusters. When you cut the rope or clear the weight on top, they don't just fall; they slide. If you don't have 3 or more empty slots on your conveyor belt when these ropes release, the resulting cascade will jam your belt, forcing a restart.
The Logic Flow
This level is a linear logic gate. You cannot paint until you unlock. You cannot unlock until you dig. You cannot dig until you clear space. This strict dependency chain means that "painting" is actually your last priority, while "logistics" is your first.
Strategic Color Order & Analysis
Before you tap a single cup, you need a strict plan for color execution. The game suggests a palette, but the *order* in which you send those colors up the belt determines success or failure.
Priority 1: The Green Foundation (Background)
Why Green first? The Green cups are mostly located in the top-left and top-right corners, forming the background behind the apple. Crucially, several Green cups are sitting on top of the Rope Chain on the left. You must clear these Greens to lower the "weight" on the ropes, allowing you to access the cups underneath later. Send Green cups up as soon as you see them to clear the top layer of debris.
Priority 2: The Yellow Bulk (Flesh)
Yellow is the "safe" color. It takes up the most space and is the most forgiving. Once the Key is found and the Lock is open, you will be flooded with Yellow cups from the center. You want to start pouring Yellow *after* you have established the Green background, as the Yellow paint will sit on top of the Green without bleeding.
Priority 3: The Red Precision (Outline & Seeds)
Red is the danger color. It is used for the thin outline and the tiny seeds. If you send a massive wave of Red sand while the painting is still mostly blank, it will cover everything, turning your apple into a red blob. You must delay pouring Red until the very end, or use it in extremely short bursts. Ideally, you save your Red cups until the Yellow flesh is already painted, so the Red naturally slides into the remaining gaps (the outline).
Inventory Management Logic
Think of your conveyor belt slots as currency. Sending a Green cup costs 1 slot. If you send 5 Green cups and none of them have painted the background yet (because you are busy digging), you are bankrupt. You must alternate: Send 2 cups, wait for them to paint, clear the slots, then send 2 more. This "Rhythm Method" is the only way to survive.
The "Dead" Zones
Avoid the bottom-left corner entirely until the Golden Lock is opened. Any taps there are wasted moves because the cups are anchored by the lock. Focus your physical taps on the top-right and center columns to keep the flow moving toward the buried Key.
Timing the Paint Stream
Do not batch-process. Do not save up 5 Red cups and release them all at once. This causes the "overflow" effect where sand spills outside the lines. Maintain a steady, slow trickle of sand to ensure pixel-perfect placement, especially for the Green background corners.
Step-by-Step Walkthrough Guide
Follow this exact sequence to navigate the Sliced Apple stage. Do not deviate from the order of operations regarding the Left and Right sides.
Phase 1: The Excavation (Right Side Focus)
Your immediate goal is the Key located at the bottom-right. It is buried under layers of Red and Yellow cups.
- Step 1: Ignore the left side of the screen completely. Do not tap the locked area or the ropes yet.
- Step 2: Locate the top-right columns. You will see a stack of Red and Green cups.
- Step 3: Tap the top-right Green cups first. This helps start the background and lowers the stack height.
- Step 4: Tap the Red cups in the right-middle column. These are blocking access to the lower layers.
- Step 5: Watch your conveyor belt. As you send these initial cups up, ensure they are pouring onto the canvas. If the belt gets full (5/5), stop tapping and wait 2-3 seconds for the sand to empty the cups.
- Step 6: Continue digging vertically down the right-most column until the Golden Key is exposed.
Phase 2: The Unlock & Shift
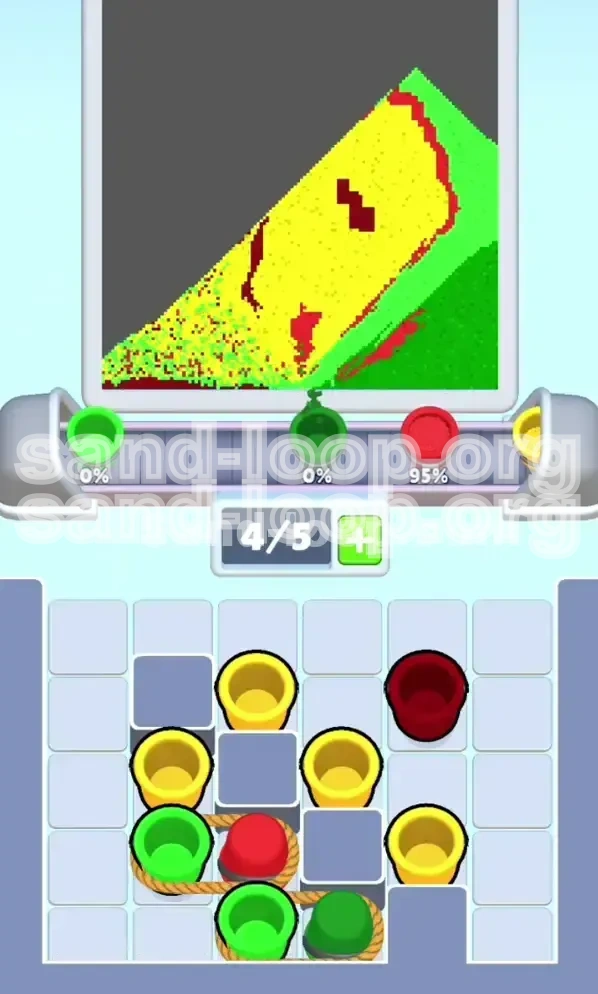
Once you tap the Key, the board state changes drastically.
- Step 1: Tap the exposed Key. The Golden Lock on the top-left will shatter.
- Step 2: STOP. Do not immediately tap the newly exposed cups on the left.
- Step 3: Check your conveyor belt. Ideally, it should be empty or near empty (0/5 or 1/5).
- Step 4: Now, look at the top-left area. The lock is gone. You will see Green cups sitting on top of the Roped cluster.
- Step 5: Tap these top-left Green cups. They are the "cap" holding the rope structure down.
- Step 6: Removing these Greens allows the Roped cups underneath to slide into the playable area.
Phase 3: Managing the Rope Chain
This is the most dangerous moment for a deadlock. The Rope Chain contains a mix of Green, Yellow, and Red.
- Step 1: Ensure you have cleared the top "cap" Green cups from Phase 2.
- Step 2: Verify you have at least 3 empty slots on your conveyor belt.
- Step 3: Tap the Roped cluster. Depending on the physics, they may slide out in a chain reaction.
- Step 4: Be prepared for a "Color Spike." You might get 3 Red cups in a row. If your belt was full, you lose. If you have space, they flow to the belt.
- Step 5: If a Red cup hits the belt, do not pour it yet if the canvas is still empty. Let it sit on the belt (occupying a slot) while you tap other cups to find Yellows.
Phase 4: The Bulk Fill (Yellow & Green)
With the Key found and Ropes cleared, the rest of the board is yours.
- Step 1: Focus on tapping the remaining Yellow cups in the center and bottom-right.
- Step 2: Pour the Yellow sand to fill the main body of the apple. Since the background is already Green, the Yellow will sit nicely on top.
- Step 3: Finish any remaining Green cups to fill the corners completely.
- Step 4: By now, your canvas should be a yellow apple with a green background, missing only the red skin.
Phase 5: The Red Finale
The final step is outlining the apple.
- Step 1: Gather all remaining Red cups.
- Step 2: Since the Yellow and Green are already 100% filled, the Red sand has nowhere to go BUT the outline.
- Step 3: Pour the Red cups steadily. Watch as the sand slides off the yellow flesh and settles perfectly into the red border and the seeds.
- Step 4: Completion achieved.
Common Mistakes to Avoid
Players often fail Level 59 not because they can't solve the puzzle, but because of bad habits. Learn from these common errors.
The "Full Belt" Syndrome
This is the cause of 90% of failures. Players get excited digging for the key and tap 5 cups in rapid succession. The belt fills up. Then they clear a lock, and a new cup tries to enter the belt, but it can't. The game logic freezes, and you are stuck with a full belt of unpainted cups. Rule of thumb: Never let your belt sit at 5/5 capacity for more than a second.
Ignoring the Weight Mechanics
Some players try to clear the bottom-left ropes *before* unlocking the top-left lock. This is impossible. The cups under the lock are "frozen." Attempting to clear them wastes taps and fills your belt with unnecessary cups. Always follow the Unlock -> Clear Rope order.
Early Red Pouring
It is very tempting to pour the first Red cup you see. However, Red is the outline color. If you pour Red on a blank canvas, it splashes randomly. If you save that Red cup until the end, it works much harder for you. Patience with Red is mandatory.
Panic Tapping
When the rope chain releases, 3 or 4 cups might shift at once. The natural reaction is to tap them all immediately. Don't. If you tap them all, they all go to the belt. If the belt is full, you deadlock. Tap one, wait for it to process, then tap the next.
Skipping the "Dig" Phase
Some players focus on painting the top-left Green background perfectly before digging for the key. While efficient painting is good, in this level, the Key is the gatekeeper. If you paint 80% of the level but realize the Key is still buried under 10 layers of cups and your belt is full of paint, you have to restart. Key access trumps painting progress.
Misjudging the Seed Size
The red seeds in the apple center are pixel-small. It takes very little sand to fill them. A massive pour of Red sand will overfill these seeds instantly, wasting the rest of the sand on the already-filled yellow flesh. Use gentle taps for the final seed details.
Speed Run & Optimization Tips
Once you understand the logic, you can optimize your movements to achieve a faster completion time. Speed running Level 59 is about rhythm.
The "3-Slot" Buffer Method
To move fast, you cannot wait for the belt to empty completely every time. However, never exceed 3 filled slots unless you are about to perform a merge or a specific action that frees up space immediately. Keeping 2 slots empty gives you the buffer needed to handle the physics of falling ropes without jamming.
Pre-Loading the Tap
While a cup is travelling up the conveyor belt to the pouring mechanism, you don't need to wait. You can tap the next cup in the tray immediately. This queues up the action. As soon as the current pour finishes, the next cup starts moving. This "overlap" shaves seconds off your time.
The Right-Side Blitz
The fastest route to the Key involves ignoring the colors entirely for the first 10 seconds. Tap the right column purely for structural destruction. Send whatever cups come up (Green, Red, Yellow) immediately, just to clear the physical space. Don't worry about "messy" painting; you can fix messy edges later. Prioritize clearing the tray over pretty painting.
Combining the Rope Release
When you unlock the Lock and clear the top-left Greens, the Rope cluster often slides into a position where multiple cups become tapable at once. If you have 4 empty slots, tap them all rapidly in a "Z" pattern or a line. This batch processing is safe only if you have verified the inventory space beforehand.
Late-Game Color Sorting
During the excavation phase, if you accidentally send a Red cup to the belt, don't pour it. Leave it sitting on the belt (Slot 1). Keep tapping other cups to find Yellows and Greens. Pour the Yellow/Green first. By the time the belt is clear, you will have a "loaded" Red cup ready to go for the finale without having to wait for it to travel from the tray.
Resetting the Physics
If cups get stuck in a weird angle (especially after a rope cut), sometimes tapping a cup *above* them or *below* them can jostle the board and reset the gravity, allowing the stuck cup to slide into a reachable position. Don't just stare at a stuck cup; manipulate its neighbors.