
Level 435
HARDHow to solve Sand Loop level 435? Get instant solution for Sand Loop 435 with our step by step solution & video walkthrough. Sand Loop 435 tips and guide.
Play Sand Loop Now
Experience the puzzle challenge firsthand
Game Screenshots

Sand Loop Level Guides
Level 435 Overview: The Countryside Cabin Challenge
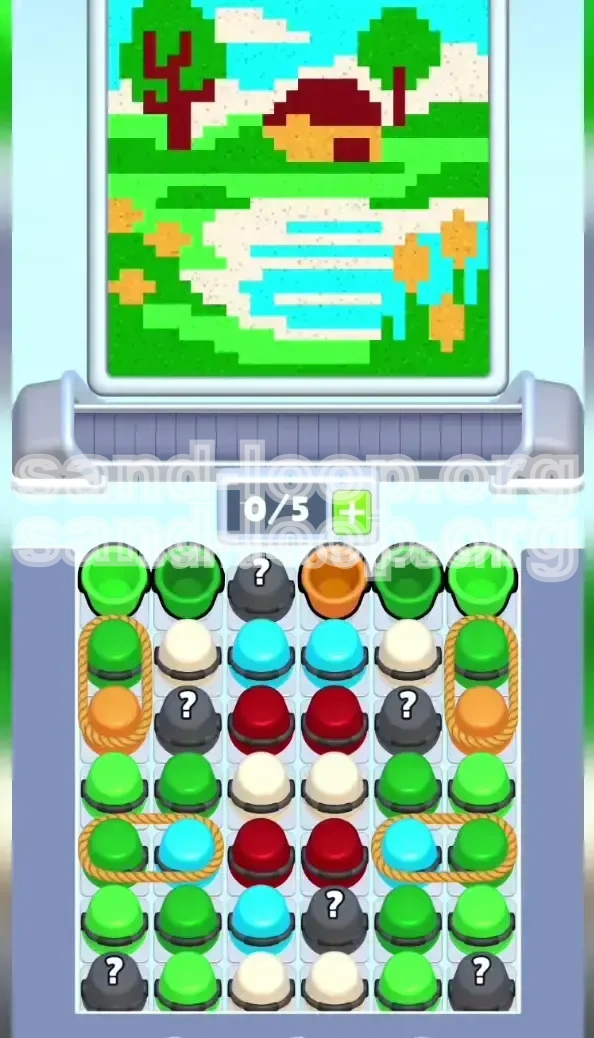
Sand Loop Level 435, often referred to as "The Cottage Landscape," is a strategic logic puzzle that prioritizes planning over reflexes. Unlike earlier levels that focus on speed, this stage is a high-interference environment designed to test your resource management skills. The visual objective is serene—a pixel-art cabin, trees, and a sky—but the underlying mechanics are a chaotic web of constraints.
The level features a "Rope Link" system that couples cups together, meaning pulling one color forces you to accept another. This creates a significant bottleneck on your conveyor belt, which is limited to five slots. The core challenge is maintaining enough free space to maneuver while simultaneously unlocking Mystery Buckets that obscure the colors you critically need.
The "Rope Link" Mechanic
The defining feature of Level 435 is the introduction of Rope Constraints. You will notice thick brown lines connecting two cups in the tray. These act as a physical coupling. You cannot separate them; pulling one commits both to the conveyor belt. This mechanic effectively doubles the cost of accessing certain colors, consuming 40% of your total belt capacity (2 out of 5 slots) in a single move.
Mystery Bucket Variables
Scattered throughout the tray are unmarked Mystery Buckets (?). In this level, these are not random; they are strategically placed to block essential colors like Maroon (for the roof) or White (for the clouds). You must treat these as logic gates. You cannot know their contents until you shift the cups above them, adding a layer of memory and prediction to your gameplay.
The 5-Slot Bottleneck
Your conveyor belt has a hard limit of five slots. This is your most critical resource. If you fill all five slots with colors you don't immediately need, you enter a "deadlock" state where you cannot process new cups. The tray becomes jammed, and the only option is to restart. Managing this space is the primary strategic layer of the level.
Color Volume Disparity
Not all sand is created equal in Level 435. You will be drowning in Bright Green (hills and trees) and Cyan (sky), but starving for Maroon (cabin roof) and Brown (cabin body). The level forces you to clear massive volumes of common colors to reveal the tiny, specific amounts of rare colors hidden underneath.
Pixel Precision Requirements
The cottage art requires clean lines. Unlike the broad strokes needed for the sky or grass, the cabin roof and door require precise pouring. Over-pouring Maroon will bleed into the Green trees, failing the level's cleanliness check. You must control the flow rate, especially during the final 10% of the level.
Primary Objectives and Winning Strategy
To conquer Level 435, you must abandon the "pull whatever you can" strategy. Instead, adopt a "Control and Clear" mindset. Your goal is not just to fill the canvas, but to manipulate the conveyor belt to keep your options open. The level is won or lost in the first 15 moves; if you start poorly, the rope constraints will choke your progress later.
Master the Rope Constraints
Do not panic when you see rope-linked cups. Instead, calculate the trade-off. If a Green Cup is tied to a Mystery Bucket, you must determine if you have two empty slots available before pulling. The winning strategy involves pulling rope pairs only when you have the capacity to process both immediately, preventing backlog.
Unlock the Mystery Chain
The Mystery Buckets are hiding the specific colors required for the cabin details (Maroon and Brown). Your primary objective is to clear the "garbage" colors (Green and Cyan) sitting on top of these Mystery Buckets. Once revealed, you can identify if the hidden color is critical or just another common color you don't need.
Maintain Conveyor Flow
A static conveyor is a death sentence. You must aim to keep at least 2 to 3 slots empty at all times. This "buffer zone" allows you to absorb the impact of a rope-linked pair without overflowing. If your belt is full, you must stop pulling and wait for the current cups to empty, even if it means pausing for several seconds.
Efficient Color Routing
Efficiency means knowing which colors to dump and which to hold. If a color on the belt is not currently on the screen (e.g., pouring Green when the cabin roof is passing), you must let that cup pass through the dispenser without tapping it. This "wasting" of cups is essential to cycle the belt and find the colors you actually need.
Prevent Color Contamination
The final objective is a clean finish. You must avoid spilling Maroon into the Green hills or Cyan into the Brown fence. This requires discipline: stop pouring just before the pixel meter hits 100% to prevent overspill. The game's hitboxes are generous, but the error margin for the roof is narrow.
Step-by-Step Walkthrough Guide
Follow this exact sequence to navigate the logic maze of Level 435. Deviating from this order often leads to a jammed belt. We will break the level into three distinct phases: The Clearing, The Reveal, and The Detailing.
Phase 1: The Top Row Clearing (Moves 1-5)
The game begins with a top row filled with high-volume colors. Your immediate goal is to create space.
Action: Tap the Bright Green Cup on the far left. It is usually free-standing (no rope).
Action: Tap the Bright Green Cup on the far right. Again, check for ropes first.
Result: The conveyor moves, and the top layer begins to shift. Do not pull the rope-linked pair yet.
Analysis: By removing the loose cups, you allow the "Rope Pairs" to shift into accessible positions without immediately clogging your belt.
Phase 2: Managing the Rope Link (Moves 6-10)
Now you face the first major constraint. You will see a Cyan Cup tied to a Mystery Bucket.
Check: Ensure you have at least 3 empty slots on your conveyor (currently occupied by the two Greens from Phase 1).
Action: Tap the Rope-Linked Pair. Both the Cyan and the Mystery Bucket will load onto the belt.
Observation: Watch the Mystery Bucket as it moves up the tray. If it reveals Maroon, prioritize it. If it reveals White, prepare to pour clouds.
Tip: If the belt hits 4/5 capacity, stop pulling immediately. Let the cups pour to free up space.
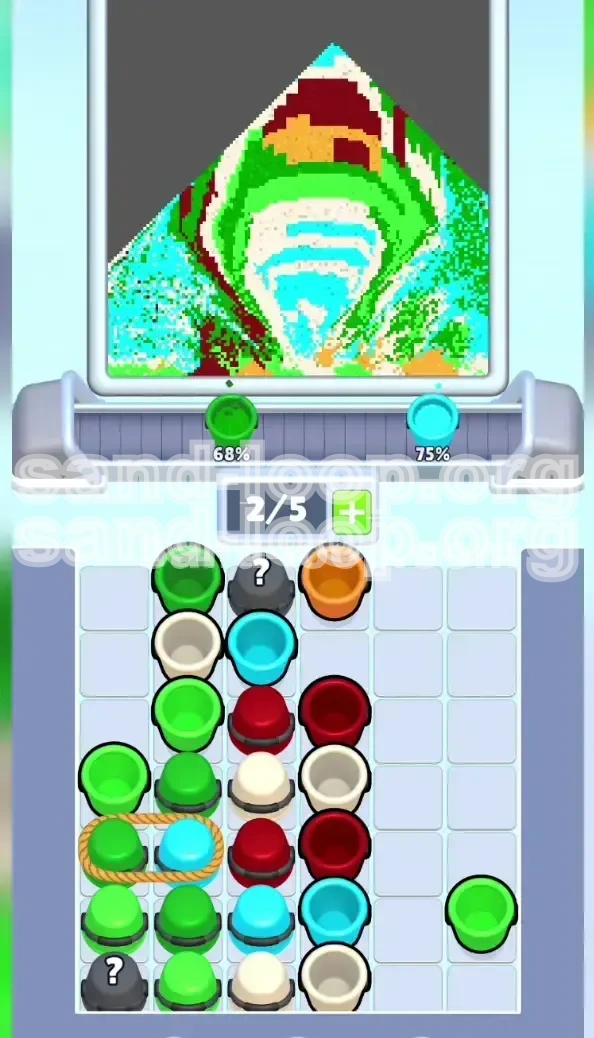
Phase 3: The Sky and Hills Bulk Fill (Moves 11-20)
This is the "Grind Phase." You need to fill the Cyan sky and Green hills to about 80%.
Action: Pull any Cyan Cups that are not tied to ropes. Pour them into the sky section whenever the dispenser aligns with the top of the screen.
Action: Pull Bright Green Cups to fill the bottom hill section.
Warning: Do not worry about the cabin yet. The canvas for the cabin is likely covered by the "ghost" of the hills and sky until those sections are mostly full. Focus on the background first.
Strategy: If a White Cup appears, hold it. Do not pour White until the clouds are fully visible, or you will waste it on the sky.
Phase 4: The Cabin Reveal (Mid-Game)
Once the background is ~70% full, the cabin silhouette will become clear.
Action: Look for Maroon or Brown. These are likely trapped under the remaining Mystery Buckets or tied to unwanted colors.
Tactic: If you need Maroon but it's tied to a Green cup, pull the pair only if you have space. Pour the Green into the hill immediately (even if the hill is 90% full) just to get rid of the cup and free the Maroon.
Precision: Start filling the Brown cabin body. Be careful not to touch the roof area yet.
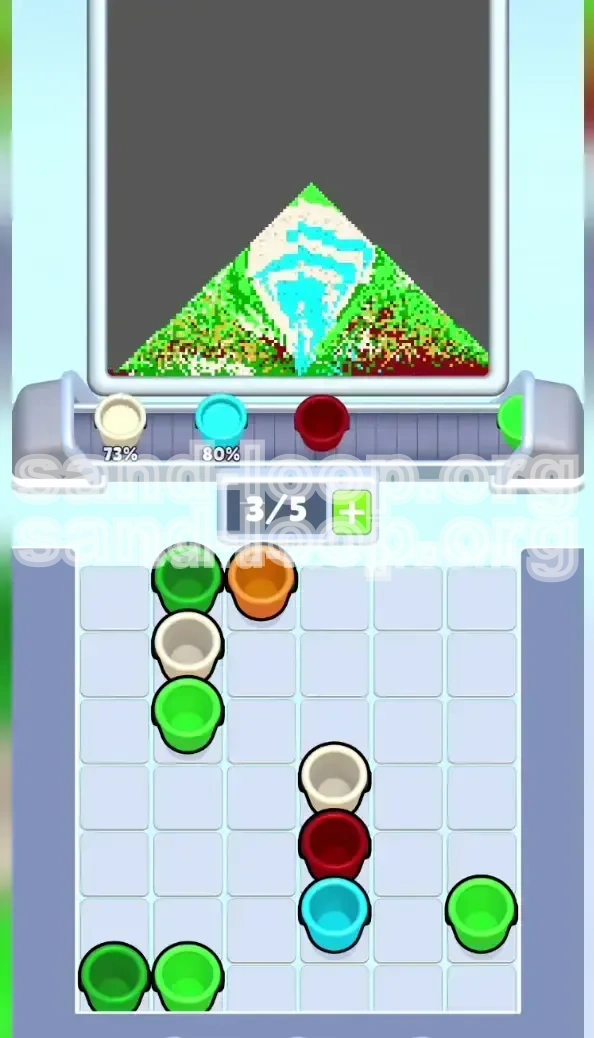
Phase 5: The Roof and Clouds (Endgame)
This is the hardest part. The conveyor is likely jammed with leftovers. You need small amounts of Maroon and White.
Action: Cycle the belt. Let unwanted cups drop into the "void" (pass through without tapping) to cycle the queue until you see White or Maroon.
Technique: Use short taps for the roof. The target is small. Continuous pouring will spill over.
Final Check: Ensure the pond (Cyan) is 100% and the clouds (White) are distinct from the sky.
Correct Color Processing Order
Processing colors in the wrong order is the number one reason players fail Level 435. The tray logic forces specific colors to be available only after others are cleared. Follow this priority list to ensure you don't get stuck needing a color that is currently buried.
1. Cyan (Sky): High Priority
Start here. The Cyan section is large and acts as a backdrop. It usually occupies the top-left of the tray. Clearing these cups often drops down the next layer of ropes. Failing the sky check is rare, but leaving it unfinished can obscure the clouds, making the White phase harder.
2. Bright Green (Hills & Trees): High Priority
This is your "dump" color. When in doubt, pour Green. The hills are forgiving and have a high capacity. Use Green to clear cups off your belt when you are waiting for Maroon or Brown to appear. You can safely overfill Green by 5-10% without penalty, making it ideal for clearing space.
3. Brown/Tan (Cabin Body): Medium Priority
The cabin body appears only after the sky is partially filled. You need to process Brown in the mid-game. Do not start Brown until you have cleared the top two rows of the tray, or you will likely find yourself stuck with a belt full of Green while trying to find Brown.
4. Maroon (Roof & Trunks): Low Priority (Critical)
This is the "Bottleneck Color." It is rare, hidden in Mystery Buckets, and tied to ropes. Do not look for Maroon until the very end. If you pull it too early, it sits on your belt taking up space that you need for Green/Cyan. Save your Maroon pours for the final 10% of the level.
5. White (Clouds & Path): Low Priority (Precision)
White is scarce. Every grain counts. Do not pour White until the Blue Sky is at least 90% complete. If you pour White into a partially filled sky, the color blending algorithm might register it as Cyan, wasting your precious White sand.
Key Tips and Notes for Success
Mastering Level 435 requires attention to detail. These tips cover the smaller mechanics that, if ignored, often lead to frustration.
The "Red Zone" Warning
Watch the slots counter on your conveyor. If it turns red (4 or 5 slots full), you are in immediate danger. Stop tapping immediately. Do not pull any more cups until you have poured at least two cups onto the canvas. Ignoring the red zone is the fastest way to a Game Over.
Mystery Bucket Prediction
While the buckets are random, they follow a logic of "balance." If you have an abundance of Green on the belt, the Mystery Bucket is statistically more likely to be a color you are missing (like Maroon or White). Use this probability to decide whether to burn a rope pull or wait.
The "Pass Through" Technique
Sometimes the best move is to not pour. If the dispenser is over the Cabin Roof, but you are holding a Green Cup, do not tap. Let the cup move past the dispenser and fall off the belt. This removes the unwanted cup and cycles the next one into view without messing up your art.
Burst Pouring for Small Targets
The cabin roof and the small white clouds require "Burst Pouring." Instead of holding down the tap, tap rapidly. This gives you more control over the flow and prevents the sand from bleeding into adjacent pixels. This is crucial for the Maroon roof, which is sandwiched between the Green trees and Blue sky.
Utilizing the "Ghost" Image
The canvas shows a faint "ghost" of where colors belong. Use this to align your pours. If the dispenser is slightly off-center, the sand might land on the grass instead of the path. Wait for the dispenser to be perfectly centered over the target area before tapping, especially for narrow paths and roofs.
Handling the Bottom Row Jam
In the final 10% of the level, the bottom row often becomes a jam of un-needed colors. Don't panic. You have two options: 1) Use the "Pass Through" technique to cycle the belt, or 2) Deliberately over-pour a safe color (like Green) to force the game to refresh the tray logic.
Common Mistakes to Avoid
Most failures in Level 435 are repetitive. By recognizing these common errors, you can adjust your strategy before you even start.
Overloading the Conveyor Early
The most common mistake is treating the first 10 moves like a standard level. Pulling 3 or 4 cups immediately without accounting for the ropes will fill your belt. Once full, you cannot pull the Mystery Buckets needed to progress. Always keep 2 slots open.
Ignoring Rope Links
Players often tap a cup without noticing the rope attached to it. Suddenly, a color they didn't want (e.g., extra Cyan) clogs their belt while they are hunting for Brown. Always trace the line from the cup you want to see if it's dragging a "passenger" along with it.
Precious Color Spillage
Maroon and White are finite resources in this level design. A common mistake is spilling Maroon onto the grass or White onto the pond. This wastes the rare color and leaves you at 95% completion with no way to finish. Use short taps for these colors.
Focusing on the Cabin Too Soon
Trying to paint the cabin while the sky is only 50% done is inefficient. The dispenser moves in a pattern. Focus on the broad strokes (Sky/Grass) first. As you fill the background, the dispenser alignment naturally favors the cabin center later in the level.
Wasting Mystery Buckets
Don't pull a Mystery Bucket just because it's there. If your belt is full, pulling a Mystery Bucket is a gamble you can't afford. Only pull them when you have the space to handle whatever color pops out, or if you are desperate and willing to restart.
Solutions for When You Are Stuck
Even with a plan, you might reach a point where progress seems impossible. Here is how to troubleshoot the specific deadlock scenarios in Level 435.
Scenario 1: The "Full Belt" Deadlock
Situation: Your conveyor has 5 cups (e.g., Green, Green, Cyan, Mystery, Green). You need Maroon, but it's buried in the tray behind a rope you can't pull.
Solution: You must waste cups. Let the dispenser pass over the canvas without tapping. Allow the Green cups to fall off the end of the belt. This is painful, but it is the only way to free up slots to pull the rope hiding the Maroon.
Scenario 2: The "Last 5%" Trap
Situation: You are at 95% completion. You need just a little more White for the clouds, but only Green and Cyan are spawning.
Solution: The game requires you to clear the tray. Pull and waste the Green/Cyan cups as fast as possible. The spawning algorithm is weighted; if you clear the "trash" colors, the game is forced to spawn the remaining White from the bottom rows. Don't stop cycling.
Scenario 3: Misaligned Colors
Situation: You have the Maroon cup ready, but the dispenser is stuck hovering over the Green hill.
Solution: Do not pour. Wait for the dispenser to complete its current loop. If the dispenser logic seems stuck, try tapping a different color (like Green) to "reset" the arm movement, then switch back to Maroon when it aligns with the roof.
Scenario 4: Rope Lock Jam
Situation: A rope-linked pair (Green + Maroon) is ready, but you only have 1 slot open.
Solution: You must create a slot. Pour the current cup in the dispenser immediately. If the current cup is a color you don't need (e.g., Green on a Green hill), dump it fast. Once you have 2 slots, pull the rope. The Green is the tax you pay to get the Maroon.
Speed Run Tips and Shortcuts
Once you understand the logic, you can optimize your playstyle for a faster completion time (under 2 minutes). These shortcuts rely on riskier maneuvers but pay off in speed.
Aggressive Early Pulling
In a speed run, you don't wait for the belt to clear completely. You can safely pull rope-linked pairs if the resulting colors (e.g., Green + Cyan) are both needed immediately. This "double tap" approach fills the canvas faster but requires perfect hand-eye coordination to avoid overfilling.
Pre-emptive Mystery Solving
If you are confident in your reflexes, you can pull Mystery Buckets while the belt is moving. By the time the cup reaches the dispenser, you will have identified the color. If it's White, you pour. If it's Green, you let it drop. This saves seconds spent waiting for the belt to stop.
The "Batch Pour" Method
Instead of tapping for every pixel, hold the tap down for the Sky and Hills. These areas are large and contiguous. Only release the tap when the meter hits 95%. This is much faster than tapping and allows you to focus your mental energy on the tricky roof details later.
Ignoring Small Perfections
Don't aim for 100% precision on the first pass for the Hills. It's faster to get the Green hills to 90% and move on to the roof. The "splatter" from the roof work might accidentally fill the remaining gaps in the grass. Fixing details later is faster than perfecting them early.
Memorizing the Tray Layout
The tray layout in Level 435 is static. The positions of the ropes and Mystery Buckets are the same every time. Memorize that the "Top-Left Rope" hides a Maroon, and the "Bottom-Right Mystery" is usually White. This allows you to plan your pulls 3 steps ahead without looking.