
Level 487
HARDHow to solve Sand Loop level 487? Get instant solution for Sand Loop 487 with our step by step solution & video walkthrough. Sand Loop 487 tips and guide.
Play Sand Loop Now
Experience the puzzle challenge firsthand
Game Screenshots


Sand Loop Level Guides
Level Overview: The Wizard Chick Challenge
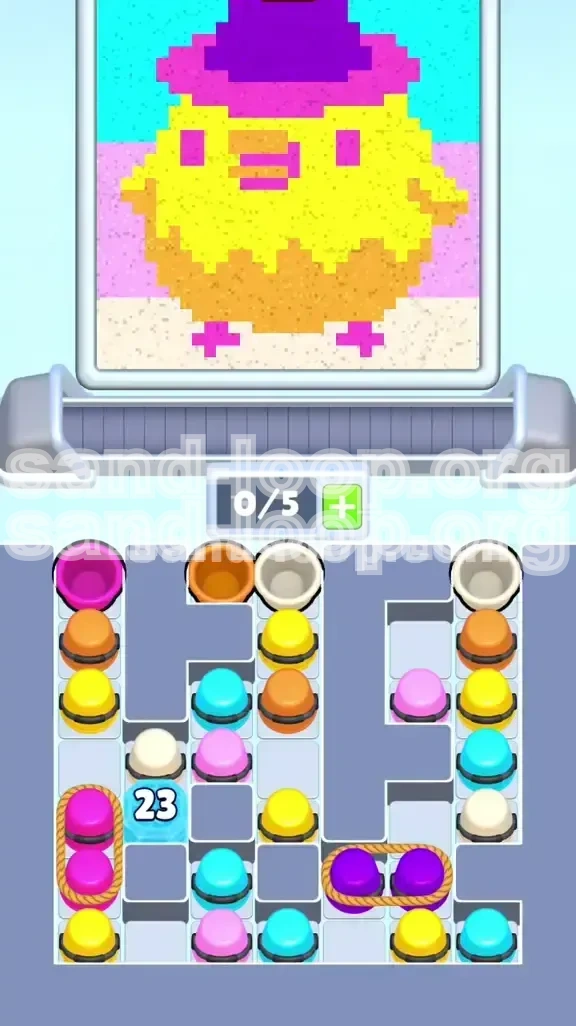
Welcome to the definitive walkthrough for Sand Loop Level 487. This stage introduces you to the "Wizard Chick," a pixel art composition that is visually charming but mechanically punishing. Unlike previous levels where you could rely on reflexes, this stage is a test of pure logic and inventory management. The core difficulty lies not in the pouring mechanics, but in the restrictive "Tetris-style" grey dividers that chop your supply tray into isolated sectors.
The level requires you to construct a yellow bird wearing a purple wizard hat, complete with a magenta rim, set against a cyan sky and white ground. The challenge is amplified by a slot economy that limits you to only 5 active cups at any time. If you fill these slots with the wrong colors, you will face an immediate deadlock. Furthermore, the level introduces "Ice Block" mechanics and "Roped" pairs that force you to burn two slots at once, drastically reducing your flexibility.
The Visual Layout
The target image is divided into distinct horizontal zones. The top 30% is the Cyan sky, which must be filled carefully to avoid spilling into the hat. The middle 40% is the Wizard Chick itself, comprising a Yellow body, Orange belly, and the Purple/Magenta hat. The bottom 30% is the White ground, which is tricky because the initial source of White sand is locked behind an Ice Block.
Mechanics Overview
This level utilizes three specific mechanics to control your pace: Ice Blocks, Ropes, and Dividers. The Ice Block requires 23 cup clearances to shatter, acting as a timer for your White sand. Ropes bind pairs of cups (Magenta and Purple) together, forcing you to take two items of the same color simultaneously. The grey dividers physically block access to lower cups until the cups above them are removed.
Slot Economy Basics
You have 5 available slots. This sounds like a lot, but when you are forced to pick up a roped pair, you instantly consume 40% of your capacity. A common failure point is holding onto a single cup of a color that isn't currently needed, leaving you with no room to maneuver when the dispenser demands a different color.
The "Tetris" Tray
The supply tray is not an open grid; it is a puzzle. The cups are arranged in columns blocked by grey shapes. An "F" shaped divider on the right traps crucial Cyan and Yellow cups at the bottom. You cannot simply pick any cup you want; you must clear the top cups to create a path to the ones beneath.
Why Logic Beats Speed
Attempting to speed-run this level by tapping rapidly will result in a "Soft Lock" within 30 seconds. Because the White cup is frozen and the Magenta cups are roped, you cannot simply process colors in the order they appear on the conveyor. You must plan 3 steps ahead to ensure you don't run out of space while waiting for the Ice Block to clear.
Primary Objectives and Strategy
To achieve a 3-star completion on Level 487, you must adhere to a strict set of priorities. Your goal is not just to fill the image, but to do so without over-pouring or getting stuck. The strategy revolves around "Clearing the Middle," "Managing the Ice," and "Timing the Details."
Objective 1: Shatter the Ice Block
This is your most critical early-game objective. The White cup needed for the ground is trapped under Ice Block 23. This block only decreases its counter when a cup finishes pouring and leaves the screen. Therefore, your primary focus in the first 60 seconds is high-throughput clearing. You need to cycle 23 cups as fast as possible.
Objective 2: Clear the Middle Path
The "F" divider on the right side blocks your late-game Cyan cups. You must clear the Orange and Yellow cups from the top right and middle columns immediately. Failing to do so means that when you eventually need Cyan for the sky, you physically won't be able to reach it because it's buried under other cups.
Objective 3: Reserve Slots for Roped Pairs
The level features two sets of roped cups: Magenta (Hat rim/Feet) and Purple (Hat top). You must always keep at least 2 empty slots available in your inventory. If you have 4 cups and the dispenser asks for a roped color, you cannot pick it up. This rule dictates that you should pour off single cups quickly to make room.
Objective 4: Strict Color Separation
You must prevent color contamination. The Magenta hat rim is a thin strip sandwiched between the Purple hat and the Yellow head. Pouring Magenta too early or too late will cause it to bleed into the Yellow body or the Cyan sky. You must wait for the specific prompt for the rim to appear before activating these cups.
Objective 5: Background Filling
The Cyan sky and White ground must be filled last. Filling them early is a trap; it consumes your slots with colors that are abundant, leaving no room for the detail colors (Magenta/Purple) which have limited supply but high requirements. Prioritize the "Body" colors (Yellow/Orange) first.
Color Order and Processing Guide
The specific order in which you process colors is the difference between success and failure. This section breaks down the "Dependency Chain" that dictates the flow of the level.
Phase 1: The Bulk Colors (Orange & Yellow)
Start your run by immediately tapping all available Orange and Yellow cups from the top of the tray. These are your "Bulk" colors. The dispenser will almost certainly ask for these first as they make up the Chick's body. By pulling these, you clear the vertical columns in the tray, revealing the cups trapped underneath, and you contribute heavily to the Ice Block counter.
Phase 2: The Ice Block Countdown
While processing Yellow and Orange, keep an eye on the Ice Block counter (Starts at 23). Do not stop pouring. Even if you have to temporarily hold a cup in a slot, keep the conveyor moving. Every cup that exits reduces the counter. You cannot touch the White cup until this hits zero.
Phase 3: The Purple Hat Top
Once the Ice Block is near shattering (around 5-10 counts left), the dispenser will likely request Purple for the top of the hat. The Purple cups are located at the bottom right and are roped. You must have 2 empty slots to grab them. Pour these carefully; the top of the hat is small, so don't over-pour or it will bleed into the Cyan sky.
Phase 4: The Magenta Details (Rim & Feet)
This is the most dangerous phase. The Magenta cups are roped on the left side. You must pick them up together. The dispenser will request the "Hat Rim" first. Wait for the prompt. Do not pour Magenta while the conveyor is still moving rapidly; wait for a stable moment to ensure the sand lands precisely in the thin rim strip. Save the remaining Magenta for the feet, which comes later.
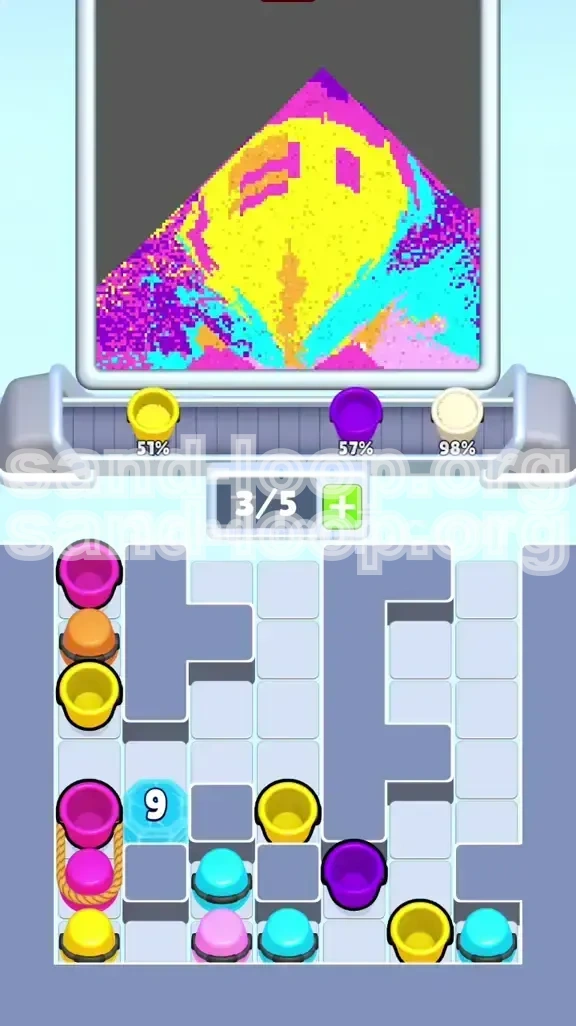
Phase 5: The Background (Cyan & White)
Only after the Chick's body is ~80% complete should you touch the Cyan (Sky) or White (Ground). By now, the Ice Block is gone, freeing the White cup. The Cyan cups are trapped at the bottom right; they should now be accessible because you cleared the top columns in Phase 1. Fill the large Cyan areas and the White ground to finish the level.
Step-by-Step Walkthrough
Follow this exact sequence of actions to navigate the level safely. This guide assumes a standard playthrough without power-ups.
Step 1: The Initial Clear
As soon as the level loads, scan the top row. You will see Orange and Yellow cups. Tap them immediately. Do not worry about organizing them perfectly yet; just get them into your slots or onto the conveyor. This prevents the tray from clogging immediately.
Step 2: Managing the First Rope (Purple)
After clearing the top layer, you will see the roped Purple cups at the bottom right. Do not tap them yet. Wait until the dispenser specifically asks for "Purple Hat." Ensure you have at least 2 empty slots. Tap the pair. Once they are pouring, check your remaining slots.
Step 3: Cycling for Ice
While the Purple is pouring, look for any single Yellow or Orange cups remaining in the middle column. Tap them to keep your flow going. You need to hit 23 clears. If the conveyor stops, you lose precious time against the Ice Block.
Step 4: The White Reveal
Once the counter hits zero, the Ice Block shatters. This reveals a White cup in the left column. Immediately tap this White cup. The dispenser usually switches to the "Ground" or "Feet" at this point. If the dispenser asks for White, pour it. If not, hold it in a slot (if space permits) or pour it off if you are desperate for space (though holding is better).
Step 5: The Second Rope (Magenta)
Now locate the Magenta cups on the left. They are roped. Wait for the "Hat Rim" prompt. This is critical: The rim is a small area. If you pour when the dispenser isn't strictly asking for the rim, you will miss. Tap the roped pair, pour the rim portion, and keep the second Magenta cup in reserve for the feet.
Step 6: Clearing the Cyan Blockade
With the top and middle gone, the Cyan cups at the bottom right (trapped by the "F" divider) are now accessible. The dispenser will ask for "Sky." Pull these Cyan cups. Since you have saved your White cup from Step 4, you can now alternate between filling the Sky (Cyan) and the Ground (White) to close out the level.
Advanced Tips and Common Mistakes
Even with a plan, things can go wrong. This section covers the pitfalls that players frequently encounter and how to recover from them.
Mistake: The "Full Slot" Jam
The most common error is picking up a roped pair when you have 4 slots filled. The game will not let you pick up the pair, and you will frantically try to pour off a cup, but the dispenser might not want it. Prevention: Always pour off a cup *before* you hit 4/5 slots if you know a roped pair is coming up next.
Mistake: Premature Background Filling
Players often see the Cyan cups and fill the sky to "get it out of the way." This is fatal. It uses up slots that are needed for the harder-to-place Magenta and Purple colors. Correction: Leave the background empty until the very end. It feels risky to see an empty screen, but it is the only way to manage the slot economy.
Mistake: Ignoring the "+" Button
Sometimes, the RNG (Random Number Generator) of the dispenser just refuses to give you the color you need. If you are holding 4 Yellow cups and the dispenser only wants Cyan, you are stuck. Solution: Use the "+" button to add a slot. It's better to spend a few gems on a slot than to lose the level entirely due to a deadlock.
Tip: Conveyor Lead Time
The conveyor has a delay. If you see the dispenser is currently pouring Yellow, but the *next* color in the queue is Magenta, tap the Magenta cups while the Yellow is still pouring. This queues the Magenta up perfectly, saving you seconds and preventing the conveyor from running empty.
Tip: Reading the "Pixel" Hints
Look closely at the pixel art of the Wizard Chick. The "feet" are detached from the body. This means you can pour the Magenta feet even if the Yellow body isn't 100% finished. Use these disconnected pixel areas to dump Magenta sand if your slots are getting too full and you need to free up space.
Tip: The "F" Divider Logic
Remember that the "F" shaped grey block on the right creates a dependency. You cannot clear the bottom right Cyan until the top right is gone. Make it a mental rule: Right Column Top = Priority. If you neglect the top right, the late game becomes impossible because you run out of accessible colors.
Speed Run and Optimization Guide
For players looking to achieve the fastest time or high scores, efficiency is key. This requires aggressive slot management and preemptive movements.
Optimization 1: The "Batch" Pull
Don't tap cups one by one. As soon as the level starts, tap 3 cups in rapid succession (e.g., Orange, Yellow, Yellow). This queues them up instantly. The moment the first cup finishes, the second is already being pulled. This minimizes the downtime of the conveyor and reduces the Ice Block timer faster.
Optimization 2: Pre-Loading the Rope
If you have 3 empty slots and you see the Roped Purple cups are next in the logic chain, tap them immediately. Do not wait for the dispenser to ask for them. Having them sitting in your slots (occupying 2 spaces) is fine as long as you still have 1 free slot for other colors. This prevents you from forgetting them later.
Optimization 3: Ignore 100% Perfection
In a speed run, stop pouring at 98% full. As soon as the meter is almost full, tap the next cup. The game allows for a tiny bit of overflow. Waiting for the exact pixel-perfect 100% slows you down significantly. Move to the next color the moment the main shape is filled.
Optimization 4: Slot Cycling
If you have a cup in your hand that isn't being asked for (e.g., a single White cup), and the dispenser is asking for Yellow, do not just stand there. Pour the White cup onto the Yellow area temporarily (if adjacent) or just discard it if you have plenty of White left. Keeping the flow moving is more important than keeping one specific cup.
Optimization 5: Know the "Dead" Colors
Once the Hat (Purple) is 100% done, any remaining Purple cups in the tray are "Dead." Do not pick them up. They are now obstacles. Treat them as part of the grey wall. Focus only on the colors that still have incomplete percentage bars.
Optimization 6: The Final Dash
The last 10% of the level is usually filling the White ground and Cyan sky. These are large areas. At this point, slot management is less critical because you are running out of cups anyway. Spam-tap the remaining Cyan and White cups as fast as you can to flood the screen and finish the level.