
Level 79
HARDHow to solve Sand Loop level 79? Get instant solution for Sand Loop 79 with our step by step solution & video walkthrough. Sand Loop 79 tips and guide.
Play Sand Loop Now
Experience the puzzle challenge firsthand
Game Screenshots

Sand Loop Level Guides
Sand Loop Level 79 Walkthrough: Mastering the Autumn Forest
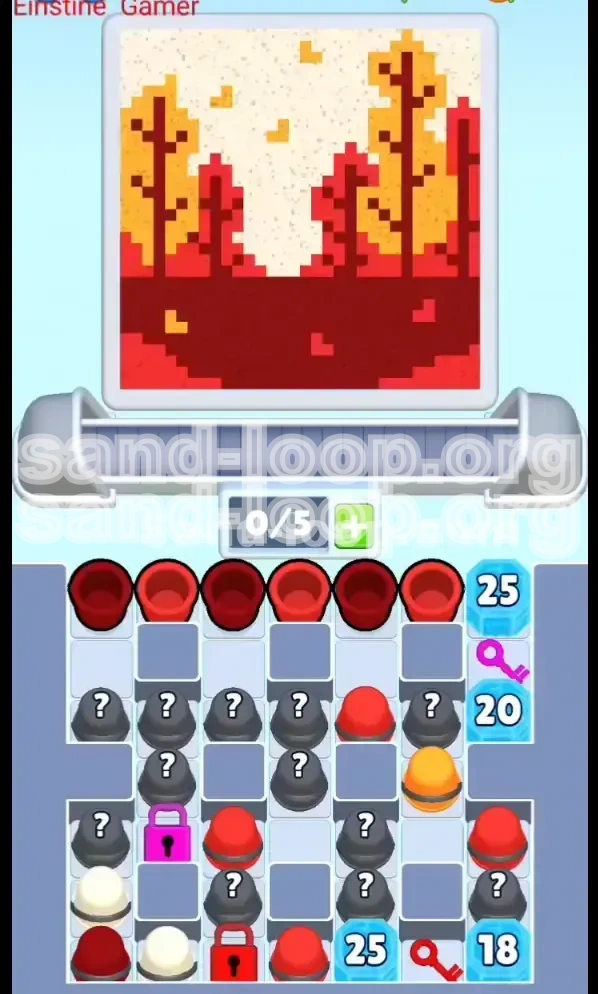
Welcome to Level 79 of Sand Loop, widely known by the community as the "Autumn Forest" endurance test. This is not a level where you can rely on quick reflexes alone; it is a calculated grind that tests your resource management ability. The level features a stunning pixel art landscape composed of warm, rustic hues—maroons, bright reds, oranges, and creamy off-whites. However, the aesthetic beauty hides a brutal reality: a massive ice barrier that blocks your progress. This guide is designed to navigate you through the "Lock and Block" mechanics, ensuring you optimize your cup usage to melt the ice and secure the keys necessary for victory.
Level Overview: The Vertical Ice Wall
The defining feature of Level 79 is the imposing column of Ice Blocks located on the far right side of your tray. Unlike standard levels where blocks are scattered, these are stacked vertically, creating a sequential dependency chain. You cannot access the exit or complete the painting until you systematically dismantle this wall.
Based on data from successful runs, the ice wall consists of four distinct segments with varying health points (HP). The total "Clear Volume" required to break the entire section is approximately 88 successful cup pours. This means you cannot afford to miss a single opportunity to clear a cup; efficiency is paramount.
Primary Objectives and Strategy
Your goal is simple to state but complex to execute: Fill the color meter to generate enough "Clears" to shatter the ice blocks, retrieve the trapped keys, and unlock the specific color locks that guard your final resources. The challenge lies in the color palette. The distinction between "Dark Red" and "Bright Red" is visually subtle, leading to easy mis-pours that can contaminate your tray and waste valuable time.
Color Palette Breakdown
Success in Level 79 starts with color recognition. The level utilizes a "Warm Spectrum" that can blur together visually. Here is the breakdown of the palette you will manage:
- Dark Red (Maroon): This is your base layer. It forms the ground soil and the shadows of the tree trunks. It is the most abundant color.
- Bright Red: Used for the vibrant foliage on the main trees. It is lighter than the Dark Red but lacks the yellow tint of the Orange.
- Orange: The highlight color for the leaves and falling foliage. It is distinct but often appears in limited quantities.
- Cream/Off-White: The background sky. This color usually appears late in the game and is often locked behind barriers initially.
The Mystery Cup Mechanic
Level 79 introduces a high frequency of "Mystery Cups"—grey cups marked with a question mark. These cups do not reveal their color until they are sitting on your conveyor belt. This creates a gambling mechanic. Tapping too many at once can fill your limited 5-slot tray with the wrong color (e.g., Sky Blue cups when the painter needs Ground Red), causing a jam that wastes precious seconds.
Ice Block Health and Key Locations
To plan your route effectively, you need to understand the math behind the ice wall. The game requires a specific number of clears to drop each item. We have broken down the HP (Hit Points) required for each section of the right-side ice tower.
The Top Segment: The First Barrier
The ice block at the very top of the right column has a durability of 25 clears. This is the gatekeeper of the level. You must generate 25 successful pours before any keys can drop. Do not focus on the details of the art yet; focus purely on volume. Tap valid cups as fast as possible to chew through this first 25 HP chunk.
The Pink Key Segment
Immediately below the top block is the segment holding the Pink Key. This block requires 20 clears to break. This means that to even see the Pink Key, you must have generated a combined total of 45 clears (25 Top + 20 Middle). Once this breaks, the Pink Key falls onto the belt, and you must drag it to the Pink Lock to unlock a reserve of cups (often the critical Cream/White colors).
The Middle Block: The Grind
The third segment down is another large barrier requiring 25 clears. This is often the most difficult part of the level because it represents the "mid-game slump." Your initial cup supply is dwindling, and you are likely relying on Mystery Cups to fuel the count. You must stay patient and avoid contamination here.
The Red Key and Final Push
The bottom segment holds the Red Key and requires 18 clears. This is the final hurdle. The Red Key unlocks the Red Lock at the bottom center, which typically holds the final reserve of cups needed to finish the last few pixels of the Autumn Forest. Total cumulative clears needed to unlock everything: 88.
Step-by-Step Walkthrough Guide
Follow this exact sequence of actions to minimize risk and maximize your clearing potential.
Phase 1: The Initial Red Rush
As the level loads, your tray will populate with a row of six Dark Red cups. There is no strategy here, only speed.
- Action: Immediately tap all six Dark Red cups.
- Target: The painter will begin filling the bottom ground layer (Dark Red).
- Goal: This initial burst contributes the first 6 points toward the Top Ice Block (25 HP).
- Tip: Keep your tray slots open. Try to maintain 3/5 or 4/5 capacity to allow new cups to flow in from the dispenser without backing up.
Phase 2: The Mystery Cup Gamble
After the initial row clears, you will be left with a field of grey Mystery Cups. This is the most dangerous part of Level 79.
- Action: Do not tap all 5 slots at once. Tap a maximum of 2 Mystery Cups.
- Observation: Watch the conveyor belt as they land. If they turn into Bright Red or Orange (colors needed for the trees), tap more.
- Warning: If they turn into Cream/White while the painter is still working on the trees, stop tapping immediately. You cannot afford to clog your belt with Sky colors while the Ground layers are unfinished.
Phase 3: Breaking the Pink Key Lock
Monitor the progress bar on the right side of the screen. Once you have cleared roughly 45 cups total, the ice block holding the Pink Key will shatter.
- Action: Locate the Pink Key on the belt and drag it to the Pink Lock (usually located on the left side).
- Result: This unlocks a stash of cups, likely providing you with the Orange or Cream colors required to finish the tree canopy.
- Note: Do this immediately. If you leave the key on the belt, it might block a cup you actually need.
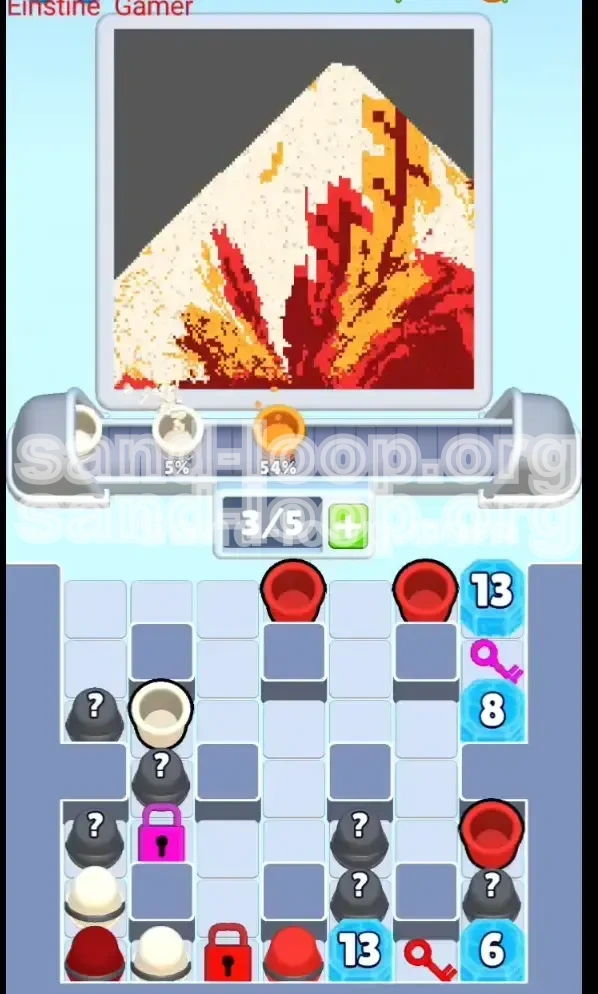
Phase 4: The Sky Transition
Once the trees are filled, the painter will switch to the Cream/Off-White color for the sky. By this point, you should be working on the lower ice blocks.
- Action: Now you can aggressively tap any Mystery Cups you previously avoided.
- Target: Fill the background sky pixels.
- Strategy: If you run out of cups, you must rely on the Red Key unlocking the final stash.
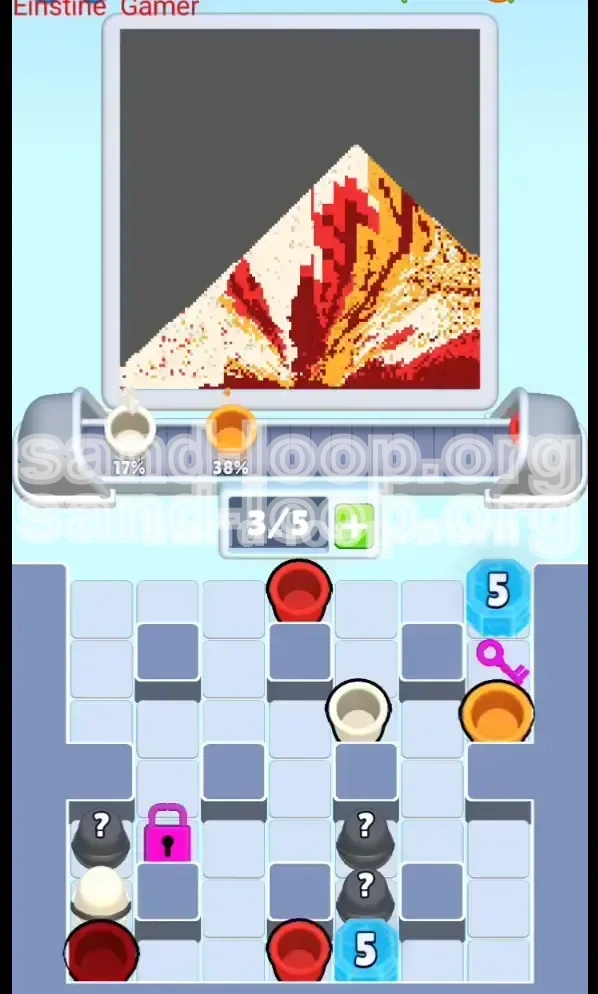
Phase 5: The Red Key Finale
The final 18 clears are needed to drop the Red Key. This key is the "Get Out of Jail Free" card.
- Action: Once the bottom ice block breaks (Total Clears ~88), drag the Red Key to the Red Lock at the bottom center.
- Result: This releases the final batch of cups required to finish the painting.
- End Game: Use these cups to fill the final remaining pixels. Do not worry about color order here; just fill the gaps to complete the level.
Key Tips for Efficiency
To achieve a high score or simply to finish without running out of moves, consider these advanced tips.
Differentiating Reds
The most common failure point in Level 79 is confusing the two reds. Here is how to tell them apart: The Dark Red (Ground) has a brownish, rusty tint, similar to dried blood or brick. The Bright Red (Foliage) is a vivid, primary red, almost like a ripe cherry or a candy apple. When in doubt, wait for the cup to fully settle on the bright belt to see its true color before tapping.
Tray Management
Never let your tray sit full at 5/5 unless every single cup is the correct color for the current brush. A full tray stops the dispenser from sending new cups. Since Level 79 relies on volume (88 clears), any second where the dispenser is blocked is a second wasted. Keep the flow moving.
Mystery Cup Rhythm
Develop a rhythm: Tap-Wait-Tap. Tap two mystery cups, watch them land, process them, and then tap two more. Do not "Pre-tap" cups (tapping them while they are still in the air). If you pre-tap and the color is wrong, you have committed a tray slot to a useless cup, causing a jam that can only be cleared by wasting that cup.
Lock Prioritization
Always prioritize keys over cups. If a Key and a usable Cup are on the belt at the same time, drag the Key to the Lock first. Why? Because unlocking the lock releases a whole new set of cups, whereas using the single cup only gives you one point. The "Unlock" action has a higher ROI (Return On Investment) than a single "Pour" action.
Understanding the "Grind"
Accept that the middle section of the level (between 30 and 60 clears) will feel slow. This is normal. The game is forcing you to rely on slower Mystery Cup spawns. Do not panic and start making random taps. Stick to the rhythm, and the numbers will eventually drop the keys you need.
Common Mistakes to Avoid
Learning from the errors of other players can save you significant frustration.
Contamination Errors
Feeding the painter the wrong shade of red creates a "contamination line" in the pixel art. While you can technically fix this later by over-painting, it wastes massive amounts of cups. In a level with limited resources like 79, one contamination line can cost you the game because you might run out of cups before you fix the mistake and finish the level.
The "All-In" Mystery Tap
The biggest trap is tapping 4 or 5 Mystery Cups in a row when the belt is empty. If you get unlucky and they are all White (Sky) but the painter needs Red (Trees), you will have to manually dump every single one of those white cups. This takes time and lowers your score. Always tap Mystery Cups one or two at a time.
Ignoring the Bottom Lock
Many players fixate on the top part of the image and forget about the Red Lock at the bottom. They reach 98% completion and have no cups left. This is almost always because they didn't grind enough clears to break the bottom 18-HP ice block to get the Red Key. Always keep an eye on the right-side ice column.
Early Game Panic
Seeing a massive "25" on the top ice block can be intimidating. Don't panic. You have 6 starting cups, and the dispenser is generous at the start. Focus on making 10 good clears in a row, and the pressure will ease as the block starts to crack.
Speed Run and Shortcuts
For players looking to achieve a 3-star rating or a personal best time, speed is of the essence.
The "Batch Processing" Technique
If you have a fast visual processor, you can attempt batch processing. Instead of Tap-Wait-Tap, try tapping 3 Mystery Cups rapidly, but be ready to instantly pause if the first one that lands is wrong. This technique is high-risk but shaves seconds off your time if you can accurately predict the color distribution based on previous patterns.
Pre-emptive Lock Dragging
As the ice block health hits "1" (about to break), hover your finger over the area where the Key will fall. You can drag the key to the lock the millisecond it spawns, saving the animation time of it sitting on the belt. This keeps your combo multiplier up.
Ignoring Perfect Art for Speed
While normally you want a clean picture, in a speed run, minor contamination (feeding a slightly wrong shade) is acceptable if it keeps the flow moving and the belt empty. Only do this if you have a surplus of cups and the ice blocks are close to breaking.
Optimal Tray Loading
Try to maintain a "Checkerboard" pattern on your tray if possible. Alternate between Bright Red and Dark Red. This prevents you from getting stuck with a "clump" of one color that blocks the other, ensuring you always have the right cup available regardless of which pixel the painter targets next.
Using the "Pause" to Plan
Sand Loop does not penalize pausing. If the screen gets chaotic with too many Mystery Cups, hit pause. Look at the tray, identify which cups are trash (wrong color), and plan your dumping sequence before un-pausing. This prevents accidental clicks that cost valuable seconds.